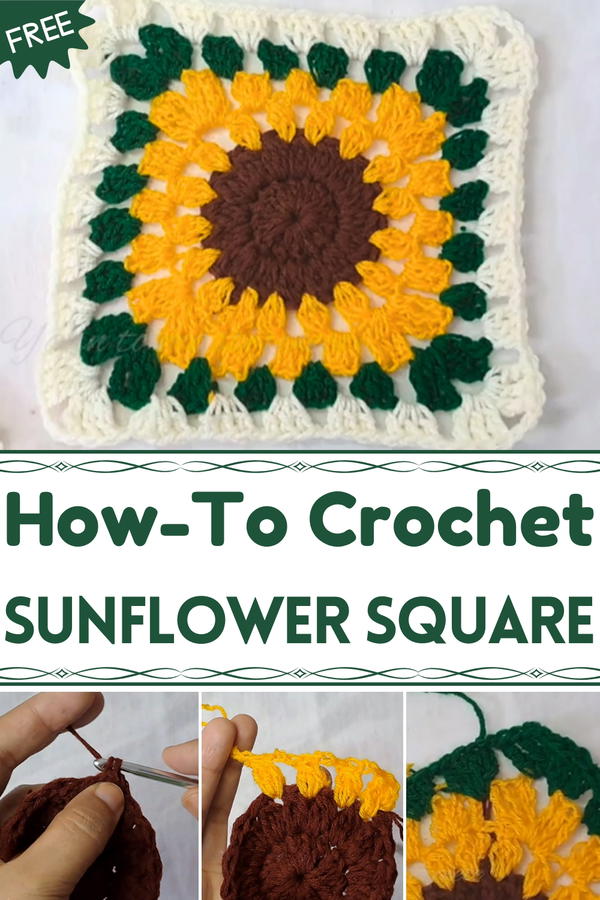
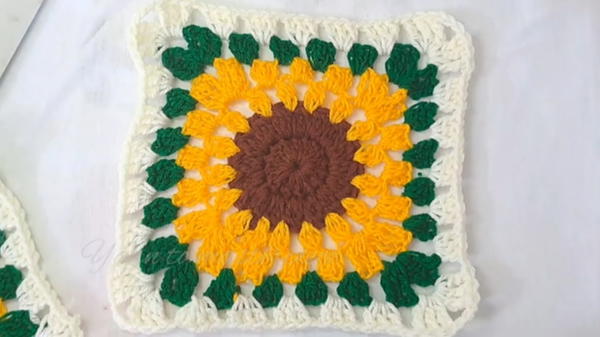
Brighten any project with the Free Crochet Sunflower Square Pattern that adds sunny charm, vibrant color, and a delightful touch to your creations.
Sunflowers are celebrated for their warmth, happiness, and the simple joys of nature, brightening gardens and homes with their cheerful faces. The Free Crochet Sunflower Square Pattern brings this same radiant charm into the hands of makers, turning soft yarn into vibrant, tactile squares that capture the essence of the beloved bloom. These sunflower squares are versatile and functional, ideal for assembling into blankets, cushions, bags, or decorative wall hangings, adding color and texture to everyday life. Lightweight yet durable, they allow for creative experimentation with yarn shades and combinations, letting each square reflect a unique personality.
Delightful Crochet Sunflower Square That Brings Sunshine
Beyond decorative appeal, working on these squares provides a meditative, satisfying crafting experience, perfect for both beginners and seasoned crocheters seeking quick, rewarding results. The Free Crochet Sunflower Square Pattern also serves as a thoughtful handmade gift, offering a bright, cheerful accent that spreads joy and warmth.
Each stitch contributes to a piece that is both practical and visually captivating, encouraging patience, focus, and creative expression. Whether displayed individually or assembled into larger projects, these crochet sunflowers infuse everyday items with happiness, artistry, and handmade charm, turning simple yarn into enduring, heartwarming treasures.
Materials Needed
- Crochet Hook: Size 5 mm, as mentioned in the tutorial.
- Yarn: Mid-weight yarn (medium or worsted weight) is recommended for this type of project.
- Scissors: To cut the yarn when you're finished.
- Stitch Markers (optional but helpful): To mark the start of rounds or specific stitches.
Special Features
- Puff Stitch Integration: Adds texture and dimension to the pattern, making it visually interesting.
- Triple Crochet Corners: These create defined edges and corners for a square-shaped design.
- Chaining Between Stitches: Gives the project an open design ideal for decorative purposes.
Level of Difficulty
This tutorial is suitable for advanced beginners or intermediate crocheters due to the combination of the puff stitch, increases, and corner shaping. If you're familiar with basic stitches (double crochet and chain stitches), you can achieve this design with practice.
Step-by-Step Instructions
Step 1: Create the Base Round
- Begin with a slip knot to attach the yarn to your hook.
- Make a magic circle or chain 5 stitches and join them with a slip stitch to form a ring.
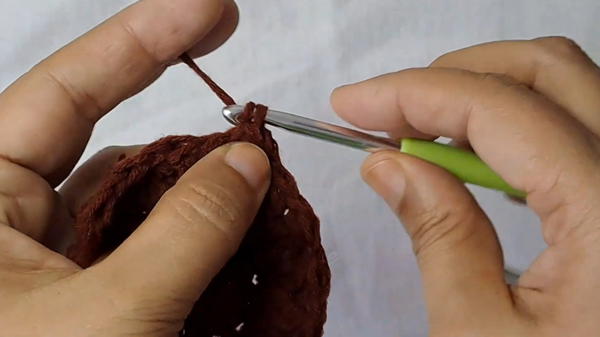
- Chain 3, which will count as the first double crochet.
- Crochet 15 double crochets into the circle.
- Close the round with a slip stitch to the top of the chain-3. You should have 16 double crochets in total (including the chain-3).
Step 2: Transition to Puff Stitches
- Start the next round by chaining 3 stitches for height.
- In the first stitch, create a puff stitch:
- Yarn over, insert the hook into the stitch, and pull through a loop. Repeat this step multiple times (until you have multiple loops on the hook).
- Yarn over again and pull through all of the loops on the hook.
- Chain 1 to close the puff stitch.
- Skip the next stitch, and again, create another puff stitch with a chain-1.
- Continue this process around the circle until you have 16 puff stitches separated by chain-3 spaces.
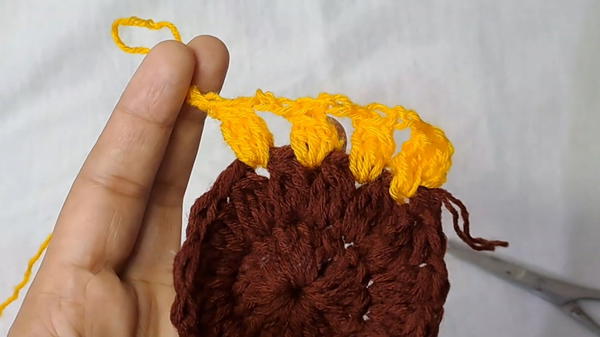
- Close the round with a slip stitch.
Step 3: Begin Forming the Square
- Chain 3 as the start of the next round.
- Incorporate a series of double crochets separated by chains:
- Crochet 3 double crochets into the first puff stitch, followed by a chain-1.
- Skip to the next puff stitch and repeat: 3 double crochets and chain-1.
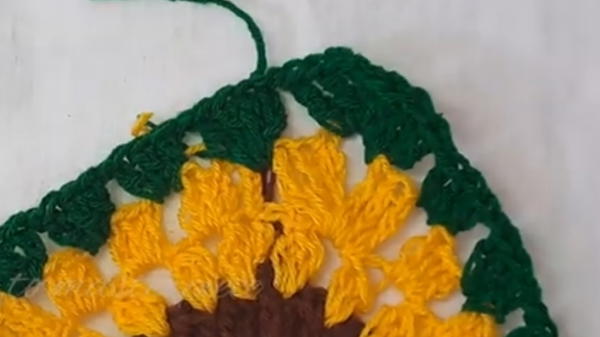
Step 4: Add Corner Sections
- In each corner puff stitch, create the following sequence to form the square's edges:
- 3 triple crochets in the same stitch.
- Chain 3 (this forms the corner).
- Another 3 triple crochets in the same stitch.
- Continue working this double crochet and corner pattern around the square, with chain-1 spaces separating the double crochets.
Step 5: Build Additional Rounds
- For subsequent rounds, follow the same process:
- 3 double crochets and chain-1 in each space between double crochets from the previous round.
- Work the corner stitches the same way: 3 triple crochets, chain-3, 3 triple crochets in one corner space.
- Close each round with a slip stitch, and chain-3 to begin new rounds.
Tutor’s Suggestions
- Use Stitch Markers: Place a stitch marker at the beginning of each round or in the corner spaces for easier counting.
- Maintain Consistent Tension: This ensures the pattern’s structure remains uniform across each round.
- Experiment with Color Changes: Alternate yarn colors for each round to add a vibrant, striped effect to your square.
Uses of the Design
- Granny Squares: Combine multiple squares to create blankets, throws, or garments.
- Decorations: Use them as coasters or table décor.
- Wall Art or Ornaments: Frame a single square for decorative purposes.
- Practice Piece for Beginners: This pattern is a perfect practice exercise to learn shaping and texture techniques.
Tip for Success
When creating puff stitches, ensure they are not too tight. Pull up the loops generously to make the puff more prominent, as this will add texture and prevent a rigid design.
Conclusion
This crochet tutorial emphasizes foundational crochet techniques such as the double crochet stitch and puff stitch, while integrating corner shaping with triple crochets to transition from a circular base to a square design. The repetitive pattern makes it an excellent project for both skill improvement and decoration.