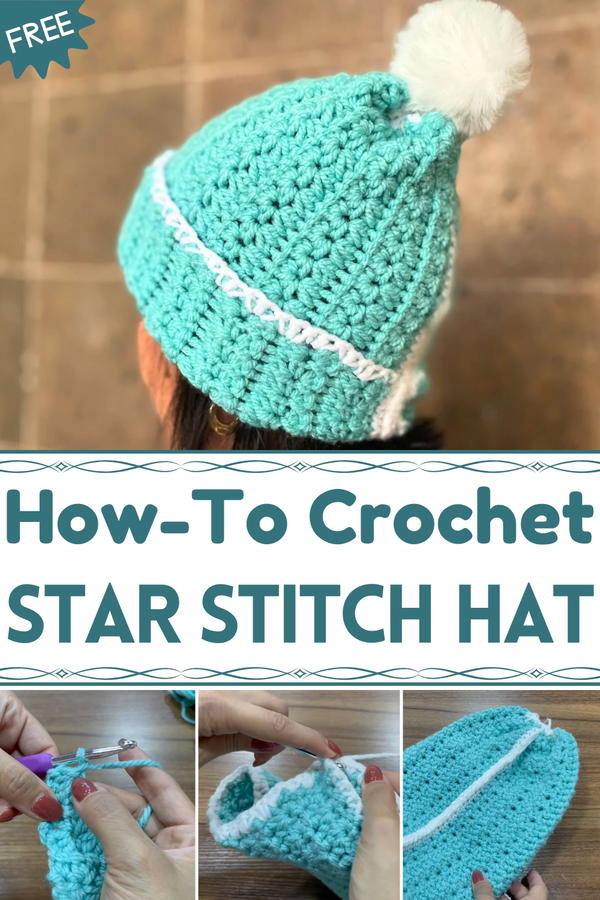
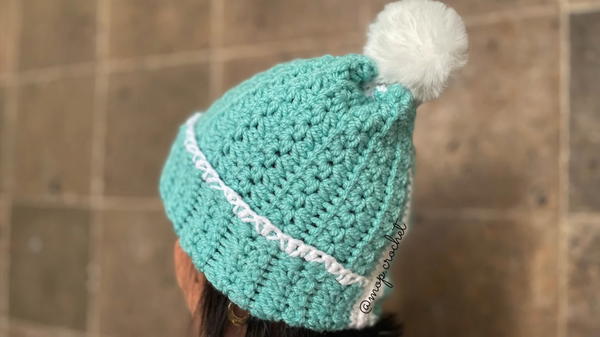
Top off winter style with this Free Crochet Star Stitch Hat Pattern, offering a cozy, handmade touch that adds warmth and charming flair to any outfit.
Crisp mornings and chilly evenings call for accessories that combine warmth with style, making cozy hats a staple in every wardrobe. The star stitch, celebrated for its textured and dimensional appearance, transforms simple yarn into a visually striking piece that is as functional as it is charming. The Free Crochet Star Stitch Hat Pattern provides a way to craft a soft, insulating hat that comfortably protects the head and ears while adding unique flair to any outfit.
Chic Crochet Star Stitch Hat Pattern for Everyday Wear
Lightweight yet durable, it suits outdoor activities, casual walks, or layering during colder seasons, and its stretchy construction ensures a snug fit for different head sizes. Working with the star stitch offers a rhythmic, satisfying experience, encouraging focus and mindfulness while producing a beautifully textured finish. Clear step-by-step instructions guide both beginners and experienced crocheters, making the project accessible and rewarding.
Beyond practicality, the finished hat serves as a versatile accessory, perfect for gifting, wardrobe enhancement, or seasonal style statements. Each completed star stitch hat turns simple yarn into a functional, elegant, and eye-catching item, blending comfort, individuality, and handcrafted artistry into everyday wear while highlighting the joy and satisfaction of creating something both useful and stylish.
Materials Required
- Yarn: Acrylic yarn, approximately 5mm thick (100g required). Make sure it’s soft and warm for a hat.
- Crochet Hook: 5.5mm crochet hook.
- Scissors: For trimming the yarn.
- Yarn Needle: For sewing seams and attaching the pompom.
- Pompom: Either make your own or get a store-bought decorative pompom.
Step-by-Step Instructions
Step 1: Foundation Chain
- Start with a slip knot.
- Create an even number of chains to achieve the length desired for the hat. In the video, 40 chains were used, equivalent to 30 cm (you can adjust for personal size).
- Make one additional chain to begin the row.

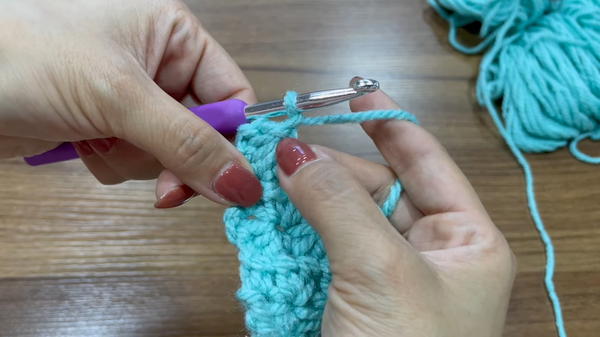
Step 2: Row 1 – Star Stitch
Begin by inserting the hook into the second chain from the hook.
Yarn over and pull through to leave a loop on the hook.
Repeat this process three more times, working in consecutive chains until there are five strands on the hook.
Yarn over and pull through all five strands on the hook to close the group.
Chain one to secure the star. You’ll now notice the first star forming.

For subsequent stars:
- Insert the hook into the chain space created after closing the previous star and pull through.
- Insert the hook into the last loop of the previous star and pull through.
- Continue inserting the hook into the next two chains and pull through until you have five strands on the hook.
- Yarn over and pull through all five strands, then chain one to close the star.
Repeat the process across all chains, and in the final chain, make a half double crochet (hdc) to finish the row.
Step 3: Row 2 – Half Double Crochet Row
- Chain two stitches and turn your work.
- Work into the chain spaces (created by closing a star in the previous row).
- In each chain space, make two half double crochets (hdc).
- Repeat this pattern until the end of the row.
Step 4: Alternating Star Stitch and Half Double Crochet Rows (Rows 3–30)
- Row 3:
- Begin with three chains, turn, and repeat the star stitch pattern as explained in Row 1.
- Row 4:
- Chain two stitches, turn, and repeat the half double crochet pattern as explained in Row 2.
- Alternate between these two rows until you reach the total required length to fit the circumference of your head.
- In the video, 30 rows were crocheted, equaling 50 cm in length.
- In the video, 30 rows were crocheted, equaling 50 cm in length.
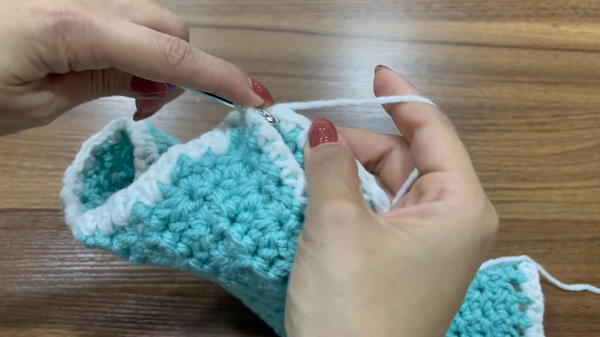
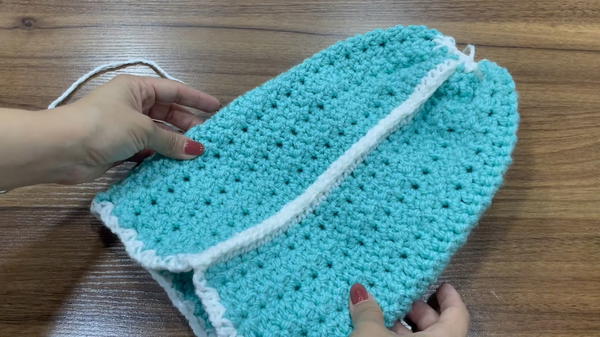
Step 5: Adding a Border
- Once the base is ready, add a border by working a round of single crochets around the entire edge of your project.
- If you want contrast, switch to a different yarn color for the border (like white in this tutorial).
- Start with a chain stitch and crochet single stitches around all edges.
- Work two single crochets in each corner or side gap to avoid folding.
- Close the round with a slip stitch.
Step 6: Seaming and Shaping the Hat
- Fold the crocheted piece in half with the wrong side outward so the star stitches are less visible.
- Seam the sides together using slip stitches.
- Insert the hook through stitches from both edges, yarn over, and pull through to join with slip stitches.
- Once finished, leave a long yarn tail for closing the top.
Step 7: Closing the Top
- Thread a yarn needle with the long yarn tail.
- Weave through the top stitches, alternating between going front to back and back to front on each stitch.
- Gradually pull the yarn to gather and close the top tightly.
- Secure the closure by sewing over the gathered section several times and tying knots to ensure it doesn’t loosen.
Step 8: Attaching the Pompom
- Turn the hat right-side out.
- Position the pompom on top and sew it securely using the same yarn thread used for closing the top.
- If the pompom has elastic or a tie, sew through the loops and secure firmly.
- Trim excess yarn after attaching the pompom.
Special Features
- Unique Texture: The star stitch gives the hat a visual appeal with its intricate and elegant texture.
- Versatility: This design can be adapted for various sizes by adding or adjusting rows and chains.
- Customizable Look: Add creative borders, contrasting pompom colors, or experiment with yarn shades for a personal touch.
Level of Difficulty
The Star Stitch Hat project is suited for beginner to intermediate crocheters. While the star stitch may seem tricky initially, the instructor demonstrates the steps clearly, making it approachable even for those with basic experience.
Tutor’s Suggestions
- Take it Slowly: Focus on creating even loops when working on the star stitch for a neat pattern.
- Consistent Tension: Maintain uniform tension to ensure the overall project looks smooth.
- Customize the Fit: Try the hat on periodically while making the rows to ensure the circumference is comfortable.
- Experiment with Borders: Switching border colors elevates the look of the hat subtly.
Uses
- Everyday Wear: A cozy and stylish accessory for cold weather.
- Gifting: Handmade gifts are always cherished by friends and family.
- Seasonal Projects: Great for winter markets, DIY decor, or charity donations.
Pro Tip
When closing the top, make sure to pull the yarn gently but firmly to avoid breaking it. Reinforce the closure with extra knots for added durability.
Conclusion
The Star Stitch Hat Tutorial is a rewarding project that combines functionality with elegance. With clear instructions and the flexibility to customize, it’s perfect for crochet enthusiasts looking to create a stylish yet cozy hat.


