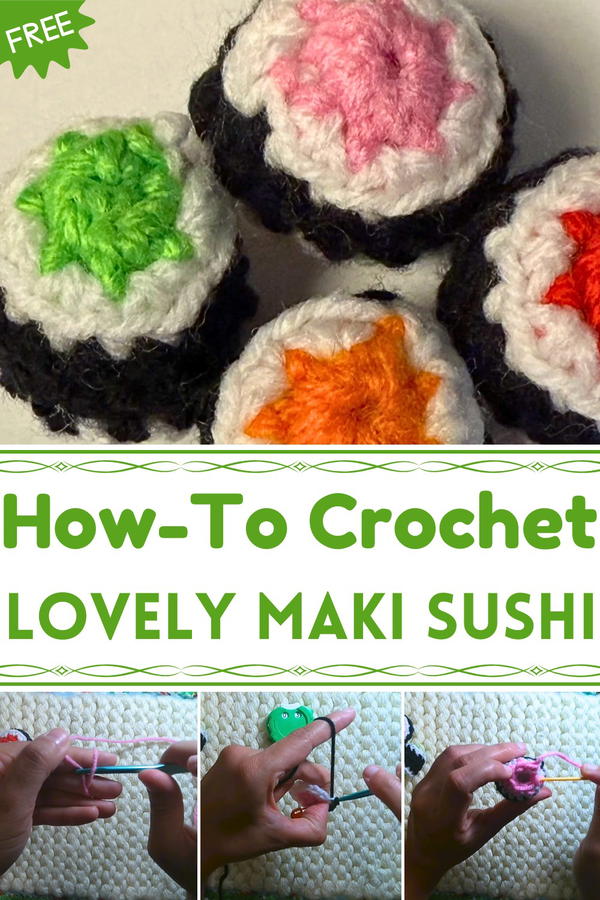
Delight in playful creativity with the Free Crochet Maki Sushi Pattern, a cute and quirky project ideal for décor, gifts, or fun crafting moments.
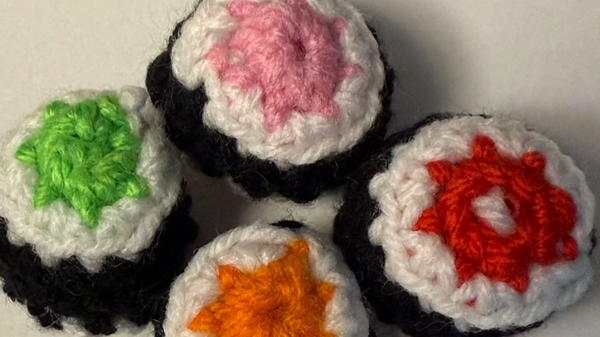
Small, playful décor pieces have a way of capturing attention and bringing charm to any space. The Free Crochet Maki Sushi pattern transforms simple yarn into a whimsical and huggable version of this classic favorite, offering a delightful accessory for both display and interactive fun. Its intricate stitching and vibrant colors create a piece that is visually appealing while remaining soft and approachable.
Lovely Crochet Maki Sushi Pattern that Inspires Creativity
Beyond being an adorable decoration, this amigurumi serves multiple purposes. It can be used as a fun collectible, a quirky addition to kitchens or dining areas, or a playful companion for children. Its compact size makes it easy to arrange in displays, stack with other sushi creations, or even carry as a novelty gift. The repetitive stitching also promotes mindfulness, patience, and focus, providing a calming and rewarding activity while producing a tangible, satisfying result.
The Free Crochet Maki Sushi pattern delivers a finished piece that combines charm, durability, and personality. Each completed amigurumi reflects care and attention, resulting in a whimsical accessory that enhances spaces with playful character. This project offers a unique opportunity to produce a joyful, handmade item that sparks smiles, adds personality to any setting, and becomes a memorable keepsake for anyone who enjoys imaginative and handcrafted collectibles.
Materials Needed
Gather the following supplies to complete your crochet sushi project:
Crochet Hook:
- 4.5 mm crochet hook
Yarn Choices:
- Black yarn: "I Love This Yarn" by Hobby Lobby (for the seaweed wrap)
- White yarn: "Red Heart" (for the rice)
- Pink yarn: Use for salmon (optional)
- Orange yarn: Use for spicy toppings (optional)
- Light green yarn: Use for vegetable fillings (optional)
(Note: Laura recommends sticking to a medium-size yarn, size #4, to achieve the correct proportions.)
Other Materials:
- Scissors
- Stuffing/Fiberfill
- Tapestry needle (for weaving ends and closing gaps)
- Stitch markers
Special Features of This Tutorial
- Beginner-Friendly Techniques: The tutorial focuses on foundational skills like the magic ring, single crochet, slip stitches, and decreasing stitches.
- Customizable Colors: Personalize the sushi roll by choosing your favorite yarn colors for the fillings.
- Realistic Design: Layered details of the sushi (rice, fillings, and seaweed) make the final result look adorable.
- Practice-Based Approach: Suitable for beginners to practice and perfect their tension, stitch consistency, and color changes.
- Multi-Language Accessibility: Subtitles are available in English, French, Spanish, Portuguese, and Japanese.
Step-by-Step Instructions
Step 1: Create the Sushi Filling (Salmon or Topping)
Start with a Magic Ring:
- Use pink/orange yarn for the filling.
- Wrap yarn around two fingers to form an "X" and work a magic ring. If you're unsure, Laura advises adjusting the playback speed to 0.25x for easier viewing.

Round 1 (Single Crochets):
- Crochet 7 single crochets (SC) into the magic ring. Pull the tail tightly to close the ring.
- Insert your hook, pull up a loop, yarn over, and pull through two loops to form a single crochet. Repeat this process for a total of 7 stitches.
Round 2 (Increases):
- Work 7 increases (2 SC in each stitch). This will bring the stitch count to 14 stitches.
- Use a stitch marker to identify the starting stitch.
Slip Stitch and Tie Off:
- Add a slip stitch, tie off, and leave a short tail for weaving in later.
Step 2: Add the Rice Layer
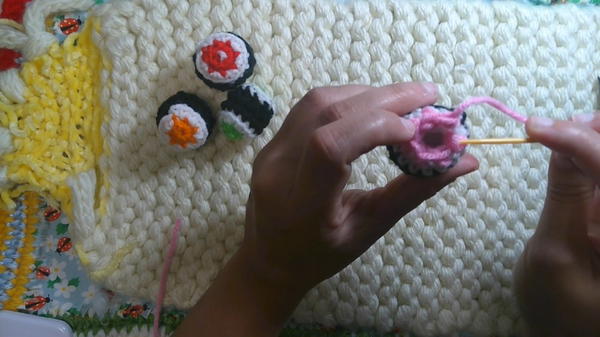
Attach the White Yarn:
- Securely knot the white yarn onto the last stitch from the previous round. Cut off the unused pink/orange yarn.
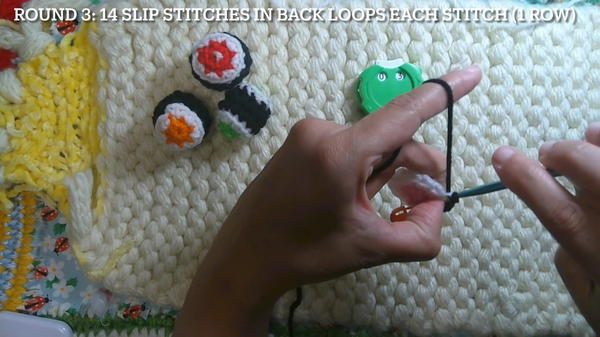
Round 3:
- Create 14 slip stitches in the back loops only. This will give the piece a clean, neat edge.
Rounds 4 & 5:
- Work 14 single crochets across both rounds. This will help you build the rice layer.
Step 3: Create the Seaweed Wrap (Maki)
Attach the Black Yarn:
- Knot the black yarn to the last stitch from the white layer. Cut off the white yarn after securing the color change.
Round 6 (Single Crochet in the Back Loops):
- Crochet 14 single crochets in the back loop only. This technique adds dimension to the sushi roll by distinguishing the rice from the seaweed wrap.
Add Stuffing:
- Lightly stuff the rice and filling layers with polyfill or fiber stuffing. Ensure the shape is firm but not overstuffed.
- Lightly stuff the rice and filling layers with polyfill or fiber stuffing. Ensure the shape is firm but not overstuffed.
Round 7 (Decreases):
- Begin decreases by creating 7 invisible decreases across the round (working front loops only). This will reduce the stitch count to 7 stitches, closing the sushi roll.
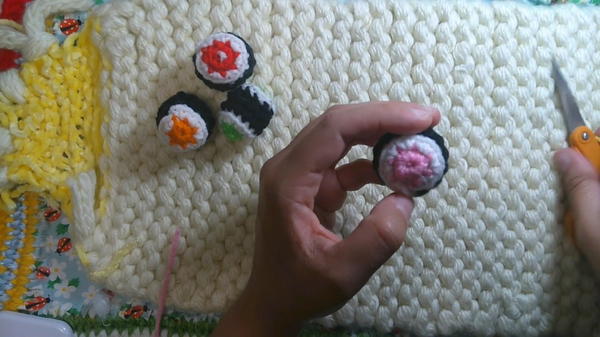
Step 4: Closing the Sushi Roll
Fasten Off the Black Yarn:
- Cut the yarn, leaving a long tail. Use a tapestry needle to secure the final stitches.
Close the Hole:
- Use the long yarn tail and needle to weave through the front loops of remaining stitches. Pull tightly to cinch the circle closed.
Weave in Ends:
- Tuck the yarn ends inside the stitches to complete the clean, polished look.
- Tuck the yarn ends inside the stitches to complete the clean, polished look.
Level of Difficulty
Beginner to Easy Intermediate
- This project is highly accessible to beginners due to its simple stitches (magic ring, single crochet, slip stitch).
- The toughest part may be transitioning between colors and maintaining an even tension, which Laura explains clearly.
Tutor’s Suggestions
Practice the Magic Ring:
- Laura emphasizes the importance of mastering the magic ring. If it’s too tricky, use a slip knot and chain two to mimic a similar base.
Playback Features:
- Use YouTube’s playback speed (0.25x) to view difficult sections more slowly, especially for the magic ring.
Stitch Consistency:
- Maintain even tension during stitching to create a smooth look. Use a thicker or larger hook if you’re struggling as a beginner.
Custom Colors:
- Experiment with other yarn colors for unique sushi rolls (e.g., yellow for eggs or green for avocado).
Uses for the Crochet Maki Sushi
- Decorative Pieces:
- Display on bookshelves or in your kitchen for a unique, handmade touch.
- Toys or Gifts:
- Great for children or as novelty gifts for sushi lovers.
- Amigurumi Food Art:
- Add to a larger collection of crocheted food items.
Conclusion
Congratulations! By following Laura’s tutorial, you’ve created a detailed and lifelike Maki Sushi Roll using basic crochet techniques. Not only did this project teach you essential stitches like the magic ring and invisible decreases, but it also encouraged creativity with color selection.
Final Tip
Always weave in your yarn ends securely to ensure your projects maintain their shape over time. For added durability, double-knot your color changes and trim excess yarn carefully for a polished look.


