Cheer up your spring days with this Free Crochet Easter Chick Keychain Pattern, shaping the body, adding wings, and finishing for a cute accessory.
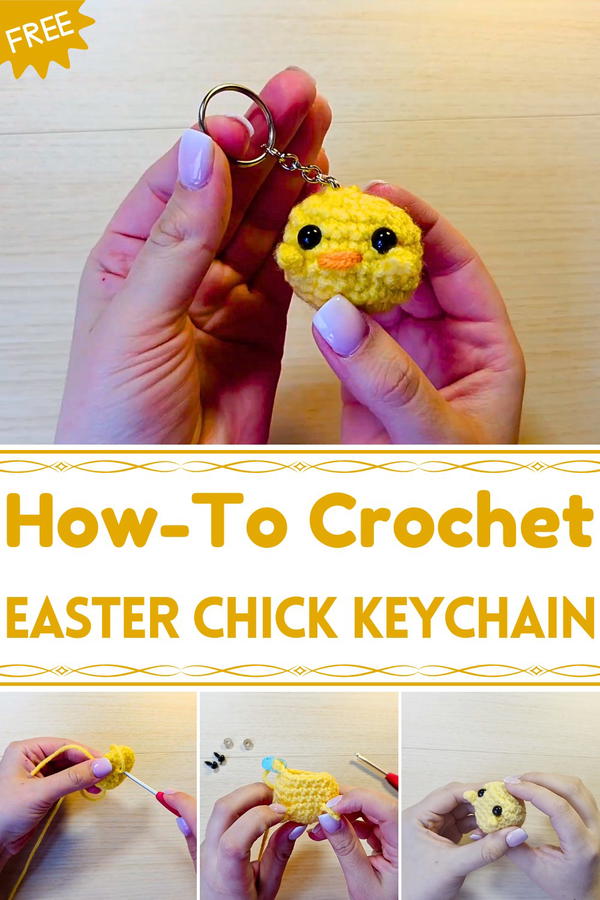
The gentle stitches form a lightweight yet durable keepsake that carries the happiness of Easter wherever it goes. This pattern offers an enjoyable way to use small yarn pieces while giving beginners and experienced makers alike something quick, easy, and rewarding to work on.
Each finished chick adds a pop of joy and a hint of nostalgia, reminding us of the little things that make celebrations meaningful. The Free Crochet Easter Chick Keychain Pattern turns a simple idea into a symbol of warmth and renewal, perfect for spreading smiles all season long. Whether made as a gift or kept as a daily companion, it’s a small treasure that brightens every day with the charm of handmade love.
Special Features
- No Sew-On Details: Arms are crocheted directly into the body, reducing assembly time.
- Fast and Easy: A beginner-friendly project that can be completed quickly.
- Customizable: Optional keychain attachment and variations to create other tiny animals (like chicks or rabbits).
- Perfect for Easter: Specifically created to suit the season, making it great for markets or gifts.
Materials Needed
- Yarn: Yellow yarn for the body and arms, and orange yarn for embroidering the beak.
- Crochet Hook: Size recommended in the video (specific size not mentioned, but a hook suitable for your yarn weight, e.g., 3.5 mm to 4.0 mm is likely).
- Safety Eyes: Place them between rounds 7 and 8 (optional if you are making an accessory).
- Stuffing: Polyester fiberfill to shape the chick.
- Keychain Hardware: Ordered from Amazon (link provided in the video description).
- Stitch Markers: To help track your placement, particularly during the arms and back loops.
- Pliers: Used for securing the keychain hardware.
- Sewing Needle: For embroidering the beak.
Level of Difficulty
- Beginner-Friendly: Despite a few techniques (magic circle, slip stitch, attaching safety eyes), the steps are straightforward and ideal for crocheters of all skill levels.
Tutor’s Suggestions
- Using Stitch Markers: Essential to track specific stitches, particularly for making the arms and working back loops.
- Secure Ties: Ensure the knot at the beginning of the magic circle is pulled tight for long-term durability.
- Stuff Gradually: Add filling carefully to maintain the chick’s shape while crocheting the last few rounds.
- Keychain Tips: Tighten the hardware securely with pliers to avoid it coming undone with usage.
Step-by-Step Details
1. Crochet the Body (Rounds 1–10)
- Round 1: Begin with a magic circle. Work 6 single crochets into the ring. Use a stitch marker to track progress.
- Round 2: Alternate between single crochets and 3 single crochets in the same stitch (increases) until you complete a round of 14 stitches.

- Round 3: Begin with 3 single crochets, followed by 3 increases, then 4 single crochets, another 3 increases, and end with 1 single crochet.
- Round 4: Work 20 single crochets all around.
- Rounds 5–7: Create the arms during Round 5 and continue shaping the body:
- Crochet 8 single crochets in the beginning, then attach an arm.
- To create an arm: Slip stitch into the front loop, chain 3, slip stitch into the second chain from the hook, work 2 more slip stitches, then slip stitch back into the front loop. Place a stitch marker in the back loop to ensure it stays intact for later rounds.
- Continue with 4 single crochets, attach the second arm, and finish with 6 single crochets.
- For Round 6, work into the back loops where markers were placed, then continue crocheting as normal.
- Rounds 7 and 8 consist of 20 single crochets in each round.
2. Shape the Head (Rounds 9–10)
- Round 9: Crochet 4 single crochets, followed by 3 decreases, then another 4 single crochets, ending with 3 decreases.
- Round 10: Final round includes a sequence of decreases and single crochets to shape the top of the head.
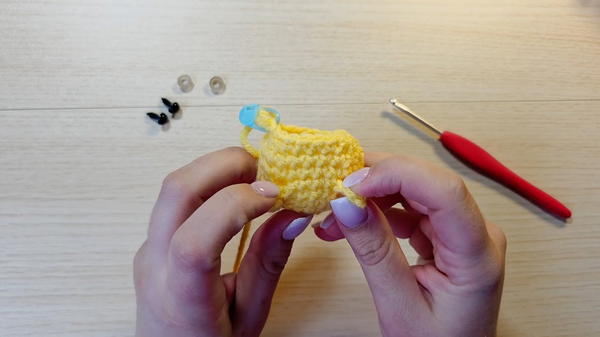
3. Insert Safety Eyes and Stuffing
- Before finishing the chick, place safety eyes between Rounds 7 and 8, ensuring they align with the arms. Leave 3 stitches of visible spacing between the eyes.
- Begin stuffing the chick gradually, using fiberfill. Shape it gently as you add more stuffing.

4. Close the Body
- Fasten off after Round 10, leaving a short tail.
- Use a crochet hook to pull the tail through the remaining stitches. Tie two secured knots, then hide the tail ends inside the body.
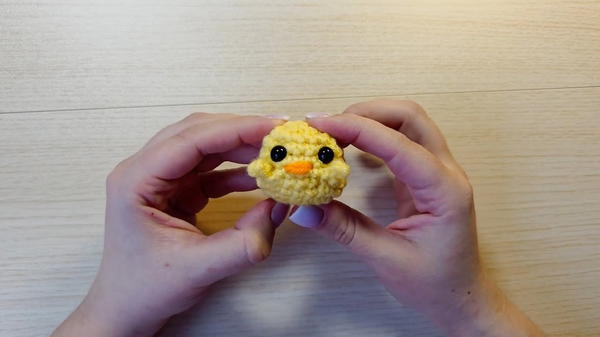
5. Embroider the Beak
- Use orange yarn to embroider a small triangular beak across 3 stitches below the eyes and above the arms.
- Start from a stitch outside the working area, leaving a tail. Repeat the embroidery twice, then bring both tails through the same stitch. Tie them off securely and hide the excess inside the body.
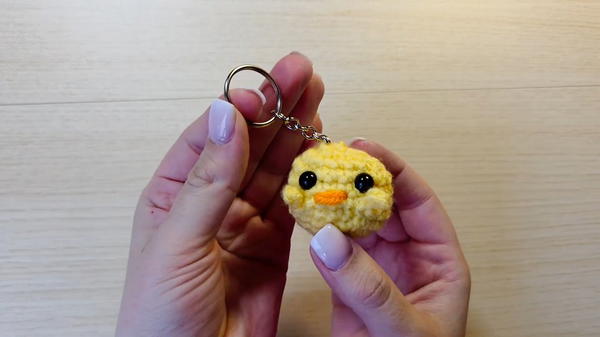
6. Optional Keychain Attachment
- Using keychain hardware:
- Attach one piece of hardware to the chick using pliers.
- Add the second piece (actual keychain), ensuring it’s tightly secured.
Uses
- Keychain Accessory: Perfect for everyday use or gifting.
- Easter Decor: Add to baskets, markets, or seasonal displays.
- Kids’ Toy: Safe and soft for children, minus the keychain attachment.
- Craft Stall Favorite: A quick and inexpensive project for crocheters selling handmade items.
Conclusion
This super cute crochet chick keychain combines simplicity with creative techniques, making it a joy to work on and a perfect seasonal project. Quick to make and highly customizable, you can adapt this design to create various animals or other themed creations.
Pro Tip
To create a smoother finish for your chick, when hiding the yarn tails after embroidering the beak, use scissors to gently push the ends deeper into the body. This ensures a clean, seamless look without visible threads.


