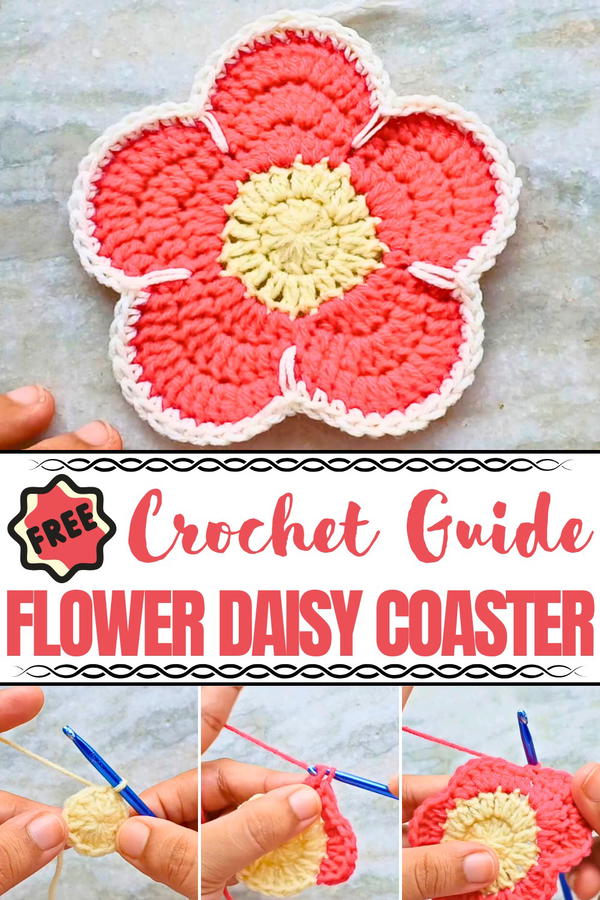
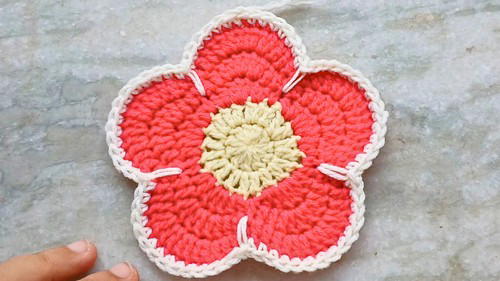
Fresh and charming with this Crochet Flower Daisy Coaster pattern, adding beauty, durability, and a floral touch to every table setting.
Long before coasters became common in homes, people often reached for scraps of fabric or small plates to protect their tables from drink rings and heat. The Crochet Flower Daisy Coaster pattern revives that simple tradition with a touch of timeless charm, turning an everyday item into something both practical and beautiful. Shaped like cheerful daisies, these coasters instantly brighten any table setting, adding a sense of freshness and joy to morning coffee rituals, afternoon tea, or gatherings with friends. Their soft texture is gentle against delicate surfaces, while their sturdy stitches ensure durability through repeated use.
Fresh Crochet Flower Daisy Coaster with Springtime Vibes
Lightweight yet resilient, they are easy to wash and maintain, making them a smart choice for daily living. Each coaster reflects the natural beauty of blooming daisies, spreading warmth and positivity wherever it is placed. They can be used individually to protect surfaces or arranged together for a delightful decorative effect, perfect for special occasions or casual family meals.
Versatile and thoughtful, they also make meaningful handmade gifts that carry both charm and functionality. With the Crochet Flower Daisy Coaster pattern, practicality and beauty come together seamlessly, offering a floral accent that is as useful as it is uplifting.
Materials Needed
- Yarn:
- Three colors:
- Color 1 for the center.
- Color 2 for the petals.
- Color 3 for the optional border.
- Four-ply yarn is used in this tutorial.
- Three colors:
- Crochet Hook: 4mm hook (recommended for four-ply yarn).
- Scissors: To trim excess yarn tails.
- Needle: For weaving in yarn ends.
Special Features
- Two Variations: Provides instructions for making the flower coaster both with and without a border.
- Demarcated Petals: Long single crochet stitches emphasize the petal shapes beautifully.
- Quick and Easy Project: Ideal for beginners, the coaster works up quickly and is simple to customize.
- Seamless Join Technique: Creates polished finishes that hide slip stitches for a refined look.
Level of Difficulty
This tutorial is suited for beginners. It incorporates basic techniques such as the magic circle, double crochet, half double crochet, single crochet, and slip stitches. However, managing the seamless join technique for finishing and adding a border may require slightly more attention, making it a good learning opportunity for novice crocheters aiming to refine their skills.
Tutor's Suggestions
- Follow the Sequence Carefully: Each round uses specific stitch patterns (such as alternating half-double and double crochets) to create the flower shape. Stick to the sequence to ensure symmetry.
- Work Over Yarn Tails: To achieve a cleaner look and save time weaving in loose ends, work over the yarn tails as you crochet.
- Tighten the Magic Circle: Cinch the magic circle completely closed in the first round to create a neat foundation for the flower shape.
- Seamless Finishing: Use the fake stitch technique to hide slip stitches, giving the coaster a polished and professional look.
Step-by-Step Instructions
1. Round 1: Forming the Center
- Step 1: Make a magic circle using the center color.
- Wrap the yarn over your finger, insert the hook under the cross, pull yarn through, and chain one to secure.
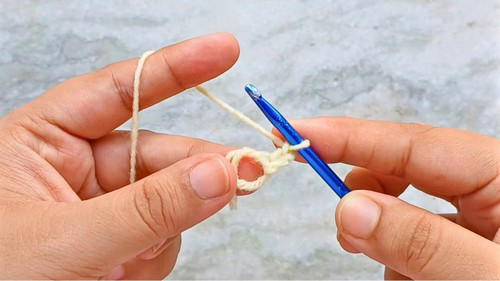
- Wrap the yarn over your finger, insert the hook under the cross, pull yarn through, and chain one to secure.
- Step 2: Chain 2 (does not count as part of the stitches).
- Step 3: Make 10 double crochets into the magic circle.
- Yarn over, insert hook into the circle, pull up a loop (three loops on hook), yarn over and pull through two loops, yarn over again and pull through the remaining two loops. Repeat this process 10 times.
- Step 4: Pull the yarn tail to tighten the circle completely, then slip stitch into the first double crochet to join the round.
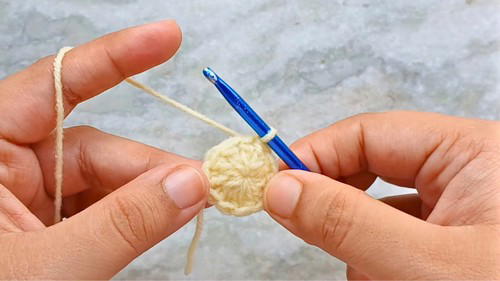
2. Round 2: Increasing Stitches
- Step 1: Chain 2 (does not count as part of the stitches).
- Step 2: Make 2 double crochets into the first stitch.
- Step 3: In each of the remaining stitches, make 2 double crochets (this doubles the stitch count from 10 to 20).
- Step 4: Slip stitch into the first double crochet to join, and cut the yarn. Fasten off, leaving a tail to weave into later.
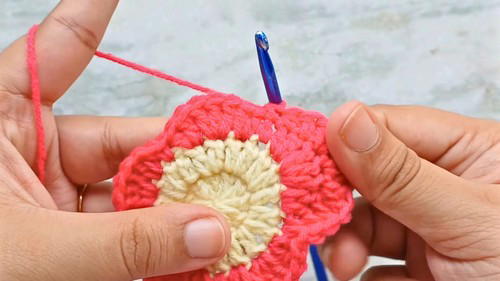
3. Round 3: Creating the Flower Petals
- Step 1: Bring in the yarn for the petals. Make a slip knot on the hook and join it into any stitch of the previous round with a slip stitch.
- Step 2: Follow the repeating stitch sequence:
- Half Double Crochet + Double Crochet in the same stitch.
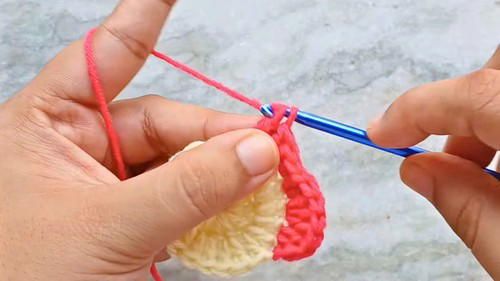
- Three Double Crochets in the next stitch.
- Double Crochet + Half Double Crochet in the next stitch.
- Single Crochet in the next stitch.
- Half Double Crochet + Double Crochet in the same stitch.
- Step 3: Repeat this sequence around the entire circle for 5 repetitions.
- Step 4: Slip stitch into the first single crochet to join.
4. Round 4: Expanding the Petals
- Step 1: Continue with the petal color. Make a half double crochet in the first half double crochet of the previous round.
- Step 2: Make two double crochets into each of the next three double crochets.
- Step 3: Follow the repeating sequence:
- Half Double Crochet, One Double Crochet, Two Double Crochets in each of three stitches, One Double Crochet, Half Double Crochet, and Single Crochet.
- Step 4: Repeat this sequence four more times until you’ve completed the round.
5. Optional Round: Adding the Border
- Step 1: Bring in the border color and make a slip knot on the hook.
- Step 2: Start with single crochets around the edge of the petals.
- Step 3: In the slip stitch between petals, go two rows down (Round 3) and make a long single crochet.
- Step 4: Continue crocheting single stitches across each petal, repeating the long single crochet between petals.
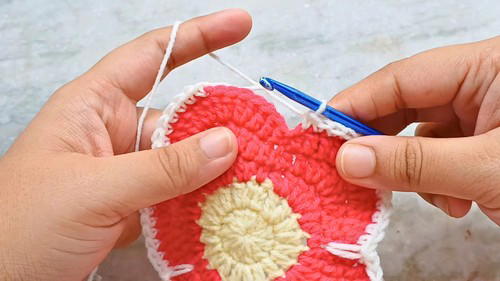
- Step 5: Slip stitch into the first single crochet to close the round, then fasten off and weave in the yarn ends.
Uses of the Flower Coaster
- Coaster: Use it to protect surfaces while adding a vibrant decorative touch.
- Gift: Perfect for birthdays, holidays, or special events like Mother’s Day.
- Home Décor: Display as a table accent or sewing onto larger projects (e.g., blankets or bags).
- Set Design: Create multiple flower coasters in different color combinations for a set.
Pro Tip
When making the border, ensure that the long single crochets are evenly placed between petals. This technique beautifully highlights the petal shapes and creates a neat separation, enhancing the overall design of the flower coaster.
Conclusion
This beginner-friendly flower-shaped coaster is an enjoyable and quick project, perfect for honing crochet skills while making something useful and beautiful. With options for customization, seamless finishing techniques, and two variations (with or without a border), this pattern offers excellent guidance for creating a thoughtful handmade item.


