Swirl into style with this Free Crochet Meringue Puff Bag Pattern, perfect for making a soft yet sturdy accessory that adds charm and everyday elegance.
Soft textures and graceful shapes often turn a simple accessory into something memorable, and a puffed silhouette offers both charm and practicality in one piece. The Free Crochet Meringue Puff Bag Pattern highlights this balance, presenting a lightweight yet sturdy bag that carries everyday essentials with effortless style. Its gentle, rounded form provides ample space while maintaining a delicate appearance, making it suitable for casual outings, evening gatherings, or as a unique gift.
Elegant Crochet Meringue Puff Bag Pattern that Feels Luxurious
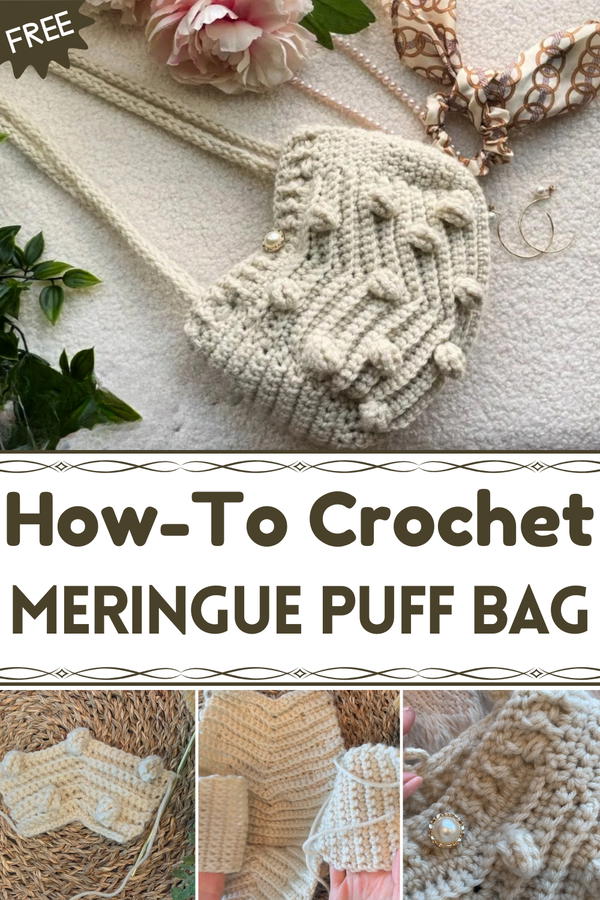
The structured puff stitches give the bag a pleasing tactile quality and subtle dimension, while the sturdy strap ensures comfort and durability for regular use. Clear step-by-step guidance allows both beginners and experienced crocheters to complete the project with confidence, while the opportunity to choose from a wide range of colors makes each bag distinctly personal.
Beyond its visual appeal, working through the rhythmic stitch pattern offers a calming, mindful experience, rewarding patience with a functional accessory that stands out in any setting. Whether carried as a crossbody, shoulder bag, or decorative storage piece, the finished meringue puff bag delivers elegance, utility, and a touch of playful sophistication, proving that everyday items can hold both beauty and purpose in equal measure.

Materials Needed
- Crochet Hooks: 4.5 mm and 3.75 mm hooks
- Yarn: Weight 4 acrylic yarn
- Other Tools:
- Scissors
- Stitch markers (or bobby pins)
- Darning needle
- Optional: Button, sewing needle, and thread
Special Features
- Dynamic Structure: Combines front-loop and back-loop single crochets, along with bobble stitches, to create a striking textured bag.
- Customizable Design: Allows flexibility in sizes and bobble placements to suit personal taste.
- Sturdy Build: The bag is reinforced with an i-cord strap that maintains its shape and functionality.
- Optional Pocket: Includes an optional pocket for added convenience and organization.
Step-by-Step Instructions
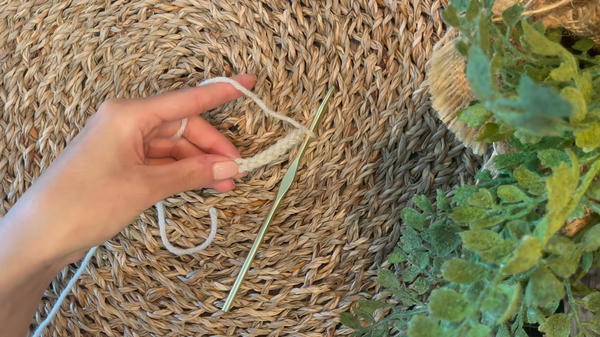
Step 1: Start the Base of the Bag
- Begin with the 4.5 mm hook and make a slip knot.
- Chain an uneven number of stitches (e.g., 15 chains). This determines the base width of the bag.
- Mark the middle stitch with a stitch marker for orientation.
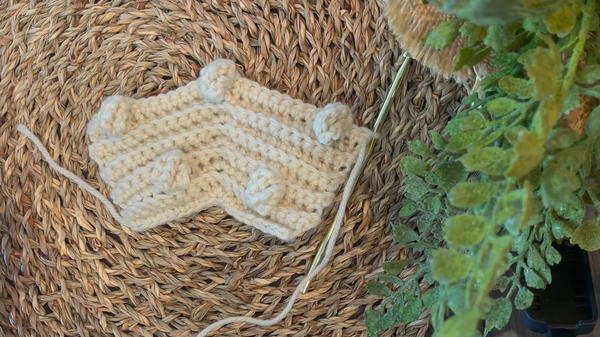
Step 2: Build the Bag’s Front Panel
- Use front-loop single crochets (FLSC): Insert the hook in the front loop, pull up a loop, yarn over, and pull through two loops.
- Complete FLSCs up to the middle stitch marker.
- At the middle stitch: Work 3 single crochets in the same stitch to create an increase. After the second stitch, replace the marker in the middle one.
- Continue FLSCs to the end of the row.
Step 3: Alternate Between Back and Front Loop Rows
- Chain one, turn your work, and work back-loop single crochets (BLSC) across the row.
- Increase on every alternate row by working 3 single crochets into the middle stitch (marked).
- This gradual increase creates a triangular shape.
Step 4: Add Bobble Stitches
- Every fourth row is a no-increase row, and this is where you add bobble stitches.
- To make a bobble:
- Yarn over twice, pull through the back loop, and pull through two loops multiple times (working into the same stitch).
- Repeat until six loops remain on the hook. Yarn over and pull through all six loops, then shape the bobble by tightening the yarn.
- Place bobbles symmetrically on both sides of the middle stitch (e.g., the 6th stitch in from each side).
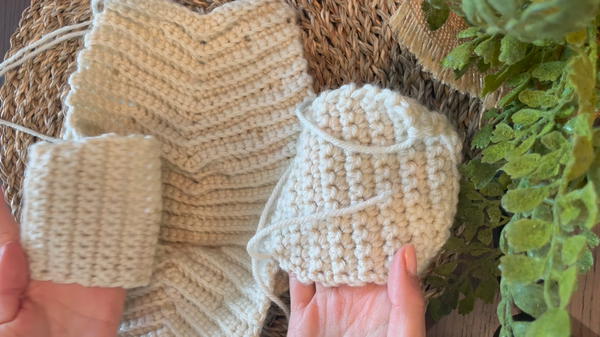
Step 5: Create the Bottom Panel
- After working the front panel's pattern and size as desired, crochet 9 rows of no increases.
- These rows will form the bag’s bottom panel.
Step 6: Build the Back Panel
- Work the back panel exactly like the front panel but in reverse.
- Mirror the bobble placements and the overall design to ensure a cohesive look.
Step 7: Add the Side Panels
- Attach the yarn at the start of the bottom panel, marking where the bottom begins and ends.
- Work single crochets along the edges (approximately 9 stitches per side) for the side panels.
- Gradually increase for 4 rows, then crochet 17 rows straight to complete each side panel.
- Repeat for the opposite side.
Step 8: Add the Pocket (Optional)
- Use the 3.75 mm hook to crochet a pocket with foundation single crochet stitches (or chain stitches if preferred).
- Crochet rows of single crochets to the desired length and shape, measuring against the bag as needed.
- Attach the pocket to the bag using a darning needle, leaving the top edge open.
Step 9: Seam the Bag Panels
- Turn the bag inside out and align the side panels with the front and back panels.
- Use the long tail left after finishing the panels to single crochet the panels together (through aligned stitches).
Step 10: Finish the Top Edge
- Attach the yarn to any top stitch and work a round of double crochets (DC).
- Alternate front-post double crochets and back-post double crochets in the next round to create texture.
- Optionally, add a final row of slip stitches to tighten the opening.
Step 11: Make the Strap
- Use the 4.5 mm hook to create an i-cord strap:
- Chain three and pull up loops from all three chains.
- Drop two loops; yarn over and pull through the remaining loop.
- Reattach the loops one by one and continue this process until the strap reaches the desired length.
- Attach the strap securely to the bag’s edges.
Tutor’s Suggestions
- Use stitch markers to clearly define the middle stitch and maintain symmetry throughout the pattern.
- Feel free to customize the bobble placements or the overall size of the bag to better fit your preferences.
- Tighten the yarn after creating each bobble to ensure it maintains its shape and stands out.
Level of Difficulty
This project is suitable for intermediate-level crocheters, as it involves multiple techniques like bobble stitches, alternating loops, and seaming panels together. While beginners can attempt it, familiarity with foundational stitches is recommended.
Uses of the Meringue Puff Bag
- Fashion Accessory: Stylish enough for everyday use or special occasions.
- Functional Design: Features a pocket (optional) for small essentials, making it as practical as it is beautiful.
- Gift Idea: A unique, handmade present for friends and family.
Tip for Success
Track your rows carefully, especially when alternating increase and no-increase rows, to avoid affecting the symmetry of the pattern. Writing down bobble placements and row counts will help ensure both the front and back panels are identical.
Conclusion
The Meringue Puff Bag Crochet Pattern is a beautifully textured project that balances both structure and creativity. From its unique bobble design to its sturdy i-cord straps, this bag is the perfect marriage of style and functionality. Whether you’re making it for yourself or as a thoughtful handmade gift, this eye-catching crochet piece is sure to turn heads.


