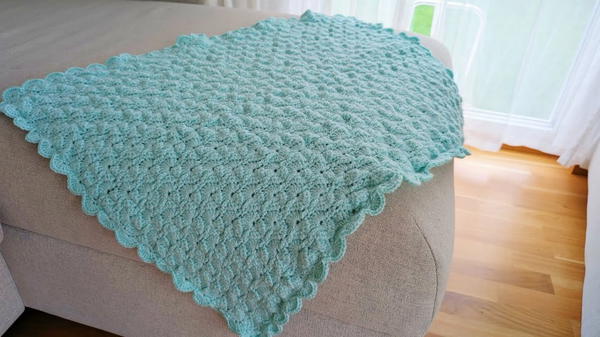
Cuddle little ones in softness with this Free Crochet Baby Blanket Pattern and make a warm, charming piece perfect for gifting or nursery decor.
Soft whispers of yarn often hold the sweetest comfort, especially for little ones who need warmth and tenderness. The Free Crochet Baby Blanket Pattern brings that gentle touch to life, offering a cozy layer of love for naps, playtime, and those precious first moments. Its smooth texture and delicate stitch work provide both visual charm and a soothing feel against a baby’s skin, making it ideal for everyday use.
Cozy Crochet Baby Blanket Pattern for Cuddly Comfort
![]()
This blanket stands out for its perfect balance of lightness and warmth, ensuring comfort through all seasons without feeling heavy. The Free Crochet Baby Blanket Pattern is also wonderfully versatile, it serves beautifully as a stroller cover, nursery accent, or heartfelt handmade gift for new parents. Its soft tones and elegant flow give it a timeless appeal, fitting effortlessly into any nursery style.
Beyond its beauty, it holds sentimental value, turning simple yarn into a keepsake that carries love through every loop. Durable, easy to wash, and endlessly charming, this blanket is a gentle reminder that the simplest things often offer the deepest comfort a perfect way to wrap a baby in warmth, care, and softness that lasts through many cherished years.
Special Features of the Baby Blanket
- Four-row repeat: The pattern consists of four distinct rows, which are repeated throughout the blanket.
- Beautiful pattern: The design involves a combination of single and double crochet stitches, creating a textured and aesthetically pleasing effect.
- Versatile size options: The blanket can be customized in terms of length and width based on preference.
Skill Level: Beginner-Friendly
This project is suitable for beginners. The tutorial focuses on basic crochet techniques such as slip knots, chain stitches, single crochet, and double crochet. Precision in counting stitches is required to maintain the pattern integrity.
Materials Required
- Yarn: The tutor uses a 500g Creativity yarn, but only 370g was needed for her project.
- Crochet hook: Size 4.5mm.
Step-by-Step Crochet Process
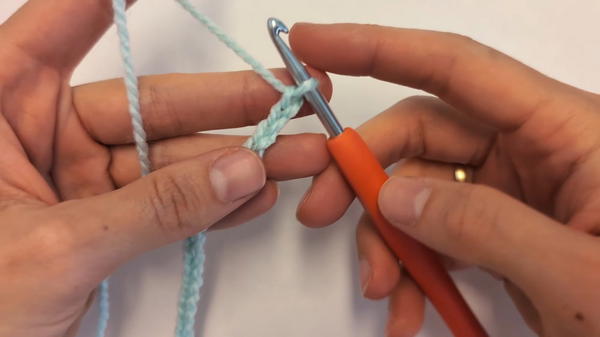
1. Starting with the Foundation Chain
- Create a slip knot to begin your work.
- Chain stitches: Yarn over and pull through to create chains. Make sure the number of chains is a multiple of eight for the blanket size you desire.
- Example: The tutor's chain is 80 cm long, comprising 144 chains.
- Example: The tutor's chain is 80 cm long, comprising 144 chains.
- Add one more chain after reaching your desired length.
2. Row 1: Establishing the Ground Row
- Skip four chains from the start.
- Double Crochets:
- Yarn over, insert your hook into the fifth chain.
- Yarn over, pull through two loops, yarn over, and pull through two loops again to complete the double crochet.
- Repeat this process to create a total of nine double crochets in the same chain.
- Single Crochets:
- Skip three chains, insert your hook into the fourth chain, and perform a single crochet.
- Skip three chains again, and into the fourth chain perform nine double crochets.
- Repeat this alternation until the end of the row.
- The last single crochet should go into the last chain.
3. Row A: Unfinished Double Crochets and Chain Patterns
- Chain three and turn your work.
- Four Unfinished Double Crochets:
- Yarn over, insert hook into last double crochet of the previous row, yarn over and pull through two loops (leaving unfinished).
- Repeat three more times until you have five loops on your hook.
- Yarn over and pull through all five loops.
- Chain Four and perform a single crochet into the next stitch.
- Nine Unfinished Double Crochets:
- Yarn over, insert hook into the next stitch, yarn over and pull through two loops, leaving it unfinished.
- Work your way down to the single crochet of the former row, then back up, repeating until ten loops are on your hook.
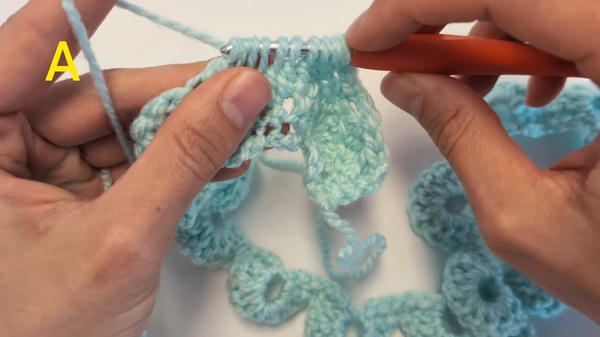
- Yarn over and pull through all ten loops.
- Repeat the process for the entire row. The end of Row A should have five unfinished double crochets.
4. Row B: Double Crochets into Loops
- Chain four and turn your work.
- Double Crochets:
- Perform four double crochets into the first small loop.
- Perform nine double crochets into subsequent loops.
- Perform single crochets on top of single crochets from the previous row.
- End Row: Finish with five double crochets into the last small loop.
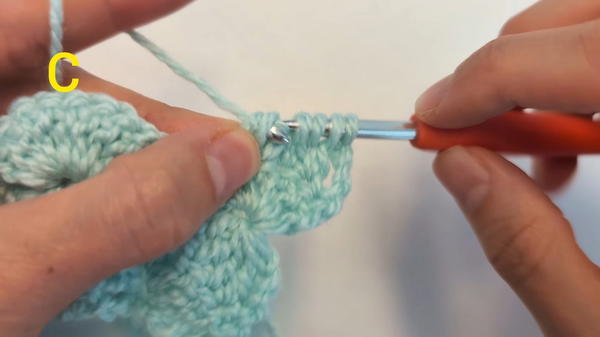
5. Row C: Similar to Row A
- Chain four and turn your work. This row begins and ends differently from Row B but follows similar stitches.
- Nine Unfinished Double Crochets:
- Yarn over, skip the first double crochet, and insert the hook into the next stitch.
- Work down to the single crochet, then back up, until there are ten loops on your hook.
- Finish with four chains and a single crochet at the end.
6. Row D: Similar to Row B
- Chain one and turn the work.
- Nine Double Crochets:
- Perform nine double crochets into loops.
- Perform single crochets on top of single crochets from the previous row.
- End Row: Finish with a single crochet into the last double crochet.
Repeating the Rows
- Repeat rows A, B, C, and D until your blanket reaches your desired size. Ensure to end the project with Row A or Row C for a straight edge.
7. Creating the Border
- Single Crochet Border:
- Perform single crochets evenly around all four sides of the blanket.
- Double Crochets into Single Crochets:
- Skip two single crochets, perform nine double crochets into the next stitch.
- Skip two stitches and perform a single crochet.
- Repeat this pattern all around the blanket edges.

Tutor's Suggestions
- Consistency and Neatness: Ensure your stitches are even and well-aligned.
- Measurement Accuracy: Carefully count your stitches to maintain the pattern and dimensions.
- Secure Yarn Changes: When changing yarn, knot securely and weave in loose ends.
Uses of the Baby Blanket
- Perfect as a cozy and warm present.
- Versatile size making it ideal for infants and toddlers.
Additional Tip
- When working the border, try to space out your stitches evenly to create a neat and professional-looking finish.
Conclusion
Following these steps, you can create a stunning baby blanket with a beautiful textured pattern. With simple repeat rows and a neat border, this project is fun and engaging, ensuring you never get bored. Enjoy crocheting and creating lovely pieces for your loved ones!


