Cozy up with this Free Crochet Christmas Hat Pattern, adding festive warmth, cheerful style, and a playful touch to holiday outfits and celebrations.
Festive gatherings often bring a playful spirit that brightens every celebration, and a simple hat can instantly add personality and cheer. The Free Crochet Christmas Hat pattern transforms soft yarn into a warm and stylish accessory that embodies the joy of the season. Its comfortable fit makes it suitable for a variety of occasions, from casual meetups to themed parties, while the soft texture ensures warmth without compromising style.
Sparkling Crochet Christmas Hat Pattern Adds Festive Style

Beyond its practical use, working on this project provides a calming and rewarding experience, allowing makers to focus, relax, and refine hand coordination with each stitch. The hat can also serve as a thoughtful handmade gift, bringing a personal touch to friends, family, or loved ones. Its versatile design allows for customization through color choices, trims, or small embellishments, making each piece unique and reflective of individual taste.
Lightweight and portable, it can be carried or stored easily, making it a functional and decorative accessory for any festive setting. The Free Crochet Christmas Hat pattern combines comfort, charm, and creativity, offering a project that is both satisfying to make and delightful to wear, spreading warmth, personality, and handcrafted cheer wherever it appears.

Materials Needed
- White Velvet Yarn: (Alize Velo) – 100 grams, 68 meters.
- Red Velvet Yarn: (Lanoso Hera Extra) – 100 grams.
- Crochet Hook: Size 7 mm.
- Stitch Markers: To track rows during the decreases.
- Scissors: For trimming excess yarn.
- Polyester Fiberfill (optional): For the pom-pom.
Step-by-Step Instructions
Step 1: Create the Base Chain
- Begin by pulling a chain stitch with the white velvet yarn.
- Chain an appropriate number of stitches to fit comfortably around the head (typically 56 chains for an average adult size).
- Slip stitch into the first chain to form a ring. Be careful not to twist the chain.

Step 2: Single Crochets for the Base
- Work single crochet (SC) stitches into each chain around.
- When you reach the end of the round, slip stitch into the first SC to close the round.
- Continue working SCs row by row in this manner until the bottom white portion reaches your desired height. This section provides the cuff for the hat.
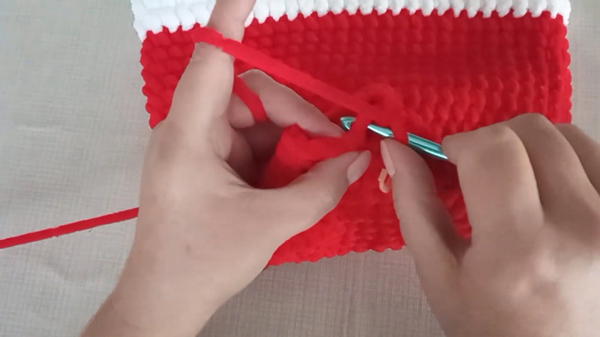
Step 3: Transition to Red Yarn
- Once the white portion is complete, switch to the red velvet yarn.
- Tie the red yarn securely at your starting point. Continue working slip stitches into each SC from the previous row to create a smooth transition.
- Once the row of slip stitches is complete, begin working SC stitches in subsequent rows.

Step 4: Build the Body of the Hat
- Continue crocheting in the round with the red yarn using single crochet (SC) stitches.
- Work evenly for 9 rows (or more), depending on how long you want your hat's body to be.
Step 5: Start Decreasing
- In the 10th row, begin the decrease process.
- Crochet 6 single crochets.
- To decrease: Insert your hook into the next stitch, pull up a loop, insert into the following stitch, pull up another loop, and pull through all three loops on the hook.
- Repeat this pattern (6 SCs, then 1 decrease) for the entire 10th row.
- After the decrease row, alternate between 1 row with decreases and 1–2 rows without decreases, depending on the hat's length and shape.
Step 6: Final Rows and Shaping the Hat
- As you near the top of the hat, shorten the number of SCs between decreases. For example:
- In the 13th row, crochet 4 SCs and then make 1 decrease.
- In the 16th row, crochet 3 SCs and then make 1 decrease.
- In the 19th row, crochet 2 SCs and then make 1 decrease.
- Once the top of the hat is narrow enough, cut the yarn, leaving a long tail for sewing.
- Using a needle, weave the long tail through the remaining stitches, pull tightly to close the top, and secure the yarn.
Step 7: Making the Pom-Pom
- Use white velvet yarn to create the pom-pom. Wrap the yarn around three fingers approximately 70 times.
- Tie the center securely with a long piece of yarn. Cut through the loops on each side to form the pom-pom. Trim the edges evenly.
- Attach the pom-pom to the tip of the hat using a needle and the long tail left from the pom-pom. Sew it securely into place.

Special Features
- Soft Texture: The velvet yarn adds a luxurious and cozy feel to the hat.
- Structured Shape: The gradual decreases provide the hat with a classic conical shape, perfect for a Santa hat.
- Customizable Size: The initial chain can be adjusted to fit any head size, and the length can be tailored to preference.
- Quick to Complete: With clear instructions, this hat can be finished in just a day, ideal for last-minute holiday gifts or sales.
Tutor’s Suggestions
- Avoid Overstretching Velvet Yarn: The tutor emphasizes working gently with the yarn to avoid uneven tension or splitting.
- Use Stitch Markers: Since velvet yarn can make rows hard to see, stitch markers are recommended to help track where decreases start.
- Try a Longer Hat: For a whimsical Santa look, extend the body of the hat with extra rows before starting the decreases.
Level of Difficulty
This project is suitable for beginner to intermediate crocheters. While the stitches themselves are simple (single crochets), working with velvet yarn and creating consistent decreases requires some attention and patience.
Uses
- Holiday Accessory: Perfect for Christmas or New Year celebrations.
- Gifting: A thoughtful, handmade present for friends or family.
- Festive Photo Props: Ideal for family photos or holiday-themed events.
- Sellable Item: Quick to make, these hats can be sold at craft fairs or online.
Tip for Success
When working with velvet yarn, maintain an even tension and avoid pulling too tightly. This prevents the yarn from bunching and maintains a smooth, professional finish.
Conclusion
Crocheting a Santa hat using velvet yarn is a delightful way to spread holiday cheer. This project combines simplicity with elegant texture, and the end result is both festive and functional. Whether you're making it as a gift, a decorative piece, or an item to sell, this hat is sure to bring warmth and joy.


