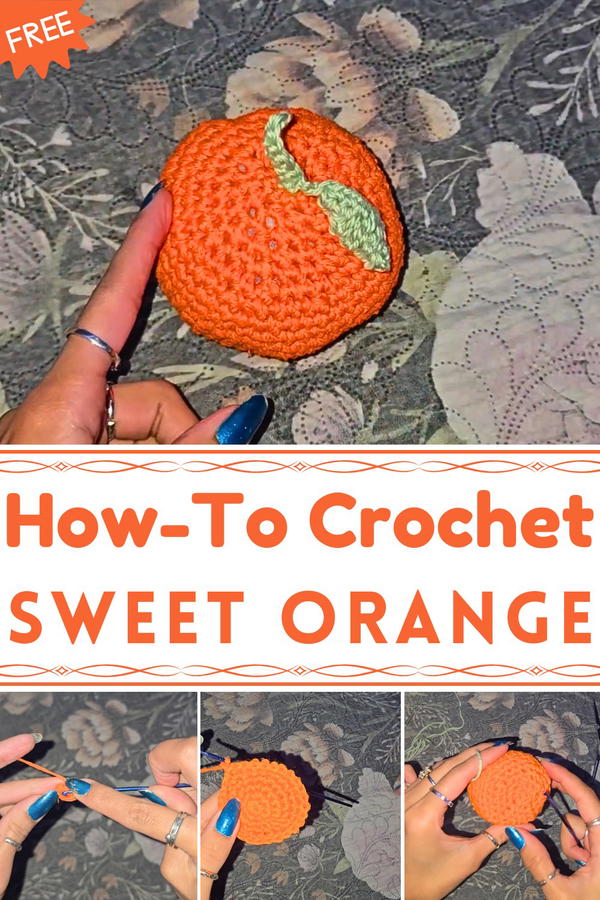
Infuse lively color into your creations with the Free Crochet Orange Pattern that adds cheerful charm and a delightful handmade touch to any project.
Freshly picked from a sunlit orchard, oranges have always symbolized vitality, brightness, and wholesome energy. The Free Crochet Orange Pattern brings this same sense of freshness into a handmade creation, turning soft yarn into a cheerful, vibrant fruit that’s both decorative and functional. Perfect for kitchen décor, fruit-themed displays, or playful additions to a child’s collection of soft toys, this crochet orange adds a pop of color and charm wherever it’s placed.
How to Personalize Crochet Orange for Unique Projects
Its round, tactile shape encourages fine motor skills when used as a toy, while also serving as a whimsical accent for gift baskets or seasonal displays. Lightweight yet sturdy, it’s easy to handle, stack, or store, making it versatile for various uses around the home or classroom. The Free Crochet Orange Pattern also allows crocheters to experiment with shades of orange, green, and cream, adding personal flair to every creation.
Quick to complete and visually striking, this project transforms leftover yarn into a delightful miniature fruit that delights both the eyes and the hands. Beyond its playful appeal, it fosters creativity, patience, and a sense of accomplishment, turning a simple crochet project into a charming, practical, and joy-filled piece that brightens any space.
Materials Needed
To make your crochet orange, you will need:
- Crochet Hook: Size 2.5 mm.
- Yarn:
- Orange yarn (for the main body).
- Green yarn (for the leaf and stem).
- Stuffing: Polyfill, spare cotton, or any soft material. (The creator humorously mentions using stuffing from her brother's pillow!)
- Stitch Marker or Safety Pin: To keep track of row beginnings.
- Scissors: For cutting yarn.
- Darning Needle: To weave in loose ends.
Step-by-Step Instructions
Part 1: Crochet the Body of the Orange
The main body of the orange is crocheted in continuous rounds, increasing and decreasing to create the spherical shape.
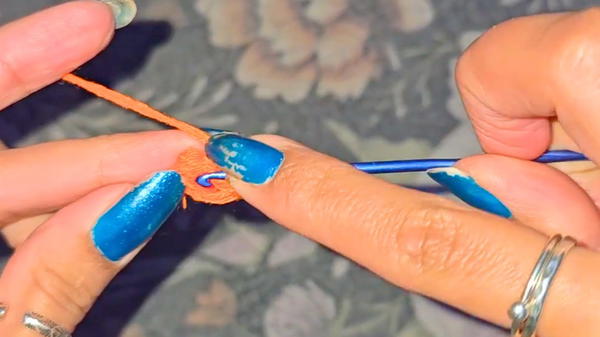
1: Beginning the Orange - Foundation Round
- Create the Starting Loop:
- Twist the yarn to form a loop, or use a magic circle if you prefer. The creator opts for twisting the yarn.
- Twist the yarn to form a loop, or use a magic circle if you prefer. The creator opts for twisting the yarn.
- Chain 2 to Begin:
- Chain 2 to secure the loop.
- Work 6 Single Crochets into the Center:
- Insert your hook into the center of the loop, yarn over, and pull through both loops on the hook to create 6 single crochets. This forms the base of your orange.
- Slip Stitch: Join with a slip stitch into the first chain space to close the round. Chain 1.
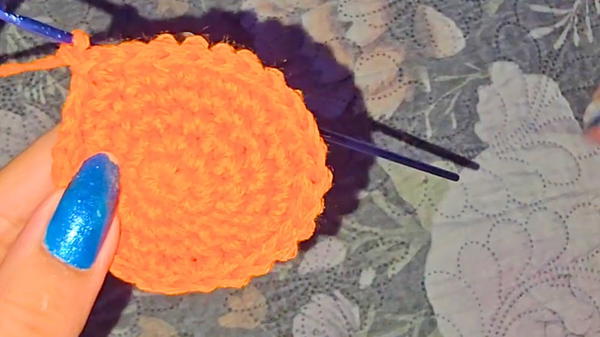
2: Increasing Rounds to Create the Sphere
Round 2:
- Place 2 single crochets in each stitch (increase in each stitch). You will have 12 stitches by the end of this round. Slip stitch to join, then chain 1.
3:
- Single crochet in the first 2 stitches, then increase by placing 2 single crochets in the third stitch. Repeat this pattern (1, 1, 2) around the round. Result: 18 stitches.
4:
- Single crochet in the first 3 stitches, then place 2 single crochets in the fourth stitch, repeating (1, 1, 1, 2) all the way around. Result: 24 stitches.
5:
- Single crochet in the first 4 stitches, then place 2 single crochets in the fifth stitch, repeating (1, 1, 1, 1, 2) throughout the round. Result: 30 stitches.
6:
- Single crochet in the first 5 stitches, then increase in the sixth stitch (1, 1, 1, 1, 1, 2). Result: 36 stitches.
7:
- Single crochet in the first 6 stitches, then add 2 single crochets in the seventh stitch, repeating (1, 1, 1, 1, 1, 1, 2) around. Result: 42 stitches.
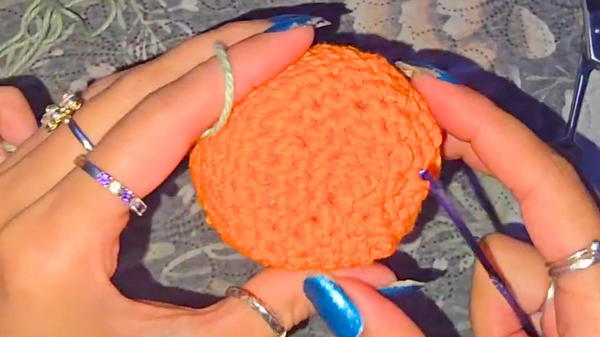
Rounds 8-14:
- Single crochet in each stitch around (no increases). Slip stitch to join and chain 1 at the end of each round.
- Your orange should now resemble a medium-sized, hollow hemisphere.
Tip: Turn the orange inside out to ensure the right side (the smoother, neater side) is on the outside.
Part 2: Decreasing to Close the Sphere
3: Decreasing Rounds
Round 15:
- For every 4 single crochets, combine the fifth and sixth stitches (decrease). This means crochet 4 single crochets, then single crochet the next 2 together. Slip stitch to join.
16:
- Single crochet in the first 3 stitches, then combine the fourth and fifth together. Repeat (1, 1, 1, decrease).
17:
- Single crochet in the first 2 stitches, then combine the third and fourth together (1, 1, decrease).
4: Stuff the Orange
- At this point, stuff the orange using your filling material. Avoid overstuffing to prevent gaps at the top.
Final Rounds:
- Continue decreasing by combining every second and third stitch until you reach the top. For the last round, crochet 2 stitches together repeatedly to close the sphere.
Once fully closed, fasten off the yarn and use a darning needle to weave in the ends securely.
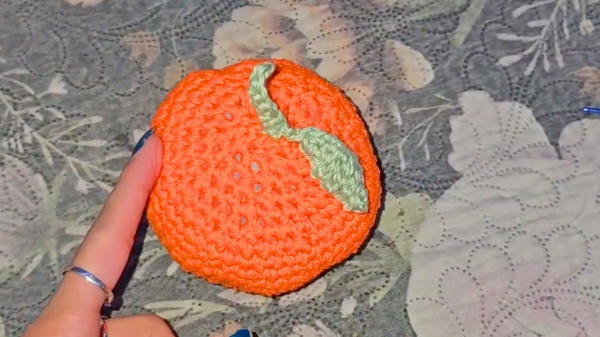
Part 3: Adding the Leaf and Stem
5: Create the Leaf
- Attach green yarn near the top of the orange.
- Chain 6:
- Skip the first chain, then work the following stitches into the rest of the chain:
- Slip stitch into the second chain.
- Half double crochet into the third chain.
- Double crochet into the fourth chain.
- Half double crochet into the fifth chain.
- Single crochet into the last chain.
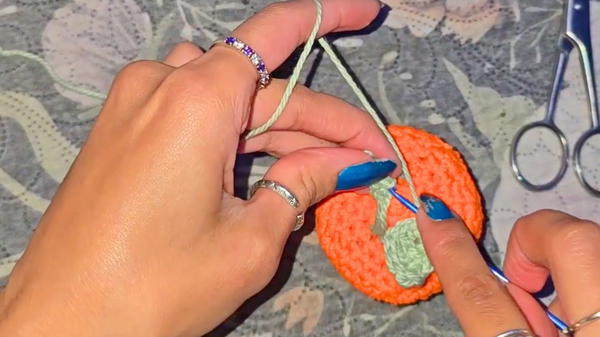
- Repeat this pattern in reverse along the other side of the chain to create the full leaf.
- Skip the first chain, then work the following stitches into the rest of the chain:
Step 6: Attach the Stem
- At the very top of the orange, make a stem:
- Secure green yarn, then chain 5.
- Single crochet back down the chain.
- Fasten off the stem and leaf, sew them securely, and weave in any loose threads.
Special Features
- Realistic Design: The tutorial offers a spherical shape with an authentic-looking leaf and stem.
- Beginner-Friendly: The project uses only basic stitches—chain, single crochet, and slip stitch—with simple increases and decreases.
- Customizable: You can adapt the yarn colors to create other fruits (e.g., lemons or limes).
Level of Difficulty
- Beginner to Intermediate: Basic crochet knowledge is sufficient to complete this project. The decreasing rounds and creating the leaf may require focus, but the instructions are easy to follow.
Tutor’s Suggestions
- Be Gentle with Stuffing: Overstuffing may cause visible gaps or uneven shapes. Fill the orange lightly and only add more before the final stitches.
- Use Markers: A stitch marker or safety pin is crucial to keep track of the beginning of each round.
- Experiment with Colors: Don’t limit yourself to traditional orange—try making a lemon, lime, or grapefruit!
Uses
- Decorative Items: Perfect for kitchen decor or as part of a centerpiece.
- Toys: Create soft and safe toys for children.
- Photo Props: These make great props for fruit-themed photo shoots.
- Gifting: A handmade crochet orange is a thoughtful and unique present.
Tip
When decreasing stitches, tighten your tension slightly to minimize gaps. This helps create a smoother, more seamless finish.
Conclusion
The crochet orange tutorial is an enjoyable and creative project suitable for beginners and intermediate crafters. The finished product is a cute, reusable decoration or toy, and the technique can inspire variations like lemons or limes.


