Upgrade your wardrobe with a Crochet Top Pattern that looks stylish, feels airy, and adds effortless charm to casual outings, parties, or warm sunny days.
This cozy creation brings a splash of handmade charm to any wardrobe with soft yarn and simple, lovely stitches that catch the eye. It feels gentle and smooth on the skin, making it perfect for all kinds of days from casual outings to warm, sunny afternoons. Its design is easy and comfortable, not too tight or too loose, giving you freedom to move and play.
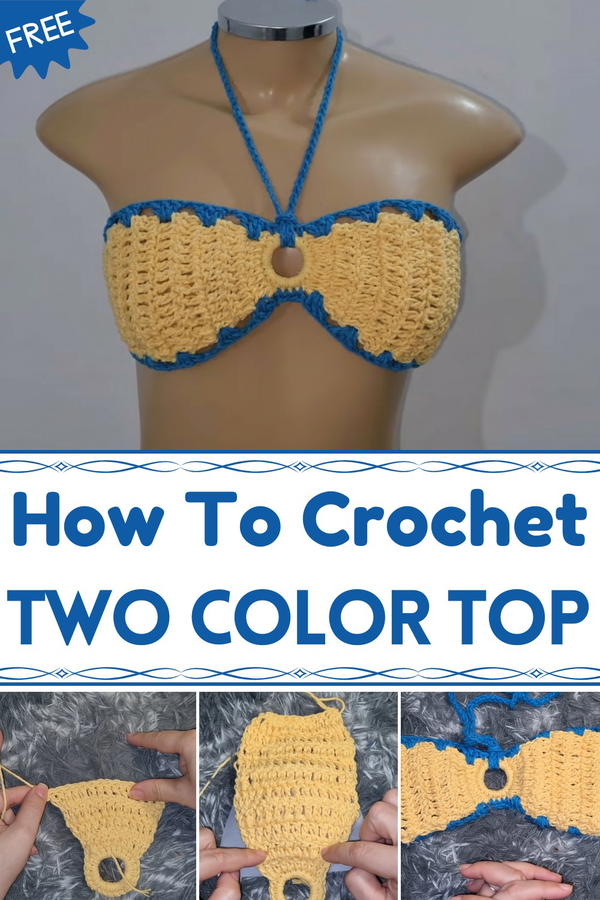
Handmade Crochet Top Pattern That Looks Professional
Whether worn with jeans, skirts, or shorts, it adds a touch of fun and brightness to your look. The texture of the stitches creates a subtle pattern that looks like little hugs all over, making you feel wrapped in warmth and care. It’s light enough to keep you cool but cozy enough for those cooler moments too. Wearing this feels like carrying a small bundle of joy wherever you go, a simple way to show off your style and personality with a smile.
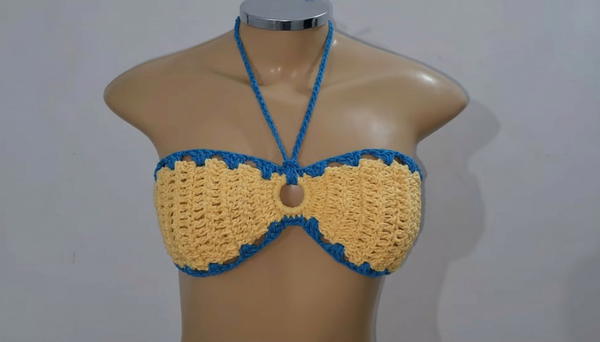
Crochet Twine Bra Top Pattern
Materials
- Twine thread, size 6 (colors of your choice, option for two-tone)
- Crochet hook 3.5 mm for main work
- Crochet hook 2.5 mm for finishing edges (optional)
- Scissors
- 3cm acrylic ring (or make a chain circle and use that as base)
- Measuring tape
Special Features
- Firm foundation using an acrylic ring or chained circle
- 4 rows of thoughtful increases for cup shaping
- Precise decreases to finish shape flattering the bust
- Separate back tie cords made of crocheted loops for adjustability
- Option to work in one or two colors for a stylish effect
- Versatile neck tie that can be removed for strapless wear
Skill Level
Intermediate: Basic stitches such as single crochet (sc), double crochet (dc), chain stitch (ch), plus increases and decreases; stitch counting and shaping.
Step-by-Step Instructions
1. Setup Base Ring
- Start with a 3 cm acrylic ring or make a small circle from chained loops approx same size.
- Tie your chosen yarn (e.g., light yellow) with a small knot around the ring for a firm hold.
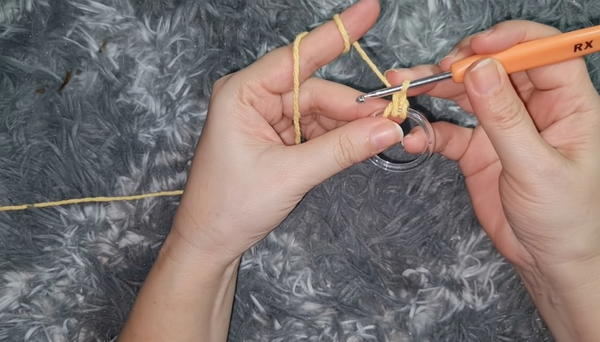
2. Round 1: Single Crochet Foundation
- Insert hook into ring, pull yarn through, and make 24 single crochet (sc) stitches evenly spaced around the ring.
- Join with slip stitch to first sc.
- Make sure ring is fully covered and evenly spaced.
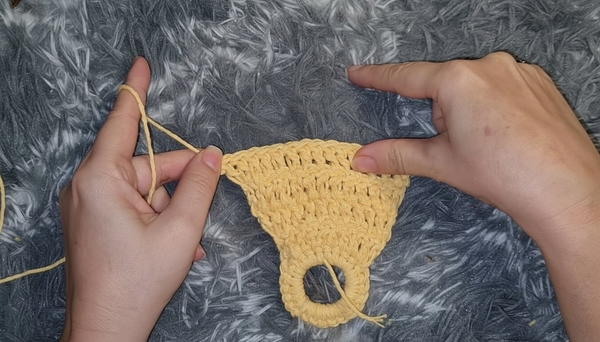
3. Round 2: Begin Shaping with Double Crochet Increases
- Chain 3 (counts as first double crochet).
- In the same stitch, work 2 double crochet (dc) to make an increase.
- Work 6 more dc stitches, one dc in each stitch.
- At the last stitch, work 2 dc stitches together (increase) again.
- Total: increase at beginning and end, 6 dc stitches in-between.
4. Round 3 to Round 6: Continue Increasing Shape
- Turn work, chain 3 (counts as dc).
- Work dc stitches across each stitch until reaching the last stitch.
- At start and end of each row, work 2 dc increases (2 dc in the same stitch).
- Repeat for a total of 4 increase rounds.
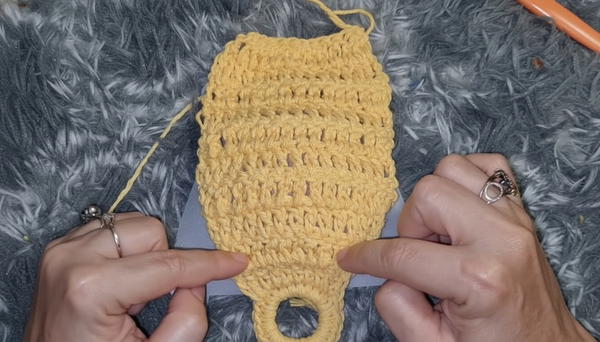
- This shapes the cup with gradual increases on edges.
5. Round 7 to Round 10: Straight Rows Without Increases
- Chain 3 and turn work.
- Work single dc stitch over each dc from previous row with no increases.
- Continue for 4 rounds to build depth and maintain shape.
6. Round 11 to End: Begin Decreasing for Cup Finish
- Chain 3 and turn work.
- Work dc decreases at start and end:
- Yarn over, insert hook through next two stitches, yarn over and pull through (2 loops on hook).
- Yarn over and pull through 2 loops to complete decrease.
- Work dc stitches in between stitches as normal.
- Continue decreasing rows by 1 stitch per side until 2 dc stitches remain.
- End with a final row of 3 chains then turn.
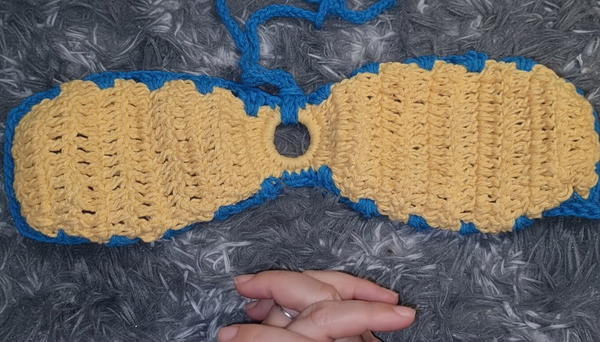
7. Create Back Tie Cords
- At one edge of cup base, chain 27 small loops—chain 3, turn, and slip stitch loops to form rings.
- Secure by tying knots near last loop to prevent unraveling.
- Repeat on the other side for double tie cords.

8. Finishing Color Change (Optional)
- Switch to contrasting color yarn (e.g., turquoise blue).
- Work around edges with decorative blocks:
- Alternate blocks of three dc stitches together, chain 1, skipping alternate rows for shell-like texture.
- End with slip stitch closure and weave in ends neatly.
9. Neck Tie Cord
- Chain 120 chains for size S (increase by 20 chains per larger size) to make neck tie.
- Finish by fastening ends securely for adjustable tie neck.
- You can remove neck tie to wear as strapless.
Tutor’s Suggestions
- Always measure width exactly for your yarn type; size 6 twine yields a base width of approx 5.5 cm for first row.
- Adjust increase/decrease rows for personal fit and cup size.
- Use smooth yarn for comfortable wear and limited stretching.
- Add lining if needed for extra coverage; sold separately or sewn on by hand.
- Practice decrease stitch before starting to ensure smooth shaping.
Uses
- Stylish summer bra top or crop top for casual wear or layering.
- Great handmade gift or boutique sale item, lightweight and breathable.
- Versatile with removable neck ties and adjustable back cord.
Final Tip
Tip: Keep track of your stitch count while increasing and decreasing to maintain symmetry and perfect cup shape. Use stitch markers if needed for marking start/end of decreases.
Conclusion
This delicate but sturdy twine bra top combines functional shaping with elegant crochet details for an attractive summer garment. Its simple stitch pattern and clear increase/decrease strategy make it an excellent intermediate project.