Create cozy charm with a Free Crochet Granny Square Pattern, turning stitches into colorful pieces for blankets, bags, and gifts.
A small piece of yarn can turn into a neat square just by repeating a few easy steps. The process begins with making a small ring, then simple stitches are added again and again in a circle to build the shape. A Free Crochet Granny Square pattern is easy to follow because the same steps are repeated in each round, so it becomes simple to remember.
Free Crochet Granny Square Pattern Learn Basic Stitches Fast
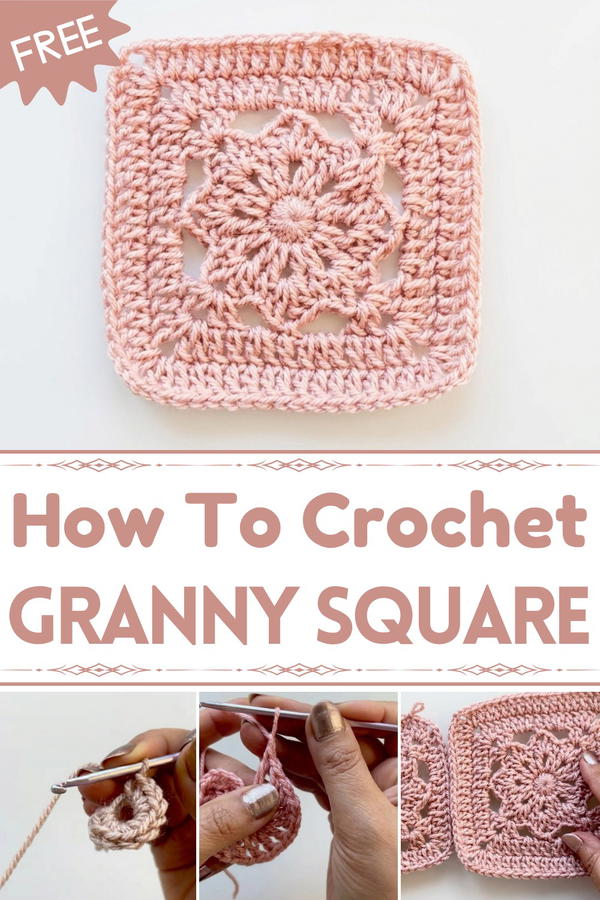
Corners are formed by adding extra stitches, which helps the square keep its proper shape and flat look. Its appearance looks soft and open, with tiny spaces that give it a light and pretty design. Different yarn colors can be added in each round, making it look bright and attractive. This square is useful because many pieces can be joined together to make items like blankets, small mats, or bags. It is also easy to carry and work on anywhere. Its beauty comes from its neat shape, soft texture, and colorful style.
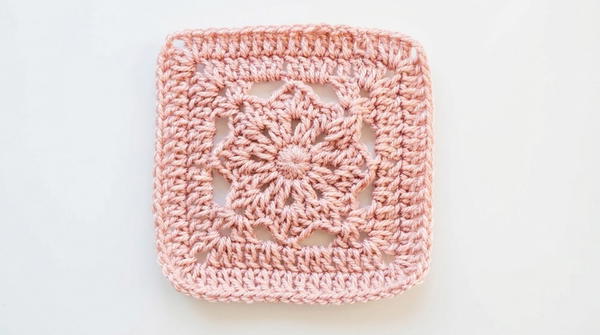
Crochet Gorgeous Square
Materials Needed
Yarn:
- Lightweight (DK) Yarn, single color or multi-color for customization.
- Approximately 20-50g per square, depending on the size.
Crochet Hook:
- 3.5mm Crochet Hook (or size suitable for your yarn).
- Use a smaller hook if you prefer tighter stitches with minimal gaps.
- Use a larger hook if you want a lacier, more open look.
Additional Supplies:
- Scissors for cutting the yarn.
- Tapestry Needle for weaving in loose ends.
Skill Level
Intermediate - Familiarity with basic stitches like Single Crochet (sc), Double Crochet (dc), Chain (ch), and other techniques like increasing (working two stitches into one) is required.
Special Techniques
Magic Ring:
- Creates a tight, neat center for the square. You may alternatively start with a chain loop (ch 4, then slip stitch into the first chain to form a ring).
Corners:
- Increases at the corners involve working 2 dc, ch 2, 2 dc in the same space. This forms a clear square shape.
Pattern Instructions
Step 1: Magic Ring and Foundation Round (Round 1)
- Start with a magic ring (or chain 4, slip stitch to form a loop).
- Chain 1 (does not count as a stitch).
- Work 16 sc into the center of the ring. Adjust the stitches evenly as needed.
- Pull the tail of the magic ring to close the center tightly.
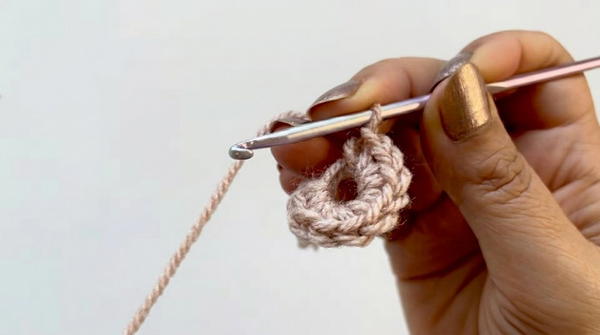
- Join to the first sc using a slip stitch (sl st).
Note: Ensure you have exactly 16 sc before moving on, as this determines the symmetry of the following rounds.
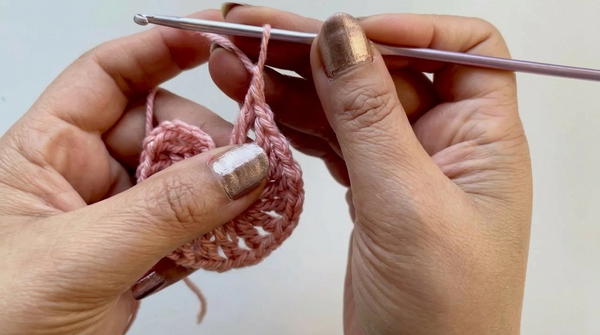
Step 2: Chain-Spaced Double Crochet Round (Round 2)
- Chain 4 (counts as 1 dc + ch 1).
- Work 1 dc into the next single crochet, followed by ch 1.
- Repeat (1 dc, ch 1) into each single crochet from the previous round.
- At the end of the round, make your final ch 1 and join to the third chain of the starting ch-4 with a sl st.
- You should now have 16 dc with ch-1 spaces between them.
Step 3: Setting the Corners (Round 3)
- Slip stitch into the first ch-1 space.
- Chain 3 (counts as the first dc), then work 1 more dc into the same space—this starts the corner sequence.
- In the next chain space, work 1 sc to fill the gap.
- In the following ch-1 space, create the first corner:
- Work 2 dc, ch 2, 2 dc all into the same space.
- Move into the next ch-1 space and work 1 sc. Then, repeat:
- 2 dc, ch 2, 2 dc in the next space to form the next corner.
- Continue this sequence:
- After each corner, work 1 sc into the next space.
- Alternate with 2 dc, ch 2, 2 dc to form four corners.
- Finish the round with a sl st into the top of the starting ch-3.
Note: You should now see a square shape forming, with four corners and alternating single crochets between corners.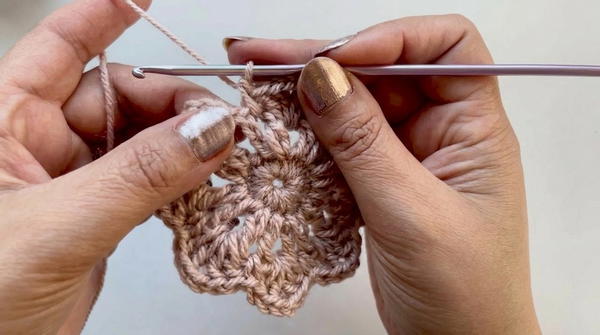
Step 4: Expanding the Square with More Rounds (Round 4)
- Slip stitch to the nearest corner space (ch-2 space). This avoids unnecessary gaps between rounds.
- Work the following sequence in each corner space:
- 2 dc, ch 2, 2 dc.
- For each side (between corners):
- Work 1 dc in each stitch along the edge.
- For each ch-3 space (created in the earlier round), work 3 dc.
- Work 1 dc on top of each sc from the previous round.
- Repeat this process for every side of the square.
- End the round with a slip stitch in the first dc of the round.
Note: The square will expand evenly with each completed round. Ensure your tension is consistent for a balanced shape.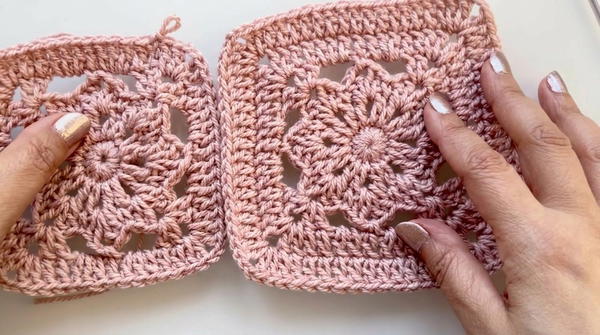
Step 5: Optional Additional Rounds
- Repeat Round 4 as necessary to increase the size of the square to your desired dimension.
- Reinforce the final shape by adding a row of single crochet:
- Work 1 sc into each dc, and (sc, ch 2, sc) into each corner space to sharpen the edges of the square.
- Finish with a sl st in the first sc.
Customization Ideas
Color Changes:
- Switch colors from the center outward to create a vibrant gradient effect. Each round can use a separate color, or alternate colors for a striped look.
Multi-Square Projects:
- Combine multiple squares to create blankets, scarves, or table linen. Use slip stitches, whip stitches, or join-as-you-go methods for assembly.
Size Adjustments:
- Increase or decrease hooks to control the density and size of the squares.
Final Finishing and Blocking
- Weave in Loose Ends: Use a tapestry needle to secure all yarn tails to prevent them from unraveling.
- Blocking: Lightly block the square for a neat and professional appearance. Use steam blocking or pin the square to your desired size and lightly spray. Allow it to air dry flat.
Conclusion
This gorgeous crochet square balances simplicity with elegance, making it ideal for various projects and uses. From single squares for coasters and small decorations to large projects like blankets and scarves, the possibilities are endless. By experimenting with colors, yarn weights, or hook sizes, you can create unique and personalized designs to suit your needs.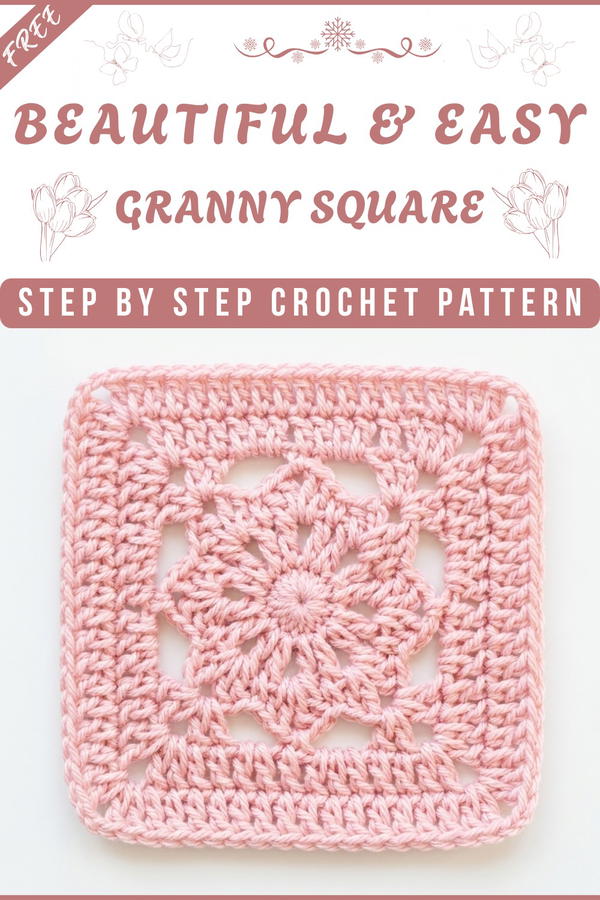
Tips for Maintaining the Pattern
- Count stitches diligently at the end of each round to ensure accuracy and symmetry.
- Maintain consistent tension throughout to keep the square even.
- If your square curls, don’t be alarmed—blocking will resolve minor inconsistencies.
- Use high-quality yarn to reduce pilling and improve the longevity of your project.