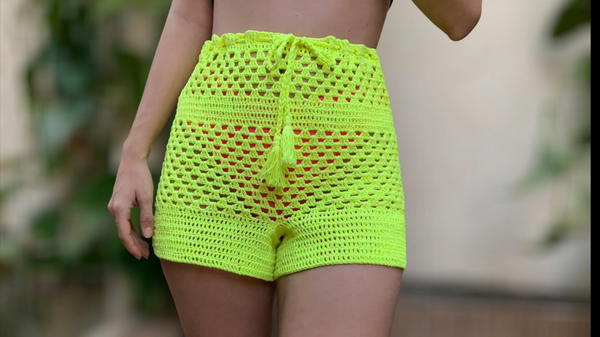
Hit the sand in style with this Crochet Beach Shorts Pattern showing airy fit playful texture and a comfy look perfect for sunny days by the shore.
Perfect for sunny days by the water, these light and breezy shorts are a must-have in your summer wardrobe. Soft and stretchy, they feel just right against the skin, keeping you cool and comfortable. Their unique crochet design adds a charming, handmade touch that sets them apart from regular shorts. The breathable fabric lets the ocean breeze flow through, making them great for beach trips, casual walks, or relaxing under the sun.
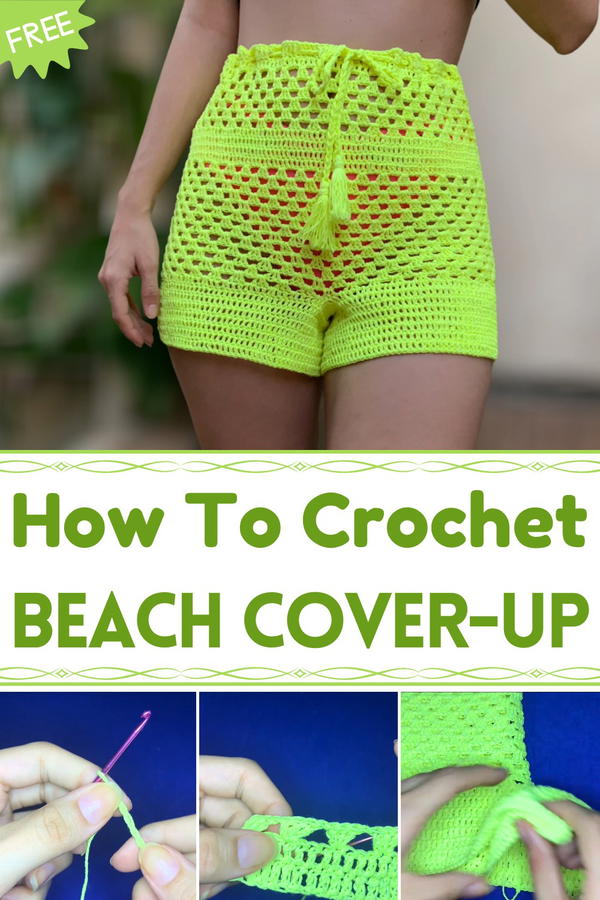
Stylish Crochet Beach Shorts Pattern That Feels Fresh and Breezy
You’ll love how easily they pair with your favorite tops or swimsuits, creating a cute and stylish look wherever you go. Made in beautiful colors, these shorts catch the eye and highlight your carefree, fun spirit. Whether you’re lounging by the shore or enjoying a casual day out, these shorts bring both style and comfort together. Lightweight and easy to wear, they’re perfect for anyone who loves summer adventures with a touch of handmade charm.
Crochet Beach Shorts Pattern
Special Features
- Made with neon jersey yarn for bright, trendy colors and soft stretch
- Comfortable elastic waistband with no zippers
- Decorative block stitch pattern—easy to learn and repeat
- Separate leg openings created with measured shaping
- Braided cord drawstring for adjustable fit and style
- Suitable for beachwear or casual summer outings
Level of Difficulty
Beginner to Intermediate
Requires basic crochet skills: chain (ch), slip stitch (sl st), single crochet (sc), double crochet (dc), working in the round and rows, and simple pattern repeats.
Materials
- Neon jersey yarn or similar (Bia used Temtex 295 yarn)
- Crochet hook size 2 mm (or preferred size for gauge)
- Measuring tape
- Yarn needle
- Scissors
Abbreviations
- ch = chain
- sc = single crochet
- sl st = slip stitch
- dc = double crochet
- st(s) = stitch(es)
Step-by-Step Instructions
1. Measurements and Preparation
- Measure your hip circumference (widest point to fit around hips and thighs).
- Measure waistband height (distance from waistband to desired short length).
- Measure thigh circumference (around fullest part of thigh).
- Optionally estimate short length by eye or client preference.
2. Starting the Waistband (Round 1)
- Begin by chaining a foundation chain equal to your hip circumference (e.g., 90 cm).
- Join the chain carefully with a slip stitch to form a loop without twisting.
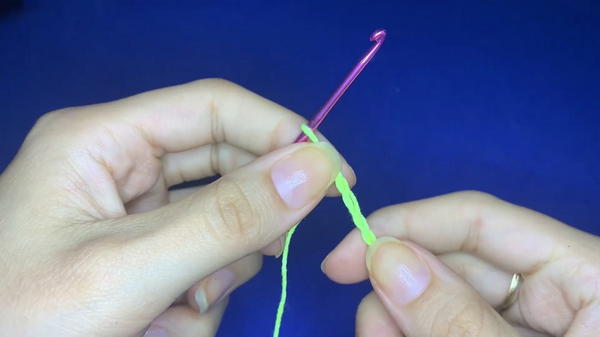
- Make sure the chain is untangled and all chains face the same way to prevent twisting during work.
3. Waistband Foundation Round (Round 2)
- Work a round of single crochet (sc) stitches evenly around the loop, joining with a slip stitch at the end.
- This forms a firm but flexible band to fit securely around hips.
- Chain 1 at the end to prepare for the next round.
4. Body of the Shorts: Double Crochet Rounds (Rounds 3–14 approx)
- Work rounds of double crochet (dc) evenly across the stitches.
- Start each round with chain 2 or 3 (counts as first dc).
- Place 1 dc in each stitch around, join with slip stitch.
- These rounds form the main body fabric and create a breathable texture.

5. Creating the Block Stitch Pattern (Rounds 15–28 approx)
Begin the decorative block pattern:
- Chain 3 (counts as first dc), then work 2 dc in the same stitch to form a cluster/block of three dc.
- Chain 1, skip 3 stitches, then make another block of 3 dc in the 4th stitch.
- Repeat this block, chain 1, skip 3 sequence around the round.
On alternate rounds, work plain dc rounds to fill between blocks.
Continue this block pattern until shorts reach desired length (typically about 13 rows of block pattern).

6. Mark and Separate the Leg Openings
- Fold garment to find midpoints on front and back of waistband; mark centers for leg openings with stitch markers or scrap yarn.
- These marks divide the shorts front and back into two leg holes.
7. Forming the Legs (Rounds 29+)
Work rows of dc stitches separately on each leg to form two tubes:
- Start at the leg opening marker, work dc stitches in rows (not rounds), making sure to keep stitch count consistent.
- Continue for desired leg length (Bia uses about 8 rows).
8. Braided Drawstring (Optional)
- Cut three equal lengths of yarn to desired cord thickness and length (Bia used triple strand technique).
- Braid or twist strands tightly to form a sturdy cord.
- Thread cord through spaces in waistband or create loops to hold it securely.
- Knot ends and trim excess.
9. Final Edging and Finishing Touches
- Add a neat border by working a round of single crochet (sc) stitches around the leg openings and waistband if preferred.
- Weave in all yarn ends with a yarn needle.
- Adjust fit with the drawstring as needed.

Tutor’s Suggestions
- Ensure your foundation chains and initial loops are not twisted to avoid fabric distortion.
- Use stitch markers at leg midpoint points for perfect symmetry.
- Maintain consistent tension for an even fabric and comfortable fit.
- Customize shorts length and width with measurement adjustment.
- Experiment with neon or other vibrant yarn colors for unique styles.
Uses
- Perfect for beachwear: lightweight, breathable, and colorful.
- Comfortable casual summer shorts.
- Unique handmade fashion accessory.
Tip
To keep your shorts looking neat, always check that your starting chain is untwisted before joining. This step prevents unpleasant twisting as you work in rounds.
Conclusion
These crochet neon beach shorts combine comfort and style in a simple, fun pattern. The stretchy fabric and block stitch texture give a breathable, eye-catching garment ready for any sunny day. With clear measurement guidelines and easy stitches, they’re a perfect project to brighten up your summer wardrobe or create a thoughtful gift.