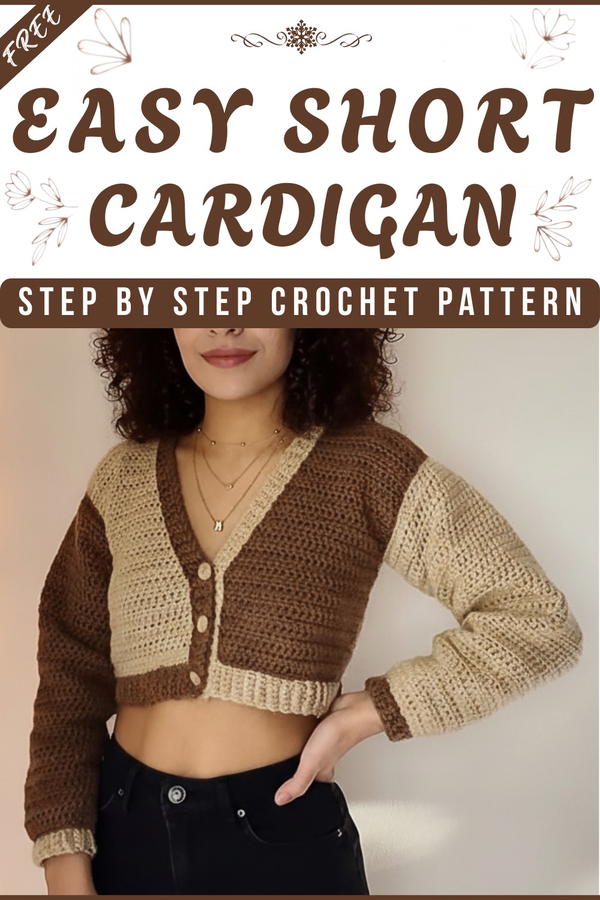
Stay cozy and chic with this stunning crochet short cardigan, a must-have for cool evenings and a heartfelt way to add charm to your favorite outfits.
Having a cozy, stylish sweater perfect for any occasion, that's what you'll get with this easy and practical crochet short cardigan pattern. This pattern lets you create a beautiful cardigan with just a few basic stitches, making it ideal even for those who are new to crocheting. The cardigan is not only soft and warm but also light and fashionable, perfect for layering over your favorite outfits.

Adorable Crochet Short Cardigans to Complete Your Look
It's great for cool evenings, casual outings, or even adding a touch of handmade flair to your work wardrobe. Made to fit snugly around your shoulders, it drapes elegantly and gives you a sense of comfort and style. With its simple yet elegant design, this crochet short cardigan becomes a stunning addition to your closet, making you look fabulous while keeping cozy. Create this lovely cardigan to enjoy or gift to someone special.

Crochet Cardigan Pattern – Step-by-Step
Materials Needed
- Two skeins of yarn in contrasting colors (4 mm wide).
- Crochet hooks: 4.25 mm and 5.25 mm.
- Yarn needle for assembly.
- Scissors and measuring tape.
- Buttons for fastening.
Step-by-Step Pattern
1. Front Panel (Make 2 – Left and Right)
Foundation Row:
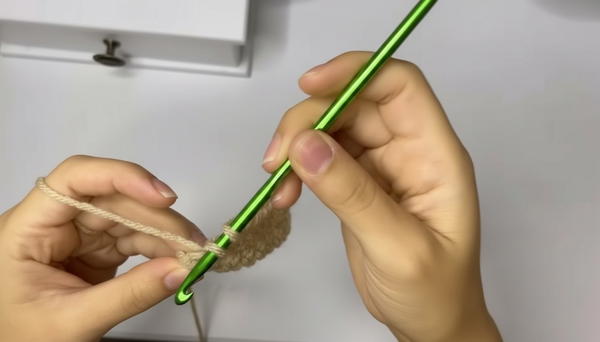
- Start with a slip knot on your hook.
- Chain 26 stitches (for size S, 19 cm wide).
- For larger sizes, add 2 chains for every 2 cm increase.
- For larger sizes, add 2 chains for every 2 cm increase.
Rows 1-10:
- Skip the first chain and start crocheting Half Double Crochets (HDC) into the second chain.
- Work across the entire row with HDC stitches.
- At the end of the row, chain 1 for height and turn the fabric.
- Repeat these HDC rows until you complete 10 rows for size S.
- For medium size: do 12 rows.
- For large size: do 14 rows.
Shaping/Decreases (Rows 11 onward):
- Begin making decreases at the start of each row to taper the piece. Skip the first stitch of the row to decrease.
- Continue crocheting until you reach the desired neckline shape:
- For size S: crochet 16 rows of decreases only.
- For medium or large sizes: Reduce the number of decreases proportionally.
- After completing decreases on one side, repeat for the opposite front panel.
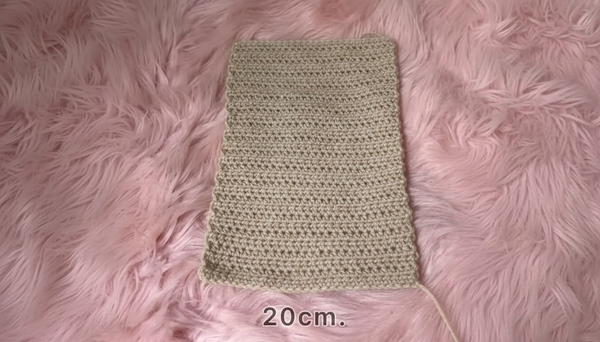
2. Back Panel
Foundation Row:
- Start with a slip knot and chain 46 stitches (for size S, approx. 34 cm wide).
- For larger sizes, increase by adding 2 chains for every extra 2 cm.
Rows 1-10:
- Work HDC across all the chains in the first row.
- At the end of each row, chain 1, turn your work, and continue crocheting with HDC.
- Complete 10 rows (S), 12 rows (M), or 14 rows (L), keeping the back panel rectangular.
Shaping (Optional):
If you want a slightly fitted cardigan, you can add minor decreases towards the waist area before returning to regular HDC stitches.
3. Sleeves
Foundation Row (Spring Cuff):
- Start with a slip knot and chain 6 stitches.
- Work HDC across the row, skipping one chain for turning at the start of each row.
- Continue crocheting spring stitch rows:
- Repeat until the piece reaches 16.5 cm (or adjust for your wrist size).
- Use a tapestry needle to attach the spring cuff to the larger sleeve.
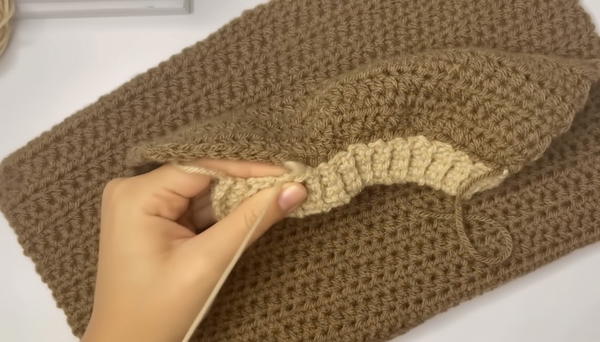
Sleeve Body Rows:
- Attach yarn to the other end of the cuff.
- Work HDC in rounds to create the body of the sleeve.
- Crochet for 14-16 rows (depending on arm length) to reach the upper arm.
- For puffed sleeves, no decreases are required for the sleeve width.
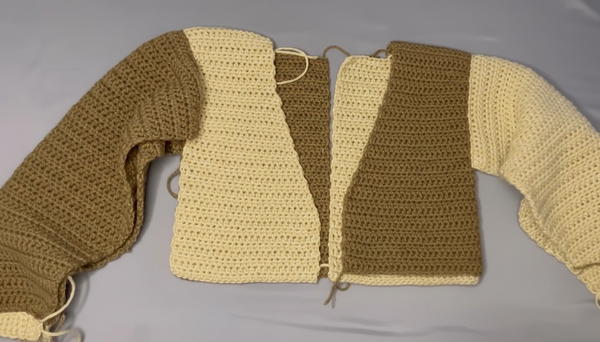
4. Assembling the Cardigan
Joining Front and Back Panels:
- Use a tapestry needle and yarn to sew the front and back panels together along the shoulders.
Adding the Sleeves:
- Pin the sleeves to the armholes using markers to ensure proper alignment.
- Sew the sleeves to the armholes with a yarn needle, working on the wrong side of the fabric.
Adding the Bottom Hem (Spring Panels):
- Crochet 4 spring strips in the same pattern as the wrist cuffs (start with 7 chains for extra width).
- Sew the spring panels to the bottom edge of the cardigan.
5. Button Strips
- Crochet two spring stitch strips for each side of the front opening.
- On the left side, make a plain spring stitch strip.
- On the right side, make buttonholes every 8 rows as follows:
- After 5 rows, make the first buttonhole: leave a space (skip one stitch) and create a chain stitch.
- Repeat this for every buttonhole required (adjust spacing based on button size).
Finishing Touches
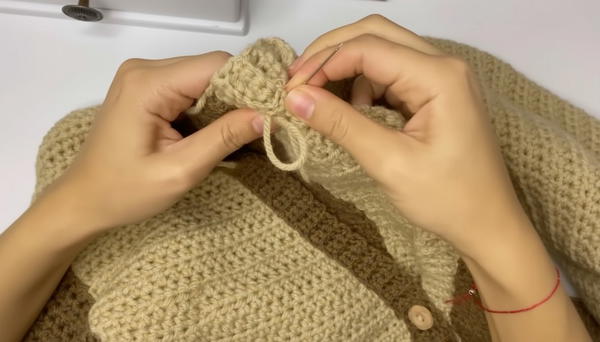
- Sew buttons precisely behind the buttonholes.
- Crochet a small border (optional): If you'd like a refined edge, crochet a line of Slip Stitches (SS) around the edges of the cardigan.
- Weave all leftover yarn ends using the tapestry needle to hide them neatly.
Conclusion:
Congratulations! By following this step-by-step crochet tutorial, you’ve crafted a versatile and stylish cardigan that’s perfect for layering or wearing on chilly days. With the unique spring-stitch finish and button details, your piece has an innovative touch to make it stand out.
Tip:
To ensure durability, wash your cardigan gently and block it for perfect alignment of stitches. If you’re experimenting with colors, try using contrasting hues for the spring stitch sections to make them pop.