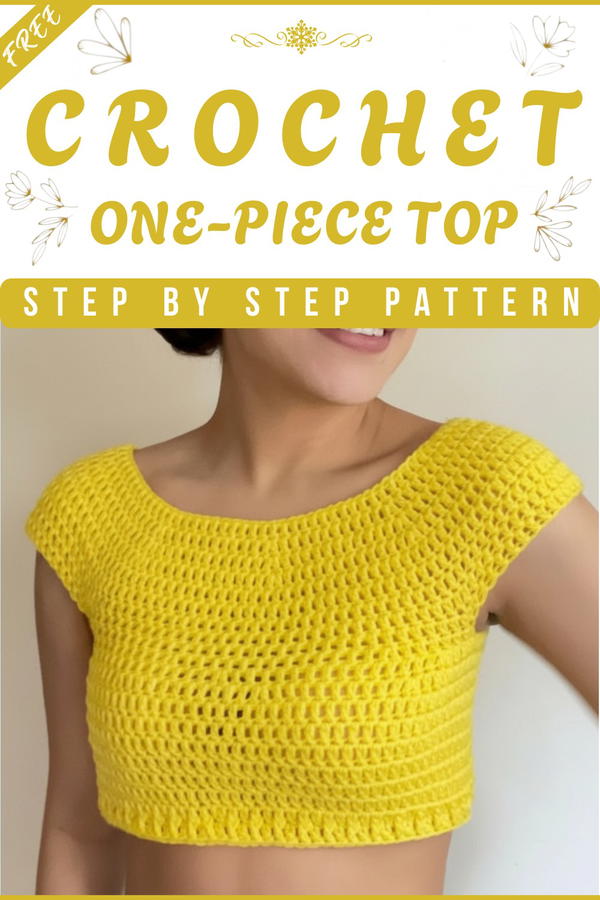
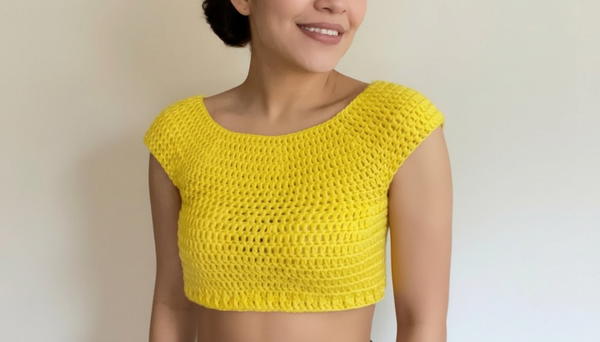
Soft and handmade clothing always feels special and cozy. A Crochet One-Piece top pattern lets anyone make a simple, beautiful top that is comfortable and stylish at the same time. Its charm comes from neat stitches, smooth texture, and a clean, flowing shape that looks attractive on everyone. The design is light and airy, making it perfect for warm days or casual outings.
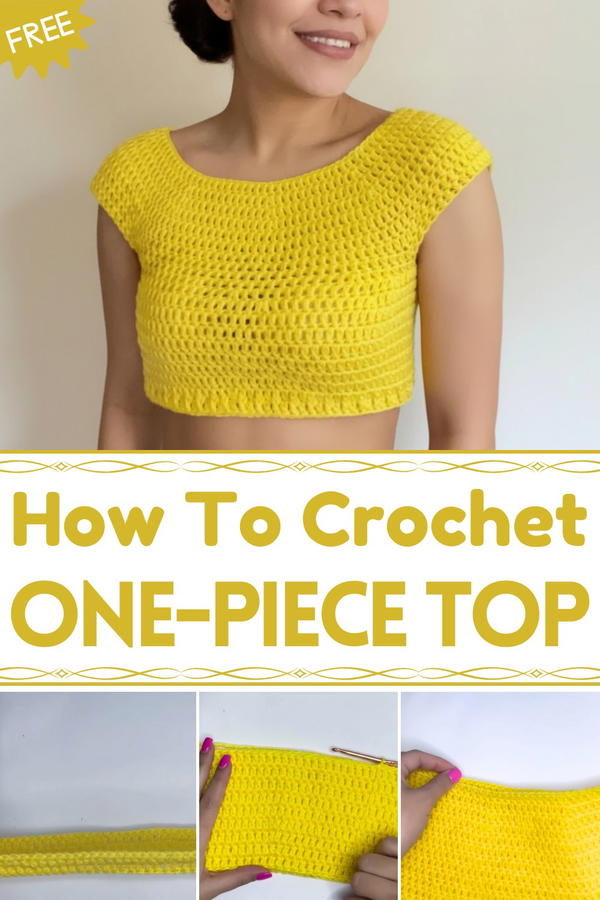
Simple Crochet One-Piece Top Pattern with Cute Design
This one-piece top can be worn alone or layered over other clothes, and it pairs well with jeans, skirts, or shorts, making it very useful in daily life. Beginners like it because the pattern is easy to follow, and it comes together quickly without complicated steps. The handmade look adds a personal touch, making each top unique. Overall, it is a soft, pretty, and practical piece of clothing that feels comfortable, looks stylish, and can be used in many simple ways every day.
Necessary Materials and Supplies
Yarn:
- 4 mm yarn (any preferred type, adjust according to your style).
- You will need yarn in at least two colors for contrast (optional but recommended).
Crochet Hook:
- 4.25 mm crochet hook (adjust size based on yarn tension).
Other Tools:
- Scissors.
- Tapestry/finishing needle (for weaving in ends).
Pattern Outline
The design consists of multiple components: starting chain, body section with accurate increases, sleeve openings, straight rounds for body length, tailored decreases for shaping, and final detailing.
Step 1: Starting Chain
Chain Foundation:
- Begin with a slip knot on the hook.
- Make a string of chains long enough to fit the width of your head plus 10 cm for ease.
- For reference, a total of approximately 100 chains is used in this example.
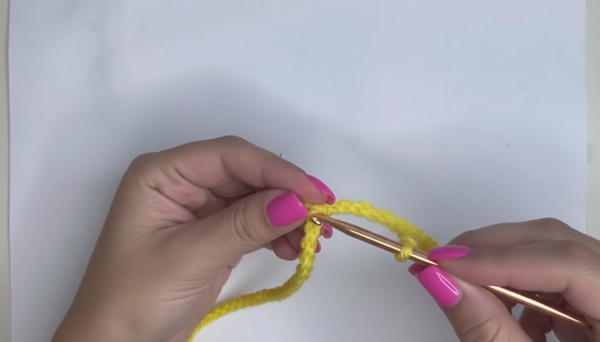
Join Chain:
- Ensure the chain doesn't twist, with the loops facing upward.
- Insert hook into the first chain, pull through the yarn, and make a slip stitch to join.
Step 2: Initial Rounds of High Points
First Round:
- Chain 2 stitches, then make 1 double crochet stitch in each chain around the loop.
- Join the end of the round with a slip stitch.
Second Round (Adding Increases):
- Start with 2 chain stitches for height.
- Work 10 double crochet stitches, followed by 1 increase (2 double crochet stitches in the same stitch).
- Repeat the sequence (10 double crochets + 1 increase) for the entire round.
Subsequent Increase Rounds:
- Third round: 11 double crochets + 1 increase.
- Fourth round: 12 double crochets + 1 increase.
- Fifth round: 13 double crochets + 1 increase.
Note: Adjust the number of rounds with increases based on your sizing needs.
Step 3: Body Section
Straight High Point Rounds:
- After the initial increase rounds, work high points evenly without increases.
- Continue for 5–6 rounds or more depending on the intended length.

Optional Adjustment for Back:
- For additional width at the back, continue working increases as follows: 13 double crochets + 1 increase in the back section of the top.
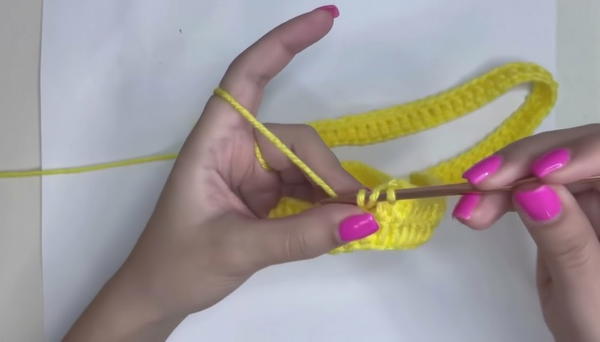
Step 4: Sleeve Openings
Divide the Top:
- Divide the number of stitches based on your sizing requirement.
- Example division:
- Back section: 37 stitches.
- Front section: 37 stitches.
- Sleeves: Skip 28 stitches total (14 on each side for each sleeve).
Creating the Sleeve Gaps:
- For each sleeve space, create 5 chain stitches for separation.
- Continue working high points in the remaining stitches for the body section.
Step 5: Length Extension
- Additional High Point Rounds:
- After completing the sleeve openings, work straight high points without increases for the body length.
- Continue until the desired length is achieved.
Step 6: Tailored Decreases
Strategic Decreases:
- In round 9, work 4 decreases to shape the top:
- Decrease 1 stitch per corner (sleeve opening and body sides).
- Decrease 1 stitch at the front middle and 1 stitch at the back middle.
- In round 9, work 4 decreases to shape the top:
How to Decrease:
- Begin a double crochet as usual but pull yarn through only 2 loops.
- Next, start another double crochet in the following stitch and pull it through 2 loops again.
- Finally, pull yarn through all three loops on the hook.
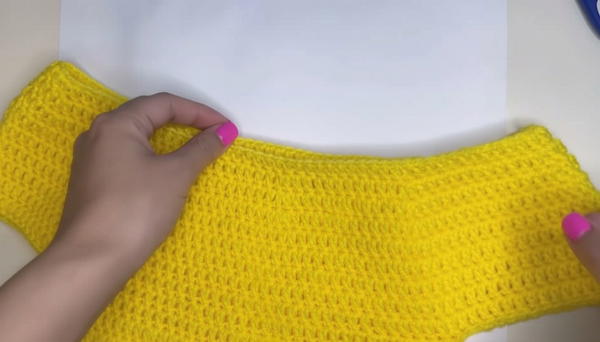
Step 7: Final Detailing and Last Round
Last Round:
- Alternate between normal double crochets and double crochets worked in the back loop only.
- Skipping one stitch occasionally creates a decorative textured effect.
Finish:
- Hide loose threads using a tapestry needle for a polished result.
- Hide loose threads using a tapestry needle for a polished result.
Tips for Success
Sizing:
- Regularly measure the top against your body for accurate fit.
- Adjust the width and number of increases/decreases as required.
Symmetry:
- Maintain even increases and decreases for balanced sections (front, back, and sleeves).
Customization:
- Experiment with alternative stitches (e.g., puff stitch or shell stitch) to add texture.
- Use contrasting yarn colors for decorative stripes or edges.
Customization Options
Sleeves:
- Extend the chain length at the sleeve openings and add decorative borders.
Edge Details:
- Replace simple high points with scalloped edges or frills for a feminine touch.
Closure:
- Add buttons or ties for a more adjustable fit.
Conclusion
This crochet top is versatile, beginner-friendly, and easy to customize for different styles and sizes. By mastering the balance of increases, decreases, and decorative techniques, you can create a tailor-made top perfect for any occasion.
Crochet Top Pattern
This detailed guide offers step-by-step directions for creating a crochet top that is comfortable, customizable, and perfect for any occasion. By following this pattern, you will combine basic stitches with increases, decreases, and unique techniques for a professional finish.