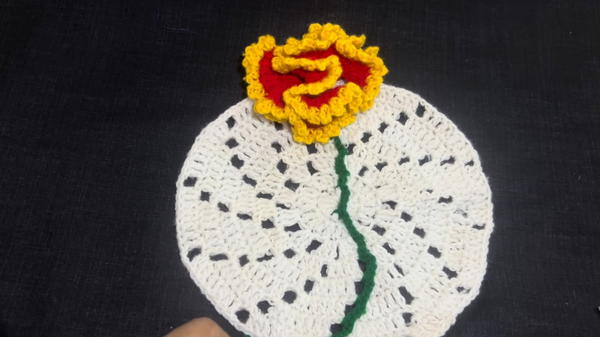
Bring cheerful charm to any space with this Free Crochet MINI Flower Bouquet Pattern, offering delicate, handmade blooms that brighten décor beautifully.
Small bouquets have been cherished for their ability to convey warmth, appreciation, and cheer, offering a simple yet meaningful way to brighten spaces or mark special moments. Handmade miniature bouquets bring this charm into a lasting form, providing beauty that doesn’t fade and versatility that fresh flowers cannot match. The Free Crochet MINI Flower Bouquet Pattern allows crafters to create delicate blooms that can be arranged into charming bouquets, ideal for decorating desks, shelves, or small corners of a room.
Bright Crochet MINI Flower Bouquet Pattern to Celebrate Spring

Lightweight and durable, these mini bouquets serve as thoughtful gifts, party favors, or keepsakes for celebrations, adding color and texture wherever they are placed. Each flower is crafted with careful attention to layers and stitches, producing a lifelike and dimensional effect that elevates even the smallest arrangement. Step-by-step instructions guide crocheters of all skill levels, making the project approachable while encouraging focus and mindful engagement.
Beyond aesthetic appeal, the process offers a relaxing and rewarding experience, turning simple yarn into tiny works of art. Finished mini bouquets allow for endless customization in colors and styles, transforming everyday spaces into cheerful displays and giving both crocheters and recipients a sense of joy, creativity, and lasting handcrafted elegance.
Materials Required
- Yarn:
- White (base)
- Red (for flowers)
- Yellow (flower detail)
- Green (for leaves)
- Crochet hook: Size 12
- Scissors: To trim excess yarn
- Yarn needle: For weaving in loose ends
Step-by-Step Instructions
Step 1: Create the Round Base
- Start by taking white yarn.
- Form a magic ring or chain and close it to form a circle.
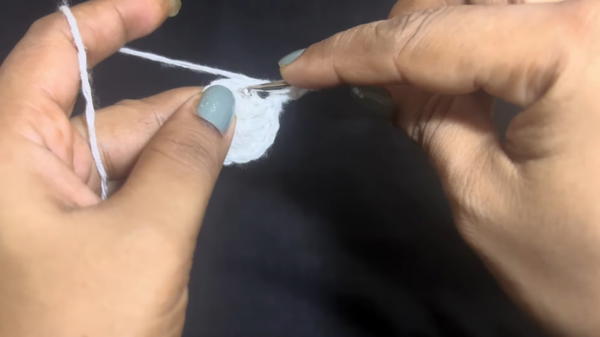
- Begin crocheting 12 double crochets inside the ring.
- Tighten the ring, close with a slip stitch to join the first and last stitches. This forms a perfect round shape.
Step 2: Adding More Rounds
Second Round:
- Chain two stitches.
- For each stitch in the previous round, make two double crochets, effectively doubling the stitch count to 24.
- Use a slip stitch to close the round.
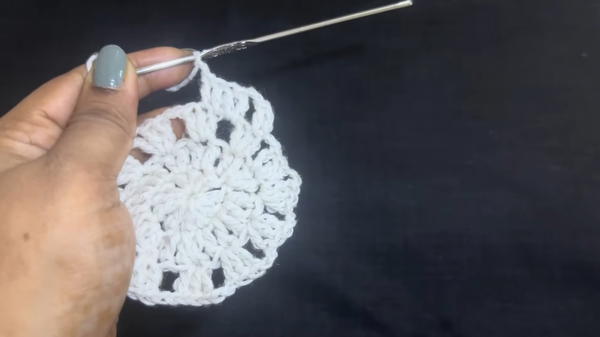
Third Round:
- Chain two stitches.
- Skip one loop and make three double crochets in the same place.
- Chain two more and repeat, skipping stitches as necessary, until you’ve created 12 sets of three double crochets.
Continue forming subsequent rounds, increasing loops gradually:
- Fourth round: Add four double crochets per loop.
- Fifth round: Shift to five double crochets using the same process.
Repeat this process until six rounds are complete. The design will shift to a "mandala" format with a balanced pattern where the number of increases matches the pattern symmetry.
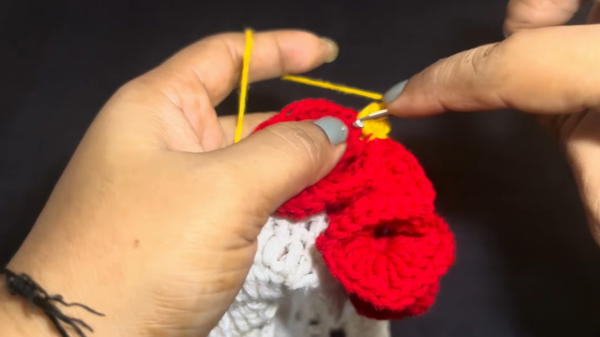
Step 3: Creating the Flowers
- Take red yarn for the flowers. Crochet at the top of the base design.
- Start single crochets on all the double crochets.
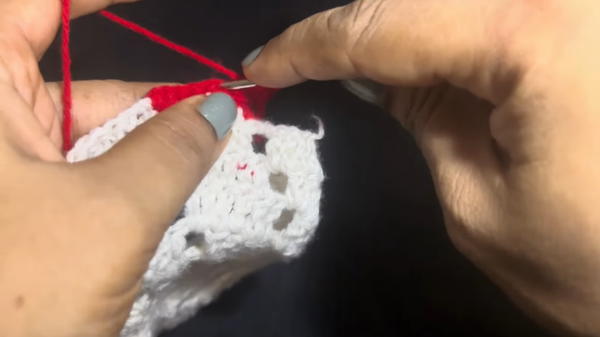
- Reverse the work to form loops and add four double crochets inside one loop, then chain and repeat.
- Form the flower's petals by systematically increasing loops.
- Once completed, join the edges with a single crochet to form the petal base.
Create two rounds of petals (using four double crochets) to achieve a fuller flower effect.
Step 4: Flower Detailing
- Use yellow yarn for extra detailing on the flowers.
- Add embellishments by crocheting three chains in between petals.
- Secure the yarn with single stitches to create a textured finish for the flowers.
Step 5: Adding the Leaves
- Choose green yarn for the leaves.
- Attach the yarn below the flower petals in a straight strip.
- Create chains (2-3 stitches) and single crochets to mimic the structure of leaves.
- Rotate around the base of the flowers to make a complete circle of greenery.
Step 6: Folding into a Mini Bouquet
- Shape the finished piece into a bouquet:
- Fold one side inward.
- Repeat for the opposite side, ensuring symmetry.
- Use red yarn to tie a decorative knot or ribbon-like texture on the midsection to hold the folds together.
- This step completes the transformation into a miniature bouquet depending on usage.

Special Features
- Two-In-One Design: The piece functions both as a tray cover and a decorative bouquet.
- Customizable Colors: The design allows you to mix and match colors based on your preference or the occasion.
- Festival Inspiration: Perfect for Mata Rani pooja during Navratri, gifting, or home décor.
- Portable and Small: Lightweight design that can fit into Puja thalis or act as a standalone gift.
Level of Difficulty
The overall project is beginner-friendly, though intermediate crocheters may appreciate the intricacies of shaping the flower and bouquet. Key skills like double crochet, slip stitch, and simple shaping are required. The tutor breaks the process into clear, manageable steps ideal for learners.
Tutor’s Suggestions
- Yarn Tension Matters: Ensure even tension for consistent and professional-looking stitches.
- Weave Ends Securely: Avoid loose threads that may unravel by weaving in securely after every floral section.
- Experiment with Colors: Choose bright and complementary colors to make the flowers and leaves stand out.
Uses
- Festival Purpose: Perfect as a decorative piece for pujas and festivals like Navratri.
- Gifting: Acts as a thoughtful handmade gift for loved ones.
- Décor Addition: Works as a table centerpiece, bouquet, or tray cover.
- Craft Practice: Enhances crochet skills by introducing techniques like floral detailing and shaping.
Tip
Pro Tip: When creating the bouquet folds, ensure symmetry by folding gradually and securing tightly at the center. Small adjustments can perfect the final look.
Conclusion
The Flower Bouquet design is not only trendy but also deeply versatile. This step-by-step project is quick to make, taking only about 10-15 minutes, and allows flexibility with colors and design. Suitable for festivals, gifting, or decorations, this project is a creative way to enhance your crochet skills while producing something truly beautiful.


