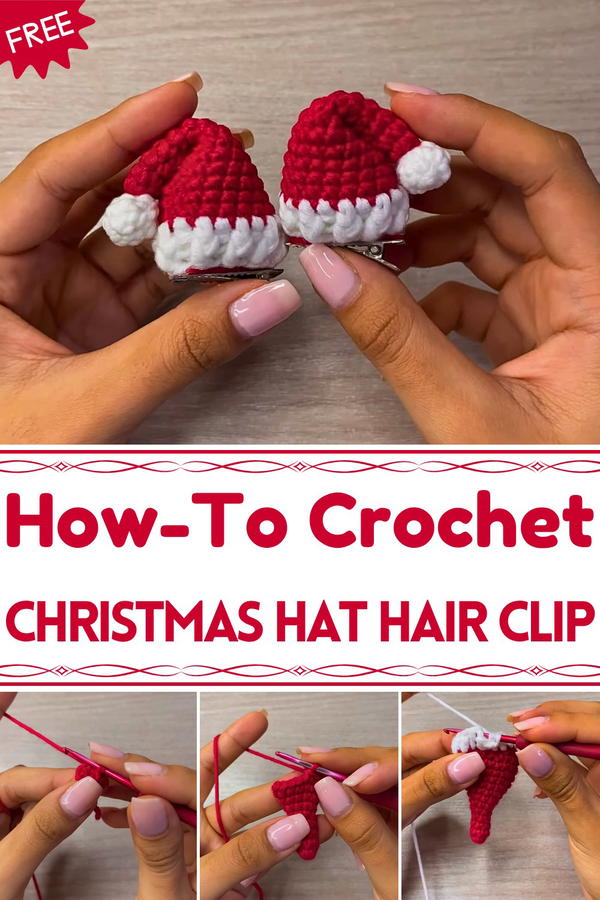
Sprinkle festive cheer on your hairstyle with this Free Crochet Christmas Hat Hair Clip Pattern, a playful and charming accessory for holiday fun.
During the holiday season, even the smallest details can spark joy and bring a smile to loved ones. The Free Crochet Christmas Hat Hair Clip pattern captures that spirit, turning a simple accessory into a festive statement. Miniature hats, handcrafted with cheerful textures, add a playful and whimsical touch to hairstyles, making them perfect for parties, school events, or cozy family gatherings.
Lovely Crochet Christmas Hat Hair Clip for Holiday Hairstyles
Lightweight and comfortable, these clips hold securely without causing discomfort, allowing both children and adults to enjoy them throughout celebrations. Their compact size makes them versatile, they can accent ponytails, headbands, or even decorate gifts and holiday décor. The repetitive, rhythmic stitching offers a relaxing and satisfying experience for crocheters of all skill levels, while the finished pieces bring tangible joy to everyday moments.
Beyond personal use, these hair clips serve as thoughtful handmade gifts, adding a personal and festive touch that store-bought items often lack. Each stitch contributes to both charm and functionality, creating a balance between playful design and practical wear. By incorporating bright colors, seasonal textures, and easy-to-use clips, this project enhances holiday cheer in subtle yet memorable ways, turning simple hairstyles into joyful expressions of festive creativity and handmade warmth.

Materials Needed
- Yarn: Red and white yarn (2mm thickness recommended).
- Knitting Needle: 2.5mm crochet needle.
- Hair Clip: A 3 cm hair clip or one of similar size.
- Felt: A small piece of felt (preferably white, but red will also work) to cover the hair clip.
- Basic Tools: Scissors, a wool needle, and silicone glue (cold or hot glue).
Special Features of the Christmas Hat Hair Clip
- Cute and Festive: The Christmas hat motif is perfect for the holiday season and can be customized with different yarn colors or additional embellishments.
- Beginner-Friendly: The project primarily uses basic stitches, making it easy to follow even for those new to crochet.
- Quick to Make: Each clip can be made in a relatively short amount of time and is an excellent stash-buster project.
- Functional yet Decorative: Ideal for adding a festive touch to your hairstyle or gifting to friends and family.
Level of Difficulty
The project is beginner-friendly, as it uses mainly single crochets, double crochets, slip stitches, and a magic ring. The tutorial offers clear instructions for each step, though some slight experience with basic crochet techniques is helpful. The most challenging aspect might be forming the "relief stitch" if you're new to it, but the video provides a thorough explanation.
Step-by-Step Details
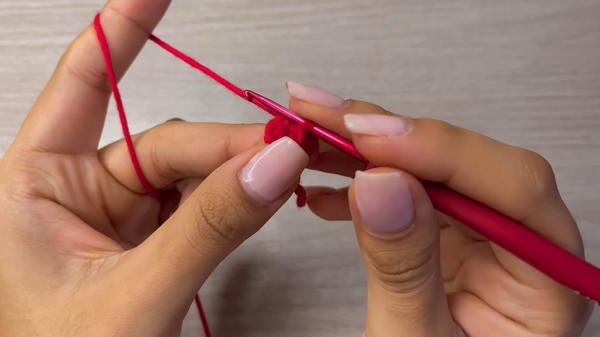
Step 1: Starting with the Red Christmas Hat Body
Make the Magic Ring:
- Using the red yarn, start with a magic ring.
- Crochet 6 single crochets (SC) into the ring, then pull it tightly to close.
Work Height with Single Crochets (Rounds 2–5):
- For the next four rounds (2–5), crochet one single crochet in each stitch from the previous round. You will maintain 6 single crochets per round.
Increasing the Hat's Width:
- Round 6: Alternate 1 single crochet and 1 increase (repeat 3 times). You should have 9 stitches at the end of this round.
- Round 7: Crochet 1 single crochet in each stitch, for a total of 9 stitches.
- Round 8: Crochet a sequence of 2 single crochets, 1 increase (repeat 3 times). You will now have 12 stitches.
- Round 9: Alternate 3 single crochets and 1 increase (repeat 3 times) to reach 15 stitches.
- Round 10: Crochet 1 single crochet in each stitch (total: 15 single crochets).
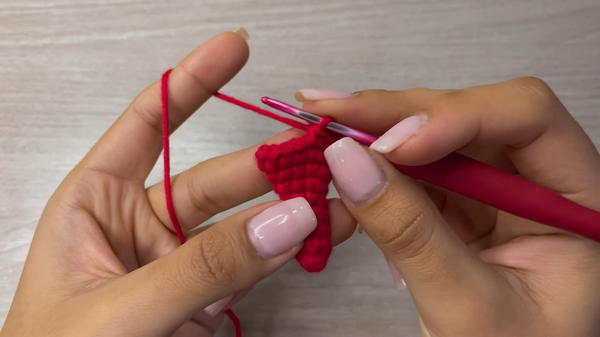
Continue With Increases and Height (R11–R14):
- Round 11: Alternate 4 single crochets and 1 increase (repeat 3 times) to reach 18 stitches.
- Rounds 12–14: Crochet 1 single crochet in each stitch, continuing for 3 rounds to add height.
Finish and Close the Hat:
- Crochet a slip stitch in the next stitch and cut off the red yarn, leaving a medium-length tail.
- Using a wool needle, form a clean finish by creating a "false stitch." Thread the yarn through the next stitches to hide it.
Step 2: Creating the White Trim
Attach the White Yarn:
- Insert the needle into any stitch at the base of the hat to attach the white yarn.
- Crochet 2 chains to begin.
Form the Brim with Double Crochets:
- Crochet 1 double crochet (DC) in each stitch around the hat.

- Crochet 1 double crochet (DC) in each stitch around the hat.
Add a Relief Stitch:
- Alternate between front-post double crochets and back-post double crochets to create the coiled, spring-like effect.
Finish the Brim:
- Once complete, slip stitch into the first double crochet, cut the yarn, and thread in the tail.
Step 3: Making the Pom-Pom
Start with the Magic Ring:
- Using white yarn, create a magic ring and make 6 single crochets into it.
Build Height:
- Crochet 1 single crochet in each stitch for the next two rounds (R2–R3).
Close the Pom-Pom:
- Thread the needle through the front loops of each stitch and pull tight to close, forming a rounded shape.
Attach the Pom-Pom:
- Sew the pom-pom securely to the top center of the hat using red yarn. Place 2–3 discrete stitches to ensure it's firmly attached.
Step 4: Final Assembly
Add the Hair Clip:
- Cover the hair clip with felt (glue the felt for a better finish). If white felt is unavailable, red felt can be used.
- Position the clip inside the base of the hat and use silicone glue to fix it securely in place.
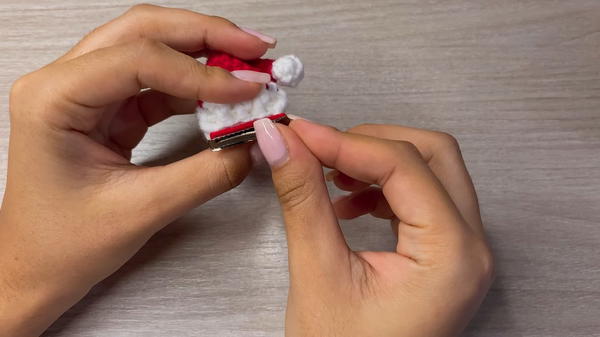
Fold and Shape the Hat:
- Fold the top of the hat so the pom-pom tilts to one side for a festive look. Use a needle and thread to secure this fold tightly.
Tutor's Suggestions
- Use stitch markers to keep track of rounds, especially when increases are involved.
- Practice the relief stitch on scrap yarn before creating it on the hat to get the hang of it if you're new to this technique.
- Personalize the project by adding glitter or beads to the brim of the hat or using different colored yarns.
Uses of the Christmas Hat Hair Clip
This festive accessory is suitable for:
- Holiday hairstyles for kids and adults.
- Gifts for friends, family, or coworkers during the holiday season.
- Seasonal craft fairs or markets.
- Decorative items (like attaching them to gift wraps or wreaths).
Bonus Tip
For a perfect finish, avoid pulling too tightly when working the relief stitch—it needs to maintain its shape to create the distinct coiled look.
Conclusion
This festive crochet project is a delightful addition to your holiday crocheting list! Not only does it add a whimsical touch to hairstyles, but it's also a quick, easy, and creative handmade gift for loved ones. With its clear step-by-step instructions and simple stitches, this project is perfect for beginners and seasoned crocheters alike.


