Wrap your favorite mug in charm and comfort with this Free Crochet Cup Cover Pattern that adds warmth, texture, and a personal touch to every sip.
On chilly mornings when steam curls gently above a favorite mug, the warmth often slips away faster than the first sip. That’s where a soft, stylish cup cover steps in, offering both charm and function. This small but thoughtful accessory keeps your drink warmer for longer while giving your cup a cheerful, customized look. The Free Crochet Cup Cover Pattern appears as a delightful way to bring comfort and personality to everyday rituals. Whether wrapped around a coffee mug, tea cup, or travel tumbler, its snug fit adds a layer of insulation while protecting your hands from excessive heat.
From Stash to Statement Free Crochet Cup Cover Pattern to Try Now
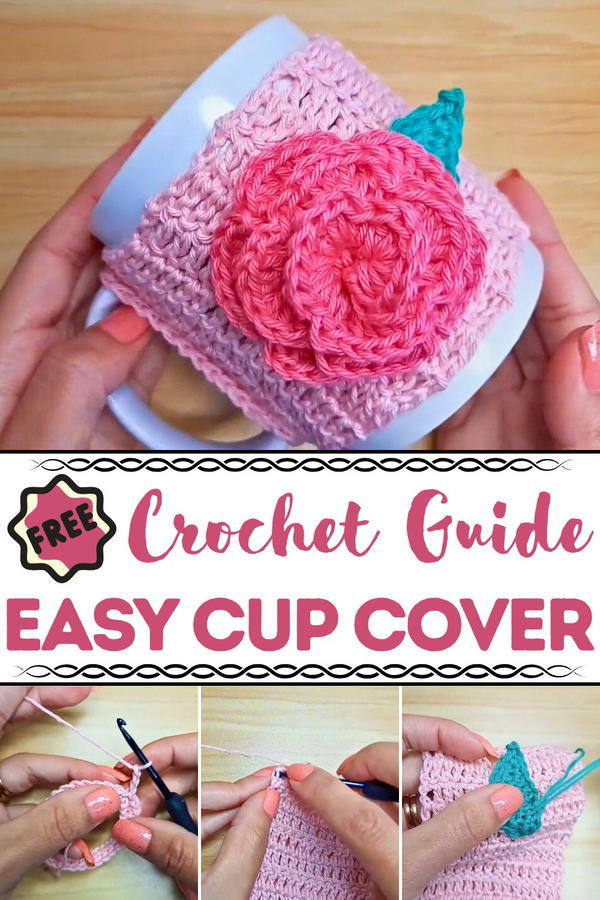
With textured stitches that add visual appeal, this cup cover brings a touch of coziness to your desk, kitchen counter, or picnic table. It’s a smart way to use up leftover yarn and makes a thoughtful gift paired with a favorite mug or bag of tea.
Easy to slip on and remove, it’s washable, reusable, and eco-friendly, perfect for those who appreciate beauty with purpose. The vibrant options in color and style allow for a personalized finish, making it ideal for seasonal themes or everyday use. Keep mornings warmer and more delightful, one mug at a time, with this charming crochet accessory.
Step-by-Step Guide for the Cup Cover
1. Materials Needed
- Cotton thread (preferably 100% cotton in 3 colors: light pink, stronger pink, and green).
- Crochet hook – size 3 (recommended for the thread type used).
- Wool needle.
- Scissors.
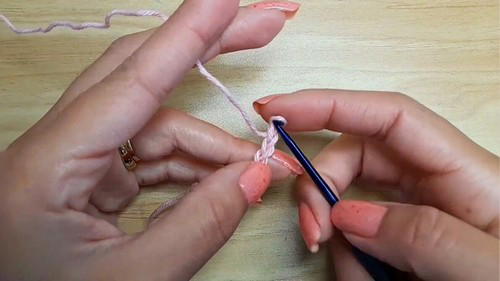
2. Initial Setup
- Begin by making a slip knot.
- Chain Stitch Foundation: Crochet 32 chains using the cotton thread. Ensure your chains measure approximately 14 cm to fit the bottom handle of a mug.
- Join the Chains: Connect the last chain to the first using a slip stitch. Confirm the chains are aligned and not twisted.
3. Working the Body of the Cover
Single Crochet Row
- Start with one chain to go up.
- Crochet 32 single crochets, working along the entire row.
- At the end, join the last stitch to the first with a slip stitch.
Double Crochet Rows
- Go up with three chains—these count as your first double crochet.
- Crochet 16 double crochets in total, covering half of the stitches (adjust based on the number of chains if different from 32).

- Turn your work and repeat:
- Go up with 3 chains.
- Complete double crochets until the row is finished.
- Repeat this process until you have 21 rows of double crochets.
- Measure your work (final height = 23 cm) and ensure it fits snugly over a standard mug.
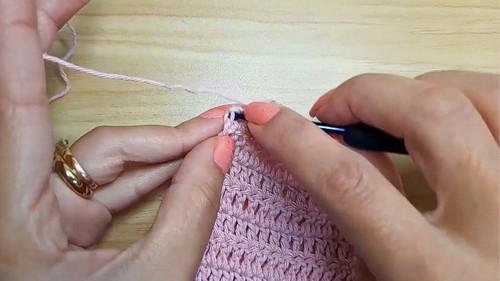
Finishing with Single Crochet
- Go up with one chain.
- Complete one single crochet in each stitch for the final row around the cover.
4. Decorative Add-ons
Making a Rose
- Use the stronger pink thread.
- Base Chain: Crochet 27 chains.
- Go back to the 5th chain and start V-stitch clusters:
- Crochet one double crochet, two chains, and another double crochet in the same chain.
- Skip one chain and repeat the V-stitch until the end.
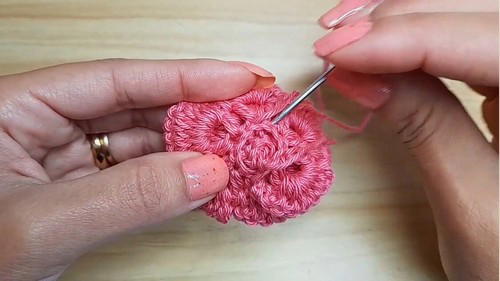
- Second Row:
- Fill each V-stitch with 7 double crochets.
- Between each V-stitch, make a single crochet.
- Roll the piece to form the rose and secure it by sewing the back of the flower using long threads left from the start and finish.
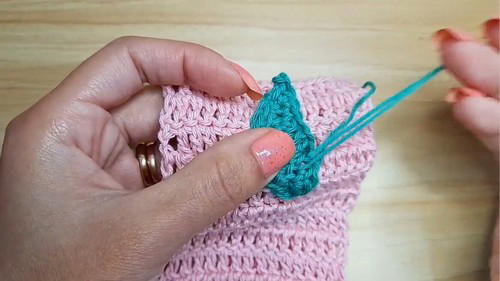
Making Leafs
- Use the green thread.
- Base Chain: Crochet 10 chains.
- Create symmetrical stitches:
- Work on both sides of the chain to form the leaf design (single crochet, half double crochet, double crochet, picot stitch, etc.).
- Leave thread for sewing.
5. Assembling the Cover
- Fold the cover in half.
- Sew the rose and leaf in the middle of the folded design, ensuring the leaf remains visible in the bottom half.
- Secure the edges and hide loose threads for a clean finish.
Special Features
- Versatility: Customize the design with other colors or materials.
- Giftability: Perfect for Valentine's Day, Mother's Day, or any special occasion. Add chocolates or candies in the mug for extra personalization.
- Durability: Can be hand-washed if sewn properly (adhesives may weaken after washing).
Tutor’s Suggestions
- Use the recommended crochet hook size (3) for accuracy and alignment.
- Adjust chain counts and rows to fit different mug sizes.
- Consider adding personal touches like embroidery or beads to enhance the appearance.
- Check thread measurements and tension to ensure the final product fits snugly.
Level of Difficulty
- Beginner-friendly: This project starts with basic stitches such as chain, single crochet, double crochet, and slip stitches. The rose and leaf designs add a slightly moderate challenge.
Uses
- Mug cover to keep your drink warmer for longer.
- A decorative piece for mugs to brighten up your table setting.
- Thoughtful handmade gifts for loved ones, potentially paired with treats or small surprises.
Tip for a Better Outcome
When sewing the decorative elements (rose and leaf), focus on the rose edges to ensure its petals appear elevated for a more realistic and elegant look.
Conclusion
With simple materials and basic crochet techniques, Joselyn's mug cover tutorial provides both a creative challenge and a rewarding result. Whether you’re making it as a personal item or gifting it, this handmade crochet is perfect for adding a touch of warmth and charm to your everyday life.


