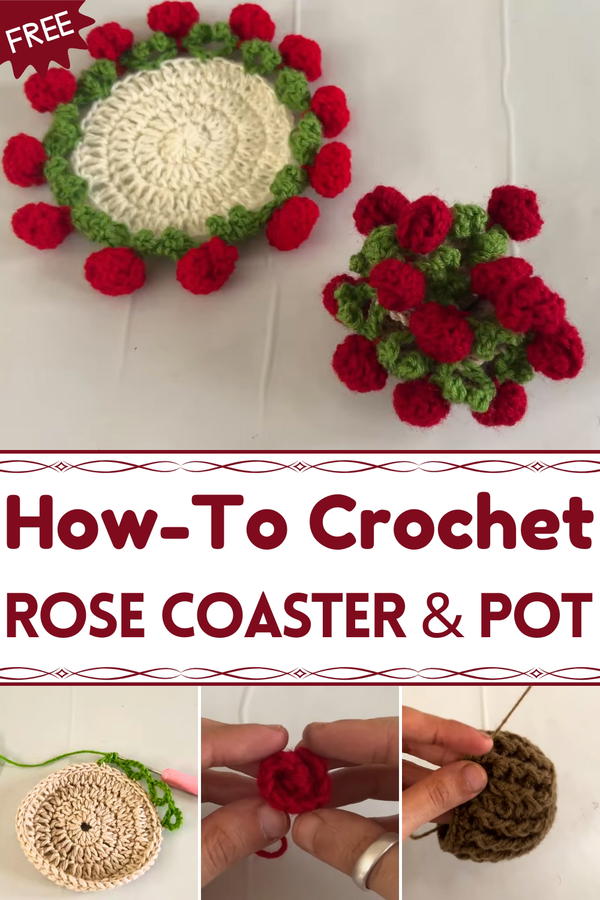
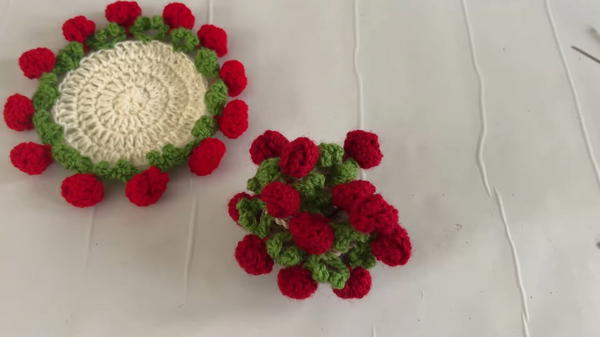
Grace your table with this Free Crochet Rose Coaster Pot Pattern, bringing a delicate handmade bloom that adds charm and lasting beauty to any setting.
Roses symbolize love and elegance, bringing a timeless sense of charm to any setting. A Free Crochet Rose Coaster Pot pattern captures that natural beauty in a lasting, practical accent that brightens everyday spaces. Perfect for shielding tabletops from hot mugs or chilled glasses, it also works as a decorative holder for small planters, candles, or keepsakes. The process of shaping each layered petal encourages calm focus, allowing a soothing rhythm to unfold while a graceful piece takes form.
Table Glow Crochet Rose Coaster Pot for Everyday Meals
Its textured surface adds both visual appeal and sturdy protection, ensuring furniture stays safe while adding a romantic touch. With limitless color possibilities, classic reds for tradition, soft pastels for subtle charm, or bold hues for a modern twist, each coaster pot can reflect personal style or seasonal décor. Lightweight and easy to move, it fits beautifully in kitchens, dining rooms, workspaces, or gift baskets.
Whether displayed as a centerpiece, presented as a thoughtful handmade gift, or enjoyed as a daily accent, this rose-inspired accessory pairs utility with lasting beauty. A Free Crochet Rose Coaster Pot pattern provides a graceful way to keep surfaces stylishly protected while celebrating the enduring appeal of flowers.
Materials Needed
Yarn:
- Cotton yarn for the coaster base and acrylic yarn for the leaves and roses (colors like blue, green, and red are used).
Hook:
- 3mm crochet hook.
Additional Tools:
- Scissors.
- Tapestry needle for sewing ends.
Step-by-Step Instructions
Step 1: Crochet the Coaster Base
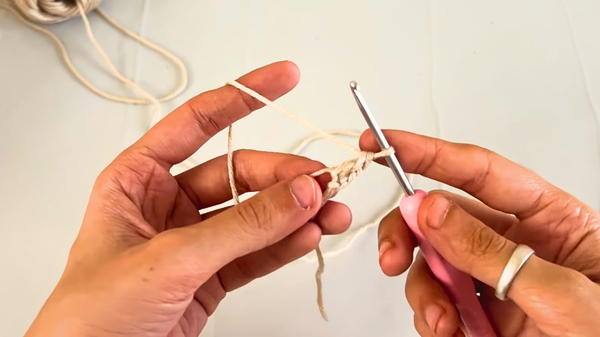
- Start with a Magic Ring:
- Wrap yarn around two fingers to create a magic ring. Insert the hook, pull the second string, and chain one to secure the magic ring.
- Add Base Stitches:
- Chain 3 and make 12 double crochets into the ring. Pull the string tightly to close the ring.
- Finish the round with a slip stitch in the first double crochet (skip the initial chain).
- Round 2 - Double Crochet Increases:
- Chain 3, then crochet 2 double crochets in the top of each double crochet from the previous round to form 24 stitches in total. Slip stitch to close the round.
- Round 3 - Increasing Pattern:
- Chain 3. Make 1 double crochet in the first stitch, followed by 2 double crochets in the next stitch (increase). Alternate this pattern (1 DC, 2 DC) to the end to form 36 stitches. Slip stitch to close.
- Round 4 - Wider Base Circle:
- Chain 3. Crochet 2 double crochets (1 each in the next 2 stitches). On the third stitch, make 2 double crochets (increase). Repeat this pattern (2 DC, 1 increase) throughout the round to reach 48 stitches. Slip stitch to close.
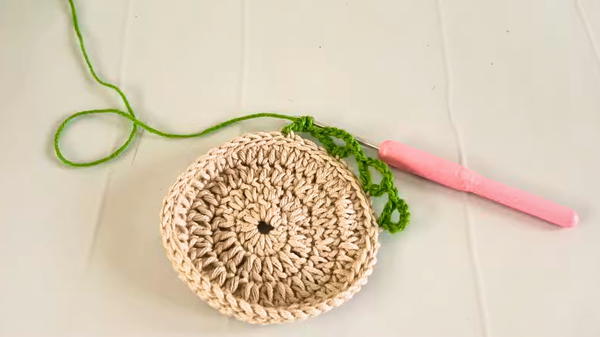
Step 2: Add Decorative Edge
- Back Loop Only Slip Stitches:
- Chain 1, and make slip stitches in the back loops of all the stitches from the previous round. Keep your tension loose to maintain a flat shape.
- Chain 1, and make slip stitches in the back loops of all the stitches from the previous round. Keep your tension loose to maintain a flat shape.
- Flatten the Coaster:
- If the coaster edges curl, gently stretch and shape it to flatten the surface before continuing.
Step 3: Crochet the Leaves
- Attach green yarn in the back loops from the previous round.
- Chain 6 and Double Crochet:
- Chain 6, then make 1 double crochet in the same stitch.
- Chain 1, skip 3 stitches, and create another double crochet. Repeat this pattern to create loops for all leaves.
- Leaf Detailing:
- Chain 3, make a slip stitch in the first chain, single crochet in the second, and slip stitch into the loop. This forms a small leaf. Repeat for all loops.
Step 4: Make 12 Roses
- Start with a Slip Knot and Chains:
- Use red yarn to make a slip knot and then chain 10.
- Create Rose Spiral:
- Skip the first 2 chains, and in the 3rd chain make a double crochet increase (2 DC in the same space). Repeat double crochet increases for 6 chains.
- For the next 2 chains, make single double crochets.
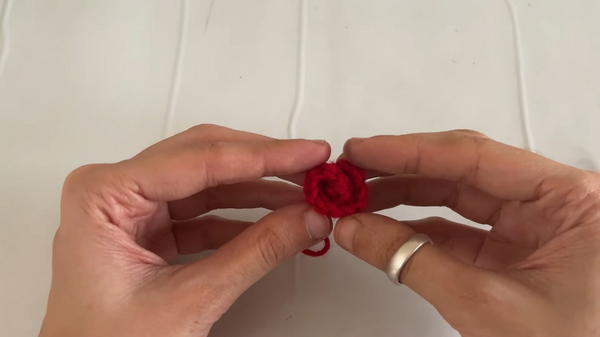
- Slip stitch into the last chain. The rose will fold itself into a spiral.
- Shape the Flower:
- Give the rose its shape by folding it inward. Use a hook or needle to connect the edges as needed.
Step 5: Attach Roses to Coaster
- Use the space between leaves to attach each rose.
- Fasten roses securely by tying knots and trimming yarn ends.
Step 6: Crochet the Pot Base
- Magic Ring:
- Use brown yarn to make a magic ring and work 6 single crochets into it. Close the ring tightly.
- Increase Rounds:
- Round 2: 2 single crochets in each stitch (12 stitches).
- Round 3: 1 SC, 1 increase (18 stitches).
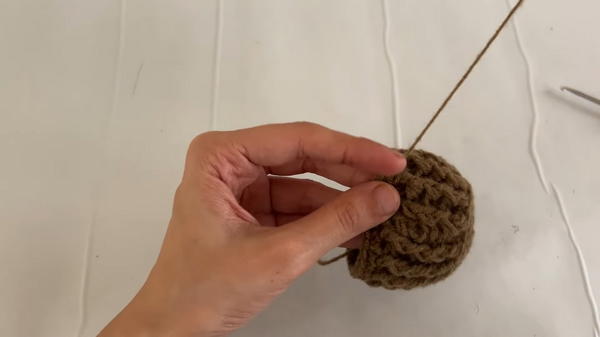
- Round 4: 2 SC, 1 increase (24 stitches).
- Round 5: 3 SC, 1 increase (30 stitches).
- Pot Body:
- Chain 2 and work double crochets in the back loops of each stitch. Alternate between front-post and back-post double crochets to create a ribbed texture.
- Repeat this pattern for 3 additional rounds.
Special Features
- 3D Roses and Leaves: The raised flowers and leaves add texture and dimension to the coaster.
- Functional and Decorative: Acts as both a coaster and a centerpiece.
- Customizable Design: You can adjust the number of roses, colors, and pot size.
Level of Difficulty
The project is beginner-friendly, with clearly explained steps and basic stitches like magic rings, single crochet, double crochet, slip stitches, and chains. However, intermediate crocheters will enjoy the design techniques for adding texture.
Tutor’s Suggestions
- Stretch and Shape as You Go: If the coaster starts curving, loosen your tension and gently stretch the piece for a flat shape.
- Use the Right Yarn: Stick to cotton yarn for the base for better shape retention. Acrylic yarn can be used for decorative elements like flowers and leaves.
- Keep Stitches Loose: Especially during slip stitching for the edges.
- Secure Roses Tightly: Ensure that the flowers are firmly fastened to avoid them coming loose during use.
Uses
- Perfect as a coaster for mugs, pots, or vases.
- Beautiful handmade gift item.
- Brightens up kitchen or dining table décor.
- Great as a small display piece or ornament.
Tip for Success
When working on the roses, use a yarn needle to secure their spirals tightly before attaching them to the coaster. This ensures the flowers hold their shape longer and adds durability to your design.
Conclusion
This detailed tutorial offers a perfect balance of creativity and functionality. The rose pot coaster is a beginner-friendly project with stunning 3D features like roses and leaves, making it an elegant addition to any space.


