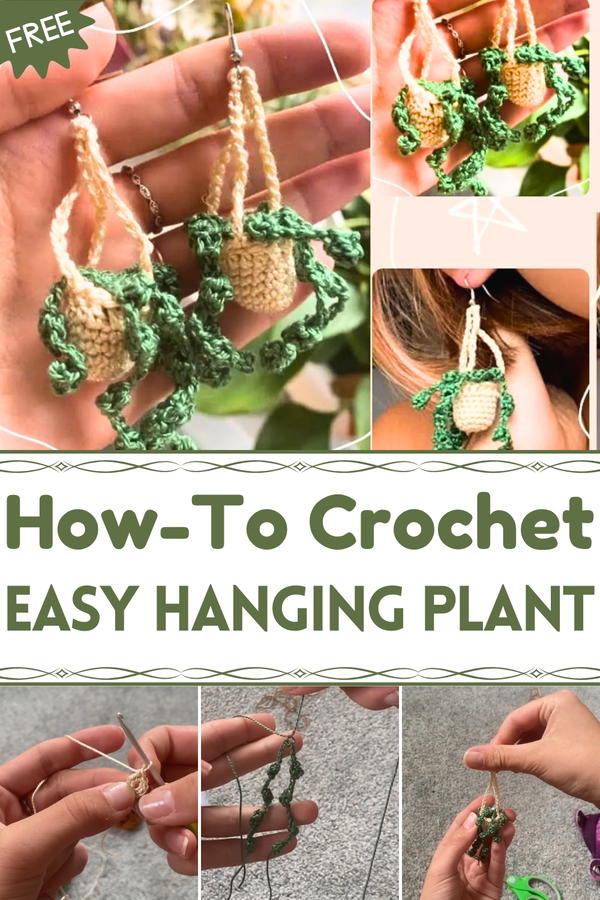
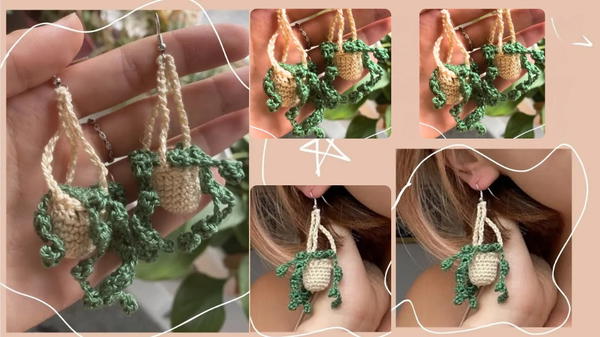
Green up your space with this Crochet Hanging Plant pattern, a fresh design that brings lasting botanical charm to décor or thoughtful gifts.
Home décor often shines through the smallest details, and greenery has long been a favorite way to bring freshness into any space. The Crochet Hanging Plant pattern offers a creative way to enjoy that beauty without the upkeep of live plants. With lifelike leaves and cascading strands, it adds natural charm to walls, shelves, or windows, brightening rooms with its soft textures and lasting appeal. Lightweight and durable, it can be hung easily in places where real plants may not thrive, such as offices, bedrooms, or low-light corners.
Bloom Crochet Hanging Plant with Whimsical Spirit
Its maintenance-free nature makes it especially practical for those who love greenery but lack the time for watering and care. The versatility of this piece allows it to be styled alone as a statement accent or grouped with other décor for a lush, layered effect. Beyond decoration, it also makes a thoughtful gift, symbolizing growth and beauty in a form that endures.
Children and adults alike enjoy its playful charm, while its timeless look fits seamlessly into both modern and traditional settings. The Crochet Hanging Plant pattern is more than décor—it is a lasting touch of nature’s grace, bringing comfort, style, and character to everyday spaces.
Materials Needed
To crochet the miniature hanging plant earrings, you'll need:
- Threads:
- Brown thread (for dirt).
- Green thread (for the plant tendrils).
- Basket color thread (color of your choice).
- Threads used should be DMC size 5, which does not split into strands.
- Crochet Hook:
- A 2.25mm hook for precision with small designs.
- Stuffing:
- A very small amount to shape the pot.
- Stitch Marker:
- If unavailable, scrap yarn can be used as a marker.
- Needle:
- For threading and sewing the parts together.
- Scissors:
- To cut and finalize ends.
Step-by-Step Instructions
Step 1: Crochet the Pot
Make a Magic Ring:
- Begin by creating a magic ring:
- Wrap the thread around your fingers to form an "X."
- Insert your hook under the first loop, grab the working yarn, and pull through to make a loop.
- Chain one, and the magic ring is complete.
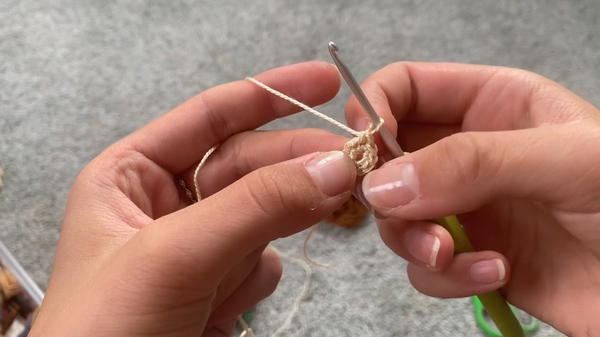
- Begin by creating a magic ring:
Single Crochets in the Ring:
- Add 8 single crochets (SC) into the loop.
- Pull the tail to close the ring.
Increase Round:
- Use a stitch marker to track your rounds.
- For the second round, make 2 single crochets in each stitch until you reach your marker (16 stitches total).
Build Height:
- Crochet one single crochet in each stitch for 4 rounds to form the pot’s sides.
Create Final Edges:
- Flip the pot inside out (or right side out).
- Slip stitch into the next stitch.
- Chain 2, and make 1 double crochet (DC) into each stitch around the pot.
- Slip stitch into the starting DC to complete the round.
Form the Straps:
- Chain 14 stitches and secure by cutting the yarn.
- Repeat this process for the other sides of the pot, evenly spacing straps.
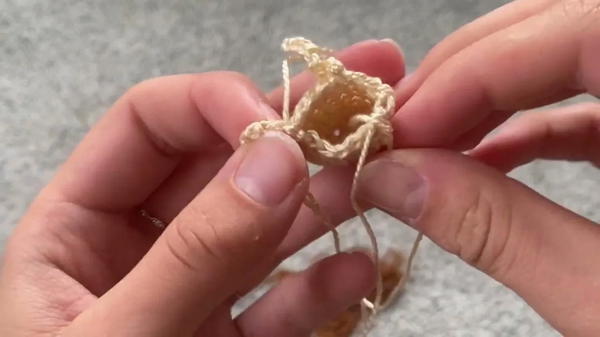
2: Crochet the Dirt
Repeat the Pot’s Base:
- Make a magic ring and begin with 8 single crochets.
- Perform increases in each stitch to achieve 16 stitches total.
Finishing the Dirt Circle:
- Slip stitch, chain one, and leave a long tail for sewing later.
- This tail will connect the dirt to the pot.
3: Crochet the Plant Tendrils
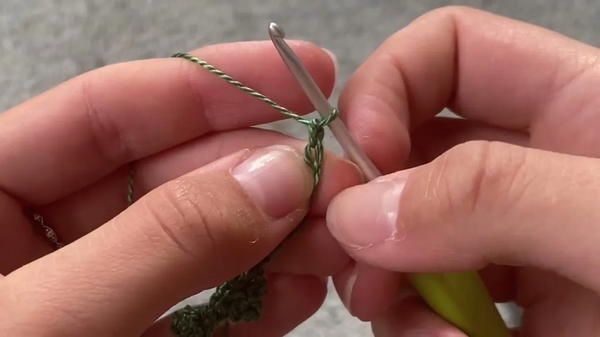
Make Bobbles for Tendrils:
- Begin with a slip stitch and chain 2.
- In the first stitch, crochet 3 double crochets.
- Remove the hook, insert it into the first DC, and pull the working loop through to form the bobble.
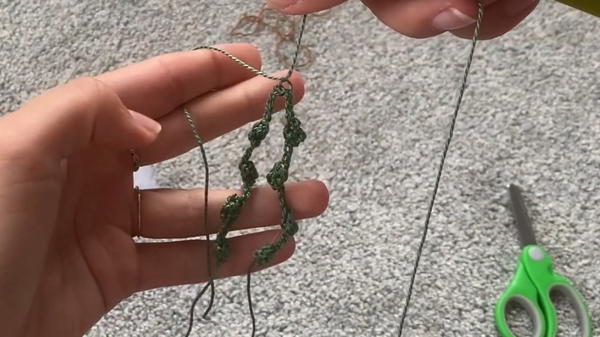
Form Tendrils:
- Chain 5, then create another bobble by crocheting 3 double crochets in the second stitch from the hook.
- Repeat this bobble process 4 times for three tendrils:
- Tendril 1: 4 bobbles.
- Tendril 2: 2 bobbles connected directly via chaining.
- Tendril 3: 3 bobbles connected via chaining.
Connect Tendrils:
- Use a long tail to sew tendrils together at the center.
- Use a long tail to sew tendrils together at the center.
4: Assemble the Plant
Attach Dirt to Pot:
- Place stuffing inside the pot for structure.
- Use the long tail from the brown thread (dirt) to sew the dirt onto the pot.
- Align the stitches from the dirt piece with the pot’s edges and stitch in the inner stitches for a neat finish.
Secure Tendrils to Dirt:
- Sew the green tendrils onto the dirt in your preferred arrangement using their long tails.
Conceal Ends:
- Thread loose ends into the center and hide them inside the pot.
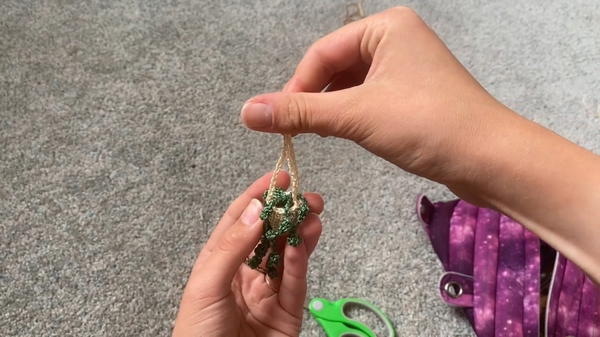
- Thread loose ends into the center and hide them inside the pot.
5: Finish the Earrings
- Add an earring hook or jump ring to the pot’s straps to create the final earring design. Alternatively, attach it to a keyring for a miniature hanging plant keychain.
Special Features
- Miniature Design: The earrings uniquely mimic a hanging plant in detailed crochet form, perfect for handmade jewelry.
- Customizable: Change colors, number of bobbles, or pot size to suit your preferences.
- Realistic Plant Effect: The bobble stitch creates realistic miniature tendrils.
- Versatile End Product: While the pattern focuses on earrings, the project can be adapted into keychains or accessories.
Level of Difficulty
Intermediate: While the stitches used are standard, working with thread and small hook sizes can require precision and patience. Beginners should practice larger designs before attempting this miniature version.
Tutor’s Suggestions
- Start with Larger Plants: If you are a beginner, practice crocheting the same design in larger dimensions to ensure comfort with the techniques.
- Use a Stitch Marker: This simplifies tracking stitches in the tiny pattern.
- Even Straps: Space out the straps evenly to achieve balance and alignment for the hanging pot.
- Experimentation: Feel free to adjust the number of tendrils and bobbles to suit your creative taste.
Uses and Benefits
- Fashion: These earrings are adorable, lightweight, and perfect for plant lovers!
- Gift Idea: Handmade gifts like keychains, miniature pots, or earrings are thoughtful and unique.
- Fun Miniature Project: It’s an enjoyable challenge to crochet tiny, intricate designs.
Tip
Keep your workspace well-lit and use magnifying tools or glasses if needed to avoid eye strain while working on small dimensions. Precision is key to making the pieces look neat and cohesive.
Conclusion
The Miniature Hanging Plant Earrings Crochet pattern beautifully combines creativity and skill to crochet tiny, plant-inspired accessories. From the pot and dirt to the tendril-like plant details, this project offers endless opportunities for customization. Whether you’re crocheting earrings, keychains, or small decorative plants, this pattern is an exciting way to enhance your crochet repertoire.


