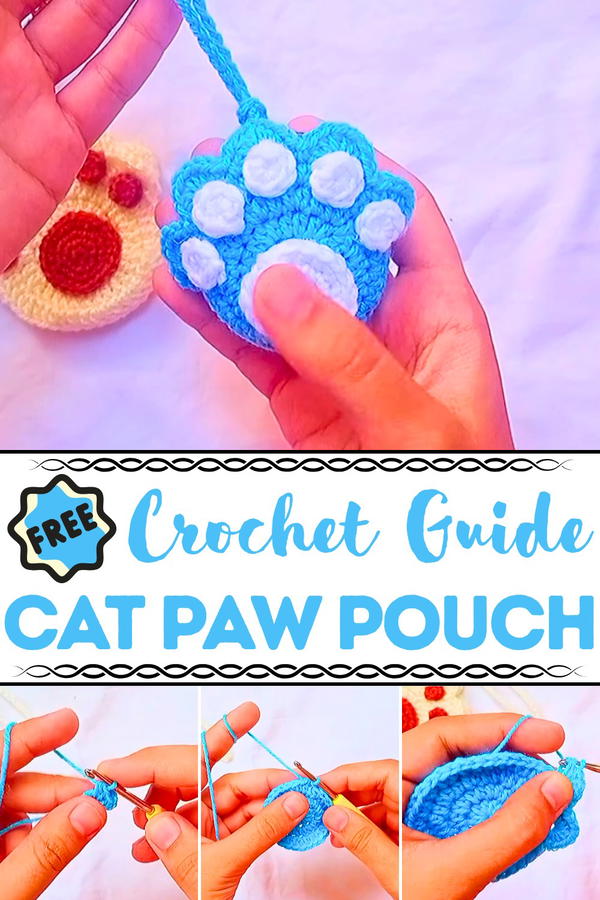
Carry the charm with Crochet Cat Paw Pouch pattern, a playful and cozy accessory that keeps your essentials safe and stylish.
In a cozy corner of a small home, a cat’s playful paw tapped across a table, leaving everyone smiling at its tiny, curious movements. Inspired by these endearing gestures, the Crochet Cat Paw Pouch pattern brings feline charm into everyday life in a practical and delightful way. This pouch features soft, rounded shapes that mimic a cat’s paw, complete with subtle textured pads, making it both visually appealing and fun to hold. Its compact size is ideal for storing small items like coins, keys, makeup, or other essentials, turning ordinary organization into a cheerful and whimsical experience.
Eye-Catching Crochet Cat Paw Pouch That Steals Attention
The soft yarn provides a comfortable feel while maintaining durability for repeated use, and the secure closure ensures items remain safely inside. Its playful design makes it suitable for gifting, adding a thoughtful touch to birthdays, holidays, or special occasions. Working on this project also offers a soothing, hands-on activity that enhances focus and dexterity while producing a functional and charming item.
The Crochet Cat Paw Pouch pattern combines utility, beauty, and whimsy, transforming a simple pouch into a delightful accessory. It offers a cozy and cheerful addition to any daily routine, providing both practicality and a touch of feline-inspired joy.
Materials Needed
Here are the materials you’ll need for this project:
- Yarn:
- Main color (for the paw body).
- White yarn (for the dots and base).
- Optional contrasting yarn for details or decorations.
- Crochet Hook: Use the recommended hook size for your yarn weight.
- Scissors: For trimming yarn.
- Yarn Needle: To weave in the ends and sew parts together.
- Hot Glue Gun or Fabric Glue: For securely attaching the dots and other elements.
- Optional Beads or Accessories: Can be used to enhance the design further.
Special Features
- Adorable Paw Design: Shaped like a paw, it features realistic pads (puffs) and dots that add charm and texture to the pouch.
- Versatile Stitch Options: Choose between half double crochet (HDC) or double crochet (DC) based on your preference for texture and appearance.
- Compact and Functional: Designed to hold small essentials like AirPods, lip balm, hair ties, or coins.
- Customizable Additions: Includes instructions for adding a drawstring, which adds practicality while enhancing the overall aesthetic.
- Beginner-Friendly: Simplified steps make it accessible for those new to crochet.
Level of Difficulty
Beginner to Intermediate:
- The basic stitches (magic ring, half double crochet, double crochet, single crochet, slip stitch) are easy to understand and execute.
- Creating even shapes (like the paw pads and dots) requires precision, making it slightly more challenging for absolute beginners.
- Attaching pieces together with sewing or glue might need patience and care.
Step-by-Step Instructions
Part 1: Creating the Paw Base
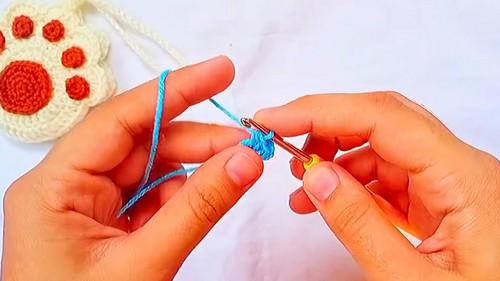
1. Starting the Magic Ring
- Begin with a magic ring. Chain one to secure it.
- Tighten the ring by pulling the yarn, ensuring the loop is adjustable.
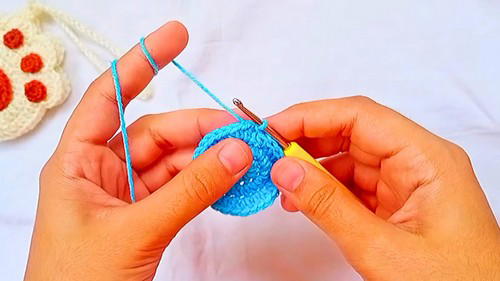
2. First Round (11 HDC/DC)
- Work 11 half double crochets (HDCs) into the magic ring. Alternatively, you can use double crochets (DCs) for a larger, slightly looser texture.
- Once complete, pull the yarn tight to close the magic ring.
3. Joining the Round
- Slip stitch into the first HDC to close the round. Pull the yarn tightly for a seamless finish.
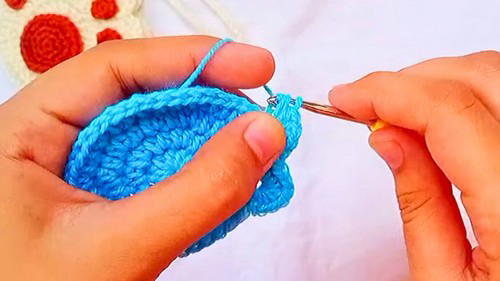
2: Building the Paw Shape
2 — Increasing Stitches
- Chain 1 and work 2 HDCs into the same stitch (this is your increase).
- Continue working 2 HDCs into each stitch around (this doubles the number of stitches).
- Slip stitch into the first HDC to close the round.
3 — Single Crochet and Increase
- Chain 1, then alternate 1 HDC in the next stitch followed by an increase (2 HDCs in the same stitch).
- Repeat the pattern of 1 HDC → increase all the way around. You should have 33 stitches at the end of this round.
- Slip stitch to join.
4 — Pattern Expansion
- Chain 1 and alternate 2 HDCs → increase. Work this pattern around the circle.
- Slip stitch into the first stitch once completed.
3: Creating Paw Pads (Puffs)
Skip and Puff Stitches:
- Skip the first stitch. In the next stitch, work seven HDCs into the same stitch to create a puff-like pad.
- Skip the next stitch and slip stitch into the following one.
Repeat:
- Repeat this process to create additional puffs (typically five in total for one paw).
- Cut the yarn and secure it to finish the paw pads.
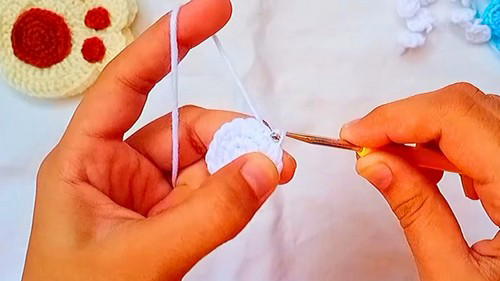
4: Adding the Paw Dots
Creating the Dots:
- Use white yarn to make a magic ring.
- Chain 2 and work 6 single crochets (SCs) into the magic ring.
- Slip stitch into the first SC to join. Cut the yarn and tie a knot for security.
Attach the Dots:
- For ease, you can use a hot glue gun to attach the dots to the paw base. Alternatively, sew them using a yarn needle for a stronger hold.
Make Additional Dots:
- Create and attach more dots depending on how many you’d like to add. Generally, 9–10 dots are used to complete the look.
- Create and attach more dots depending on how many you’d like to add. Generally, 9–10 dots are used to complete the look.
5: Joining the Paws and Creating the Pouch
Create Two Paw Pieces:
- Make two paw bases (one with a longer yarn tail for sewing).
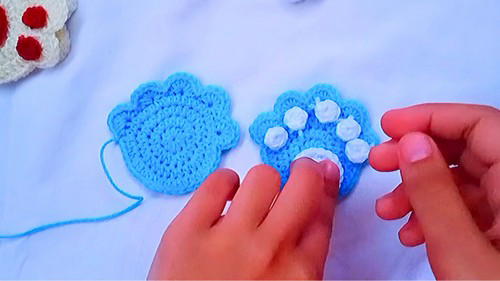
- Make two paw bases (one with a longer yarn tail for sewing).
Attach the Pieces:
- Place the two pieces together (back to back). Sew them together using a needle, working along the edges. Alternatively, you can slip stitch them together.
- Leave the top part of the paw open to form the pouch.
6: Adding the Drawstring
Creating the Drawstring:
- Leave three stitches on each side of the paw open.
- Chain 50 (or your desired length). Attach the chain to the pouch's opening.
Secure the Drawstring:
- Slip stitch the drawstring to secure it. You can also add beads or tassels to the ends for decoration.
Tutor's Suggestions
- Pay Attention to Tension: Ensure even tension when working on the puff stitches to create uniform paw pads.
- Use Hot Glue with Caution: If using a hot glue gun, work carefully to avoid damaging the yarn or burning yourself.
- Customize Freely: While this pattern uses brown and white yarn, feel free to use playful or pastel colors to match your style or theme.
- Take Your Time: Small elements like the dots and sewing the paw parts together might take time, so don’t rush.
Uses of the Cat Paw Pouch
- Accessory Storage: Perfect for holding AirPods, lip balm, hair ties, or small items.
- Decoration: Hang it on your bag as an adorable accessory.
- Gift Item: Personalized and handmade, it’s great as a gift for cat lovers or kids.
- Craft Fair Item: These pouches could be a hit if you sell handmade items.
Tip for Success
To ensure your finished product looks professional, take extra care when sewing the pieces together and securing the drawstring. Block the final product lightly if needed to enhance its shape.
Conclusion
The Crochet cat paw pouch is a delightful project combining creativity and functionality. Its beginner-friendly design makes it accessible to those new to crochet, while its adorable appearance and usability make it a wonderful gift or personal item. Whether you use it to store small items or as a fun accessory, this crochet project is sure to bring joy.


