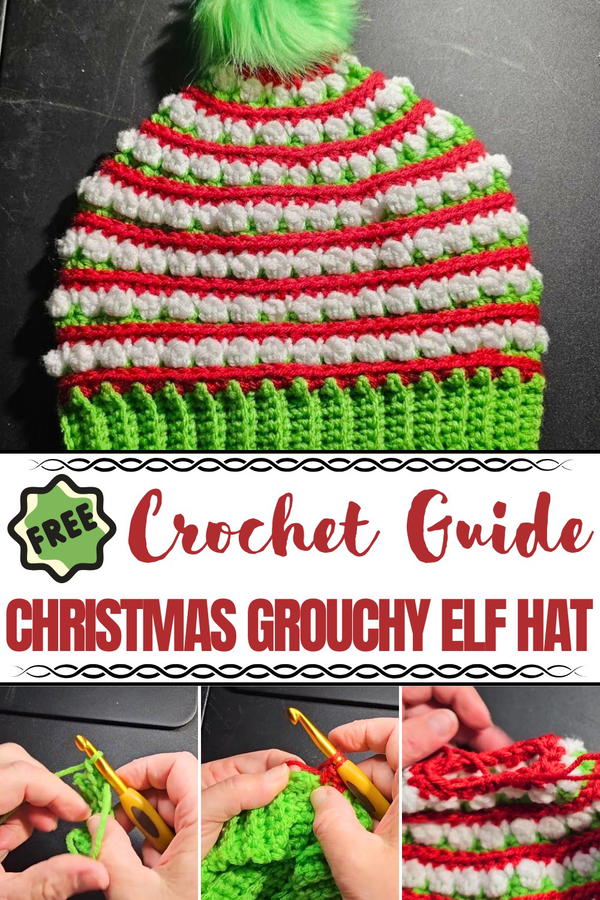
Festive mischief and cozy warmth come alive with this Crochet Christmas Grouchy Elf Hat pattern, perfect for playful holiday moments.
In a bustling holiday workshop, elves scurried about with cheer, yet one little elf often frowned at the endless bustle, earning the nickname “Grouchy.” This Crochet Christmas Grouchy Elf Hat pattern brings that playful character to life, capturing the charm of festive mischief with a whimsical twist. The hat features a pointed, curling tip and cozy ear coverage, making it both amusing and functional for chilly winter days. Its textured stitches add depth and character, giving the hat a cheerful yet slightly mischievous look that stands out in any holiday gathering.
Snug Crochet Christmas Grouchy Elf Hat for Winter Festivities
Ideal for seasonal parties, holiday photo sessions, or as a fun gift, the hat doubles as a playful accessory and a cozy winter essential. The pattern allows for variations in color and size, letting makers tailor the piece for children, adults, or even pets. Working on this project enhances hand dexterity and focus while providing a satisfying sense of accomplishment.
Beyond its visual appeal, the hat spreads laughter and festive cheer, offering a lighthearted take on traditional Christmas attire. With this Crochet Christmas Grouchy Elf Hat, the spirit of the holidays comes alive in a charmingly grumpy form, bringing smiles, warmth, and a touch of humor to every festive occasion.
Materials Needed
Here’s what you’ll need to create the Grinch hat:
- Yarn: (From Hobby Lobby's "I Love This Yarn" collection)
- Lime green (for the brim and alternating sections)
- Red
- White
- Crochet Hook: Size J (6mm).
- Pom-Poms: Optional, recommended on a removable button for washing purposes.
- Button: For attaching the pom-pom securely to the hat.
- Stitch Marker: To keep track of your starting stitch in each round.
- Scissors: For cutting yarn neatly.
- Yarn Needle: For weaving in ends and attaching buttons.
Special Features
- Festive Christmas Theme: Bold red, green, and white sections make this hat perfect for holiday celebrations.
- Ribbed Brim with Stretch: The brim is designed with single crochet stitches in back loops for a snug yet stretchy fit.
- Puff Stitch Accents: Adds an eye-catching texture to the design, making it stylish and unique.
- Optional Pom-Pom: Includes instructions on how to attach removable pom-poms using buttons for easy washing.
- Customizable Design: You can experiment with different color combinations or yarn types to suit your preferences.
Level of Difficulty
Beginner to Intermediate:
- The basic stitches used (single crochet, half double crochet, puff stitches) are easy for beginners to follow, but switching colors and working in the third loop might be slightly challenging.
- The project also requires consistent stitch counts and a good grasp of decreases for shaping the crown of the hat.
Step-by-Step Instructions
Part 1: Creating the Brim
1. Start the Brim
- Begin with a slip knot and chain 8 stitches.
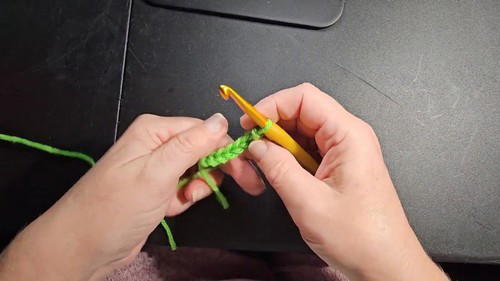
- Starting in the second chain from the hook, use single crochet (SC) in the back loops only across the row (you’ll have 7 single crochets total).
- Chain 1, turn your work, and continue crocheting back loops only for 64 rows total.
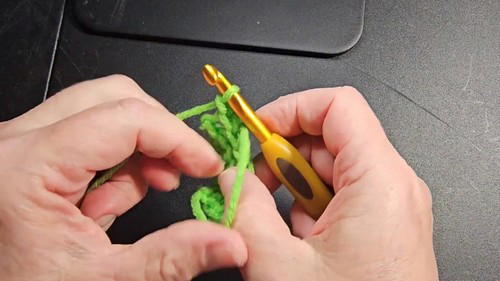
2. Join the Edges
- Fold the brim in half so the two short edges line up.
- Slip stitch across the edges to join them together, ensuring that each of the 7 stitches is aligned and seamlessly connected.
- Turn the brim inside out for a polished look.
2: Adding the Base Rows to the Hat
1. Start the First Hat Section
- Attach the red yarn near the brim seam.
- Half double crochet (HDC) evenly around the brim. Use tighter spots to avoid making visible holes. Ensure you end with 64 stitches to maintain consistency throughout the project.
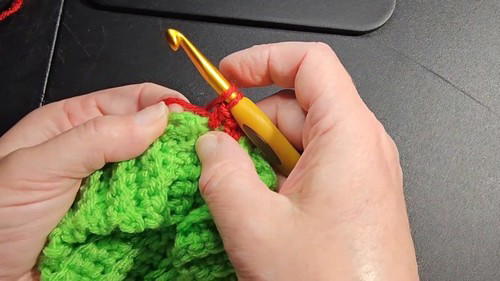
2. Switching to the Green Yarn
- Identify the third loop of each HDC. This is located behind the top V of the stitch.
- Work single crochets (SC) into the third loop around the entire row. Mark your first stitch for reference using a stitch marker.
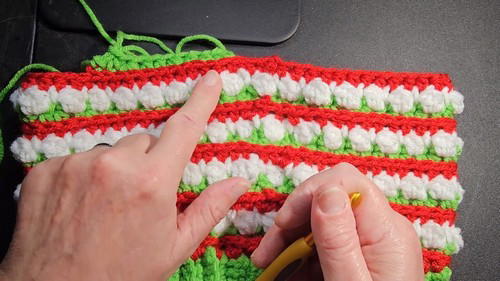
3: Creating Puff Stitches
- Switch to white yarn and begin working puff stitches:
- Chain 2 (does not count as a stitch).
- Yarn over, insert into the next stitch, pull up a loop, and repeat for a total of 4 loops.
- Yarn over and pull through all 4 loops.
- Slip stitch into the next stitch.
- Alternate between puff stitches and slip stitches all around the row.
4: Building Additional Sections
- Repeat the pattern (red-half-double crochets, green-third-loop-single-crochets, white-puff-stitches) for three full sets:
- Red → Green → White → Red → Green → White → Red → Green → White.
- After completing the third set, add one final red section to transition into closing up the hat.
5: Closing the Hat
1. Start Decreasing
- Begin the next row using the green yarn. Work half double crochet two together (HDC2TOG) stitches to begin shaping the crown:
- Wrap the hook, insert into a stitch, pull up a loop, wrap again, insert into the next stitch, pull up another loop.
- Yarn over and pull through all 5 loops on the hook.
- Follow a pattern of HDC2TOG → 2 regular HDC stitches → repeat around the row.
2. Continue Working Puff Stitches
Switch to white yarn and repeat the puff stitch row (slightly fewer puffs after decreases).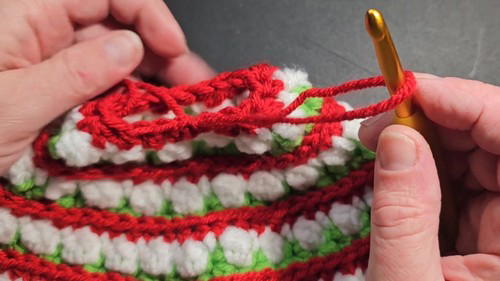
6: Final Rounds and Pom-Pom Attachment
1. Final Decreases
Work another green row with tighter decreases:
- HDC2TOG → 1 regular HDC stitch → repeat.
2. Close the Crown
Once the opening is small enough, use a yarn needle to thread the remaining stitches and pull tight to close the crown securely.
3. Attach the Pom-Pom
- Sew a button to the top of the hat's crown using green yarn.
- Attach the pom-pom to the button using its built-in loop or hook for easy removal when washing the hat.
Tutor’s Suggestions
- Be Precise with Stitch Counts: Maintaining consistent stitch counts is critical for shaping the hat properly and ensuring symmetry.
- Work Slowly with Puff Stitches: These can be tricky at first. Take your time to practice and ensure uniform size and spacing.
- Weave as You Go: Minimize hassle by weaving in yarn ends after each section instead of leaving them until the end.
- Experiment with Colors: While the suggested Grinch colors are vibrant and festive, feel free to modify the design with your own color palette.
Uses of the Grinch Hat
- Christmas Accessory: Perfect for holiday parties or themed family photos.
- Gift Idea: Handmade hats are thoughtful and personal gifts for friends and family during the holidays.
- Matching Set: Pair with the Grinch scarf tutorial for a full festive ensemble.
- Festive Décor: Use as a fun piece of seasonal décor when not being worn.
Tip for Success
Take extra care while working in the third loop of the HDC stitches, especially in the green sections. Mark your stitches to stay organized, and always double-check your count to avoid misalignments.
Conclusion
This Crochet Grinch Hat is a joyful and colorful project that allows you to showcase your crochet skills while embracing the holiday spirit. With bold colors, playful textures, and the option for a removable pom-pom, this hat is perfect for spreading cheer and warmth during Christmas. Whether making it for yourself or gifting it to loved ones, the Grinch Hat is sure to bring smiles and festive fun.