Celebrate in cozy style with this Free Crochet Christmas Vest Pattern, bringing festive warmth and cheerful charm to your holiday wardrobe effortlessly.

The beauty of this vest lies in its gentle stitch detail and smooth structure, giving it a polished yet inviting appearance. Its specialty rests in versatility, as it can be customized in colors or size to match individual style preferences. Lightweight but warm, it allows easy layering while maintaining comfort throughout the day.
More than just festive attire, it becomes a symbol of handmade warmth that carries sentimental value during celebrations. The benefits extend beyond style, offering durability, comfort, and a timeless look that stays in fashion each year. Perfect for gatherings or cozy winter days, this vest combines charm, practicality, and holiday joy in a single piece that reflects the true spirit of the season.

Materials Needed
- Yarn: 100 grams of special baby acrylic wool.
- Hook Size: 3.5 mm crochet hook.
- Optional: A needle for joining the rectangles, scissors, and a measuring tape.
Special Features of the Vest
- Simple Construction: The entire vest comprises 3 rectangles pieced together—no complex shaping or intricate stitchwork required.
- Light and Comfortable: The design is perfect for baby or lightweight wear, thanks to the use of special baby acrylic yarn.
- Customizable Fit: Measurements can be adjusted to create a vest suited to different sizes.
Step-by-Step Directions
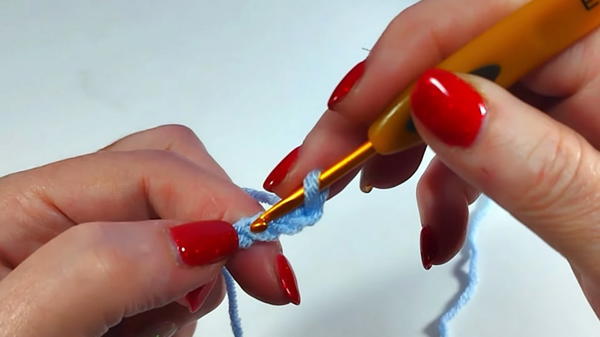
1. Base Chain
- Foundation Chain: Begin by making a foundation chain for each of the rectangles.
- Top Rectangles: For each rectangle, create 164 chains to match the chest circumference measurement.
- Bottom Rectangle: Adjust the chain length to match the combined width of the top rectangles.
- For demonstration, the tutor uses a sample chain of 32 chains.
- Top Rectangles: For each rectangle, create 164 chains to match the chest circumference measurement.
2. Row 1 (Foundation Row)
- Start with 3 turning chains.
- In the foundation chain:
- Insert 1 single crochet, followed by 2 chains and 1 single crochet in the same stitch.
- Skip 2 chains and repeat: 1 single crochet, 2 chains, and 1 single crochet in the same stitch.
- Repeat this sequence until the end of the row.
- Finish: Skip the last chain and complete the row with a half double crochet.
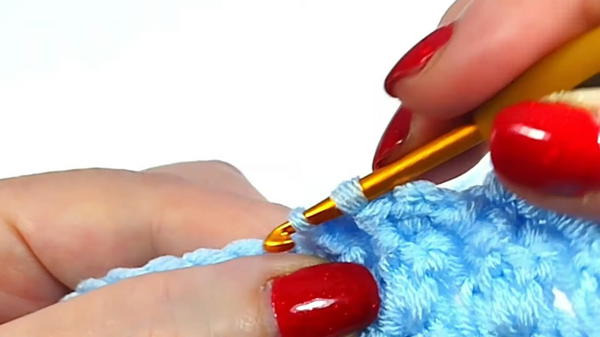
3. Row 2 (Cluster Row)
- Begin with 3 turning chains.
- Locate the space created by "2 chains from Row 1":
- Work 3 double crochets in the same space.
- Repeat this procedure across the row, working into each 2-chain space from the previous row.
- Finish: End the row with 1 double crochet.
4. Row 3 (Front Post Stitch Row)
- Begin with 2 turning chains.
- Focus on the set of 3 double crochets created in Row 2:
- At the center of each set, insert a front post single crochet, followed by 2 chains and another front post single crochet in the same space.
- Repeat this for every set of 3 double crochets until the end of the row.
- Finish: End the row with a half double crochet.
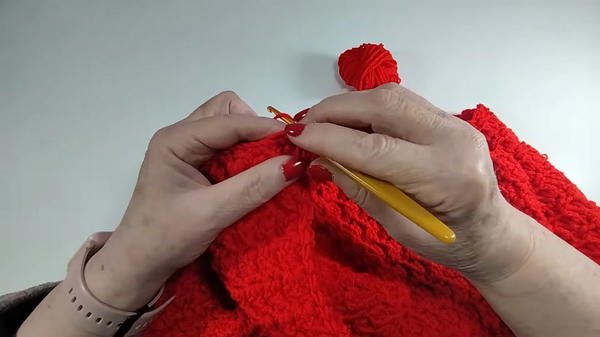
5. Repeating the Stitch Pattern
- Repeat Rows 2 and 3 until the desired length is achieved.
- Measurements demonstrated in the video:
- Top Rectangles: 80 cm (31.5 inches) long and 20 cm (8 inches) wide.
- Bottom Rectangle: Width matches the top pieces combined.
6. Finishing the Rectangles
- Complete your rectangles with Row 2 to ensure uniformity.
- Align the ends to match Row 1 and add finishing stitches:
- Use 1 single crochet, 2 chains, and 1 single crochet.
7. Assembly
- Fold and Sew:
- Fold the two top rectangles in half and join with seams to create the armholes and neckline.
- Leave one side unjoined for the sleeves.
- Attach the Bottom Rectangle:
- Sew it to the top pieces using a needle.
- Final Touches:
- Join any remaining sides, ensuring the vest is completely assembled.
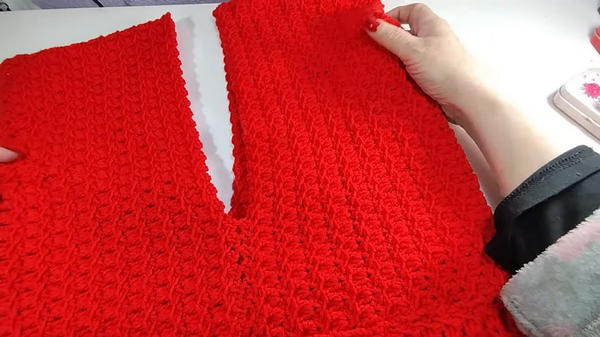
- Join any remaining sides, ensuring the vest is completely assembled.
Special Features of the Stitch
- Multiple of 3 + 2: The stitch pattern is worked with this multiple, making it easy to adjust the size.
- Elegant Look: The combination of single crochets, front post stitches, and double crochets makes the vest visually appealing yet simple to create.
Tutor’s Suggestions
- Use contrasting yarn colors when learning the pattern to clearly see the stitches.
- Measure carefully to ensure the vest fits your intended dimensions.
- Focus on maintaining tension throughout the rows for a clean, polished look.
Level of Difficulty
Beginner-Friendly: This pattern utilizes simple stitches (single crochet, half double crochet, double crochet) and repetition. Even beginners can follow this guide with ease.
Uses of the Vest
- Perfect for babies due to its soft and light construction.
- Suitable as a layering accessory for casual outfits.
- Customizable for adults or older children with minor adjustments in size.
Tip for Success
When sewing the rectangles together, pin them first to ensure alignment. This will make the final garment look neater and avoid unnecessary adjustments.
Conclusion
This easy-to-make crochet vest is a lovely project for anyone looking for a relaxing and rewarding craft. With a simple stitch pattern and clear instructions, it’s perfect for beginners and veterans alike.


