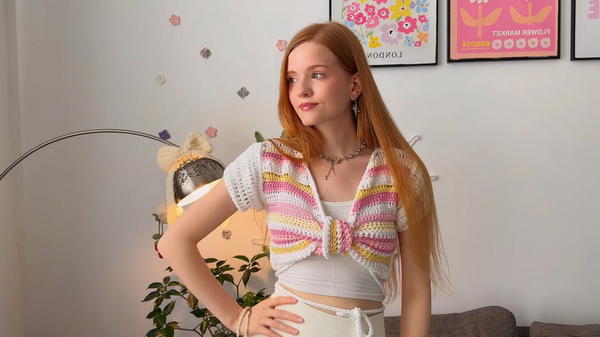
Layer effortless style with this Free Crochet Wrap Top Pattern, a chic piece that adds elegance, comfort, and a modern touch to your wardrobe.

This top is ideal for pairing with skirts, trousers, or jeans, making it suitable for daily wear, office settings, or relaxed outings. Beyond fashion, the process of creating the piece encourages patience and attention to detail, offering a satisfying hands-on experience for crocheters. The lightweight structure allows for layering over camisoles or under jackets, adapting seamlessly to changing temperatures.
Additionally, its durability ensures that the top can be worn repeatedly without losing shape or texture. With opportunities to experiment in color selection and subtle stitch variations, each wrap top becomes unique. This versatile garment combines style, comfort, and practicality, turning a handmade crochet project into a cherished addition to any wardrobe.
Materials Required
Yarns:
- Leftover yarns in complementary colors.
- White yarn (optional for blending colors and brightening the palette).
- Types of yarn: Cotton yarn, acrylic yarn, mohair yarn.
Crochet Hook: 5 mm.
Other Tools:
- Scissors.
- Yarn needle (for sewing and edging).
- Stitch markers (optional for armhole marking).
Special Features
- Makes use of leftover yarn to craft a functional garment.
- Cropped wrap design with long waist ties for versatility.
- Vibrant alternating rows featuring varied stitches for added texture and structure.
- Customizable length and sleeves, making it suitable for different seasons.
Step-by-Step Guide
1. Plan Your Yarn and Design
- Choose your leftover yarns in complementary colors (pink, yellow, white, etc.).
- If colors clash, add white yarn to neutralize and brighten the palette.
- Decide your color order in advance to achieve a cohesive look.
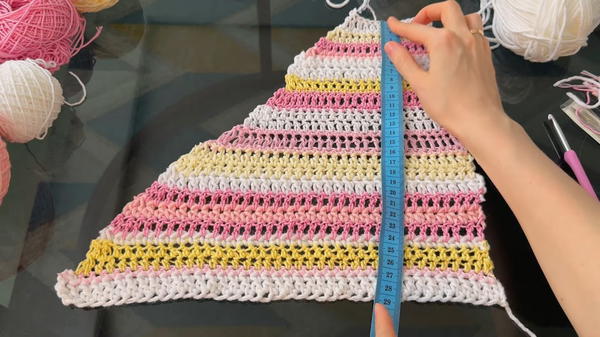
2. Start the Front Panel
Foundation Row:
- Begin with foundation double crochet stitches for a stretchier base.
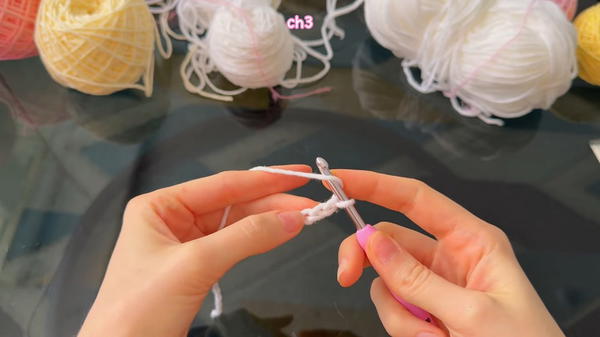
- Chain 3, yarn over, insert your hook into the first chain, pull up a loop, and complete a double crochet while forming a base chain.
- Continue this process until you make 39 stitches.
- Begin with foundation double crochet stitches for a stretchier base.
Alternate Stitches and Colors:
- Create rows using different stitches (e.g., single crochet, half-double crochet, and double crochet) for structure and pattern.
- Change yarn colors at the end of rows by tying a knot with the new yarn around the old one.
Decrease Rows:
- Decrease stitches on only one side of the panel to shape the design. Use specific decrease techniques for single, half-double, and double crochets.
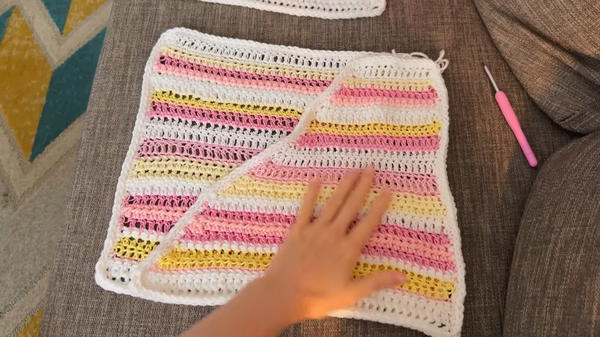
3. Create the Second Front Panel
- Repeat the same process as the first front panel, ensuring the same dimensions and edging.
- Flip the panel upside down while adding the edging for symmetrical positioning.
4. Crochet the Back Panel
- Start with the same number of foundation double crochet stitches as the front panels (e.g., 39 stitches).
- Crochet straight rows without decreases until it matches the height of the front pieces.
5. Add Edging
Use single crochets around all panels to even out uneven edges caused by varying yarn thickness.
- For rows made with single crochet, add one single crochet per row.
- For rows made with half-double or double crochet, add two single crochets per row.
After completing the single crochet edging, add one row of slip stitches for a clean finish.
6. Join the Panels and Create Armholes
- Place the panels together with right sides facing each other.
- Use single crochet stitches to join the edges, ensuring neat seams.
- Leave space (e.g., 44 stitches) for armholes and mark the positions with stitch markers.
7. Make Waist Ties
- At the corners of the front panels, create chains (e.g., 110 chains for ties).
- Work slip stitches into each chain for durability.
- Attach the ties securely to each corner.
8. Crochet Sleeves (Optional)
Start the Sleeves:
- Work under the armhole in the round, inserting the hook through the back loops.
- Begin with double crochets around the armhole.
Shape Sleeves with Decreases:
- Decrease stitches four times per round to taper the sleeve.
- Decrease at the beginning of the row, at the shoulder seam (two decreases in the middle), and at the end of the row.
Short vs. Long Sleeves:
- Add six rows total (five with decreases).
- For longer sleeves, continue crocheting evenly beyond the decreases until the desired length is achieved.
Finish Sleeves:
- Add a final row of slip stitches as edging.
- Add a final row of slip stitches as edging.
Level of Difficulty
- Beginner-Friendly: Basic stitches (single crochet, half-double crochet, and double crochet) mixed with simple decrease techniques make this project approachable for beginners.
- Intermediate Options: Mix stitch patterns creatively and work on shaping the design for added complexity.
Tutor’s Suggestions
- Don’t worry about mixing different types or thicknesses of yarn; focus on matching colors for aesthetic consistency.
- Plan your row colors and stitch types in advance to avoid confusion.
- Use markers to help keep track of decreases and armholes.
- For beginners, consider subscription boxes like "Hooks and Needles," which provide curated yarns, tools, tutorials, and projects to level up skills.
Uses
- Versatile piece for summer wear or cooler evenings.
- Great for experimenting with leftover yarns to avoid waste.
- Can be styled as a cropped wrap top, vest, or full cardigan.
Tip
When working with yarns of different thicknesses, insert your hook carefully into the center of stitches or chains to achieve cleaner edges. Adding an edging can help even out any uneven areas caused by the yarn texture.
Conclusion
This crop wrap top is a perfect project for crocheters wanting to use leftover yarns creatively while crafting a stylish yet practical garment. By alternating rows with varied stitches and blending colors, the piece achieves a textured, chic look. Whether you decide to keep it sleeveless, add short sleeves, or extend to full sleeves, this project is highly customizable.


