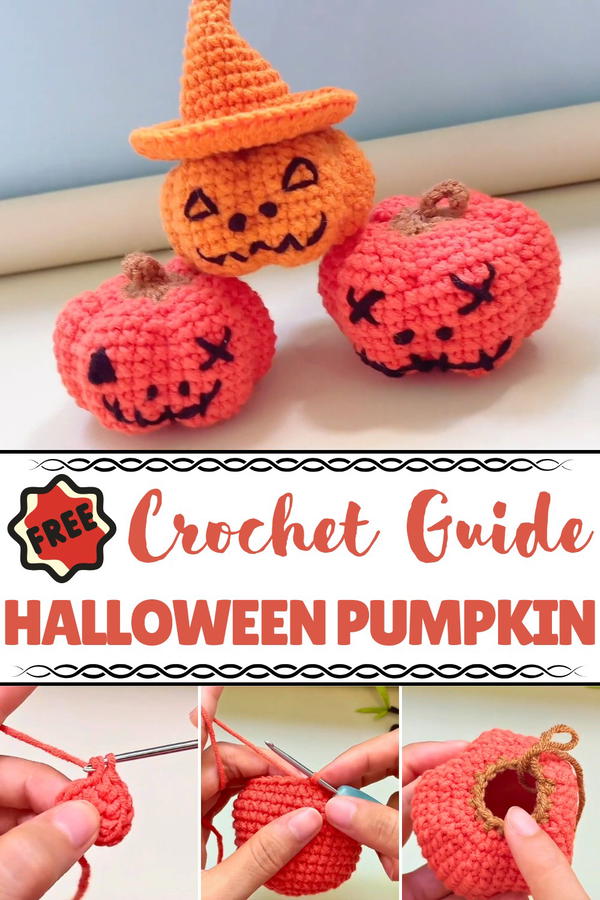
Spice up spooky season with this Crochet Halloween Pumpkin pattern, a playful design to create festive charm for décor or delightful gifts.
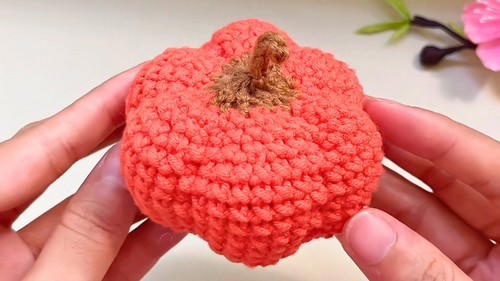
Autumn celebrations are never complete without the cheerful glow of pumpkins, symbols of warmth, festivity, and seasonal charm. The Crochet Halloween Pumpkin pattern captures that same spirit in a delightful, lasting form, turning yarn into a playful treasure that brightens any space. With its soft curves, textured surface, and sturdy stem, it reflects the familiar look of real pumpkins while adding a cozy handmade touch. Unlike fresh pumpkins that fade and spoil, this one stays vibrant year after year, making it a reliable piece for seasonal decorating.
Spooky Spark Crochet Halloween Pumpkin for Handmade Gifts
Its lightweight form allows it to rest gracefully on shelves, mantels, or tables, and it can even be grouped with other decorations to create an inviting centerpiece. Beyond personal use, it makes a thoughtful gift, carrying the joy of autumn to friends and loved ones in a unique way. Suitable for both whimsical Halloween displays and rustic fall settings, it adapts beautifully to any style of décor.
The yarn’s soft texture enhances its charm, offering a cozy feel that enriches the festive atmosphere. Durable, practical, and full of seasonal beauty, the Crochet Halloween Pumpkin pattern is a timeless keepsake that brings the magic of autumn to life year after year.
Materials Needed
- Yarn:
- Orange yarn for the body of the pumpkin.
- Brown yarn for the stem.
- Black yarn for the facial features.
- Crochet Hook: Recommended size is 3.5 mm but adjust based on yarn thickness.
- Stuffing: Fiberfill or any soft material for shaping the pumpkin.
- Stitch Marker: Useful to mark rounds during crocheting.
- Crochet Needle: For sewing sections and adding black facial features.
- Scissors: To trim excess yarn.
- Pins: For marking segments during assembly.
Special Features of the Crochet Halloween Pumpkin
- Realistic Pumpkin Shape: The pattern includes steps to segment the pumpkin into equally spaced sections for a lifelike appearance.
- Customizable Design: Add a face, choose different colors, or make your pumpkin larger or smaller by adjusting rounds and stitches.
- Beginner-Friendly Instructions: With clear step-by-step guidance for increases, decreases, and assembly, even new crocheters can confidently tackle this project.
- Dual Elements: Combines crocheting with sewing techniques to shape the pumpkin and add facial features.
Level of Difficulty
This project is beginner-friendly, focusing primarily on simple crochet stitches, including single crochet, slip stitch, increases, and decreases. While the sewing involved in shaping the pumpkin might require precision, the tutorial explains each step in a detailed and easy-to-understand way, making it accessible to new and experienced crocheters alike.
Step-by-Step Instructions
1. Crocheting the Pumpkin Base
1: Magic Ring
- Begin with a magic ring using orange yarn.
- Crochet 8 single crochets into the ring.
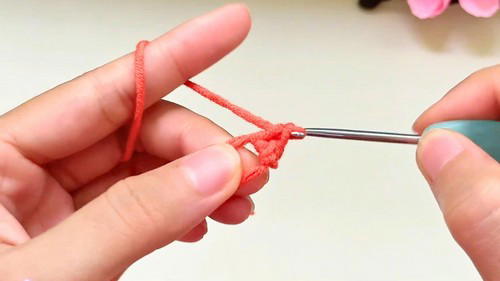
- Pull the yarn tightly to close the loop and make a slip stitch into the first stitch.
2: Increase
- Chain one to start the row.
- Make 2 single crochets into each stitch (increase) across all 8 stitches (total: 16 stitches).
- Slip stitch into the first stitch to close the row.
Row 3: Pattern Increase
- Chain one.
- Make one single crochet in the first stitch, then make an increase (two single crochets in the next stitch).
- Repeat this pattern (one single crochet, one increase) for 8 times (total: 24 stitches).
- Slip stitch into the first stitch.
4: Two-Single-Crochet Increase
- Chain one.
- Make one single crochet in each of the first two stitches, followed by an increase in the third stitch.
- Repeat this pattern (two single crochets, one increase) for 8 times (total: 32 stitches).
- Slip stitch into the first stitch.
5: Standard Row (No Increases)
- Chain one.
- Work one single crochet in each stitch around (total: 32 stitches).
- Slip stitch to close the row.
6: Pattern Increase
- Chain one.
- Make one single crochet in each of the first three stitches, then make an increase in the fourth stitch.
- Repeat this pattern (three single crochets, one increase) for 8 times (total: 40 stitches).
- Slip stitch to finish.
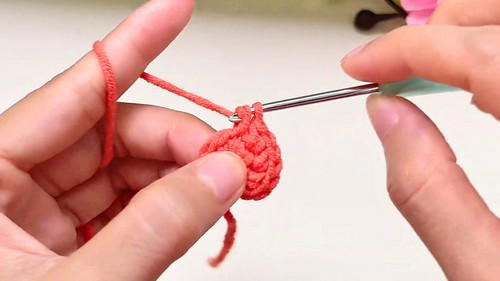
7 to 14: Standard Rows
- Chain one at the beginning of each row.
- Work one single crochet in each stitch (total: 40 stitches per row).
- Repeat for seven rows to build height.
2. Shaping the Pumpkin
15: Start Decreasing
- Chain one.
- Make one single crochet in each of the first three stitches, then make a decrease in the next two stitches.
- For the decrease: Insert your hook through the next two stitches, yarn over, pull through the first two loops, then pull through the remaining loops.
- Repeat this pattern (three single crochets, one decrease) for 8 times.
- Slip stitch to finish the row.
16
- Chain one.
- Crochet one single crochet in each stitch (total: 32 single crochets).
- Slip stitch to finish the row.
17: Decreasing More
- Chain one.
- Make one single crochet in the first two stitches, then make a decrease in the next two stitches.
- Repeat this pattern (two single crochets, one decrease) for 8 times.
- Slip stitch to close the row and fasten off. Cut the yarn.
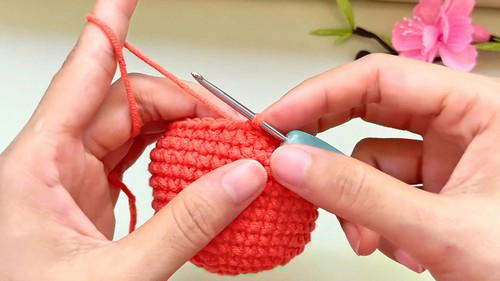
3. Adding the Pumpkin Stem
18: Attach Brown Yarn
- Insert your hook into the top of the pumpkin, attach brown yarn, and chain one.
- Make one single crochet in the first stitch, then decrease in the next two stitches.
- Repeat this pattern (one single crochet, one decrease) for 8 times.
- Repeat this pattern (one single crochet, one decrease) for 8 times.
- Slip stitch to close the row.
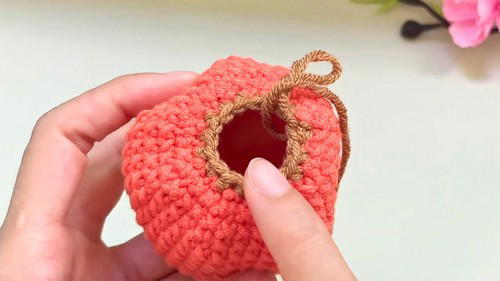
19: Final Row for the Stem
- Chain one.
- Decrease in every stitch across all 8 stitches.
- Slip stitch to finish the row, and fasten off. Leave a long tail (around 60 cm) for sewing.
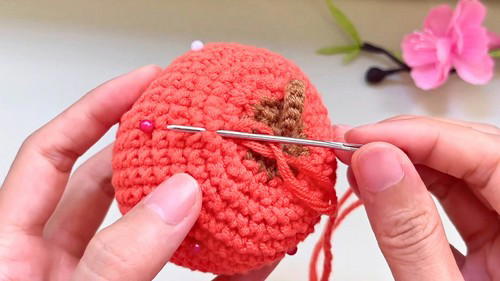
4. Closing the Pumpkin & Shaping Segments
- Stuff the Pumpkin: Add fiberfill material inside the pumpkin to give it structure.
- Close the Pumpkin: Insert the leftover yarn from the stem into the front loops of the remaining stitches to pull the top tightly closed. Secure with a knot.
- Shaping Segments:
- Using the 60 cm yarn, mark and sew 6 equal vertical lines through the pumpkin using pins for guidance.
- Insert the needle and pull yarn tightly along the lines to create realistic pumpkin segments.
5. Adding the Face
- Design the Features: Use black yarn to crochet or stitch the pumpkin’s eyes, nose, and mouth. You can customize the design (spooky, cute, funny) to suit your preference.
- Sew the features onto the pumpkin using your crochet needle.
Tutor’s Suggestions
- Focus on Evenness: Ensure your increases and decreases are evenly spaced to maintain a smooth pumpkin shape.
- Segmenting Precision: Use pins to mark sections carefully before sewing to avoid uneven segments.
- Facial Creativity: The face design is up to you—use black yarn creatively to make an adorable or spooky look!
Uses of the Crochet Halloween Pumpkin
- Holiday Décor: Add to your Halloween decorations for a handmade touch.
- Gifts: Great as a handmade seasonal gift for friends or loved ones.
- Party Accessory: Use as centerpieces or party favor items during Halloween gatherings.
Pro Tip
To make your pumpkin even more unique, experiment with yarn colors (like white for ghost pumpkins or green for gourds) or add embroidered embellishments like vines or patterns along the sides.
Conclusion
This crochet Halloween pumpkin pattern provides a fun and beginner-friendly way to create a festive piece perfect for the spooky season. From forming the pumpkin base to creatively shaping its segments and adding decorative features, this project is straightforward and highly customizable.


