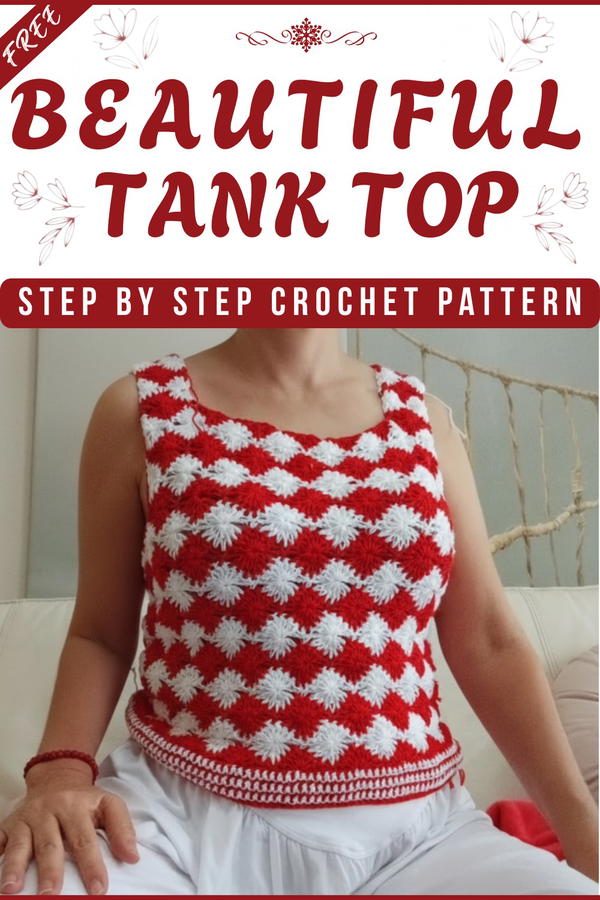
A cozy and stylish way to enjoy summer fashion is by making your own sleeveless top using simple yarn and a crochet hook. The Crochet Tank Top pattern is perfect for creating a light, airy top that looks beautiful in any color or style you like. This top feels soft on the skin, keeps you cool, and can be worn alone on hot days or layered over a shirt for a fun look.
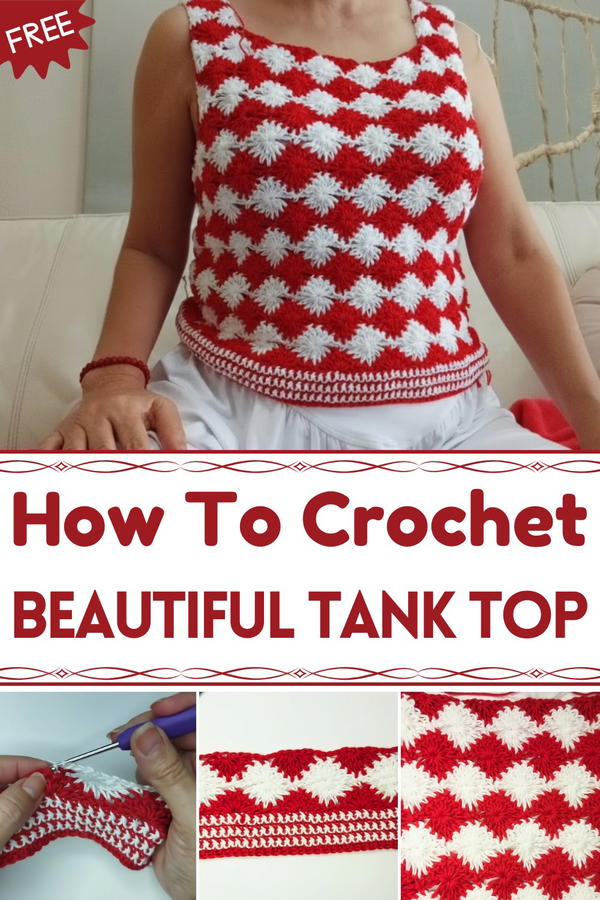
Radiance Crochet Tank Top Pattern to Shine This Summer
Bright or pastel colors, stripes, or even pretty holes and patterns can make your crochet tank truly special. This pattern is easy to adjust for any size or shape, making it great for everyone—kids, teens, or adults.
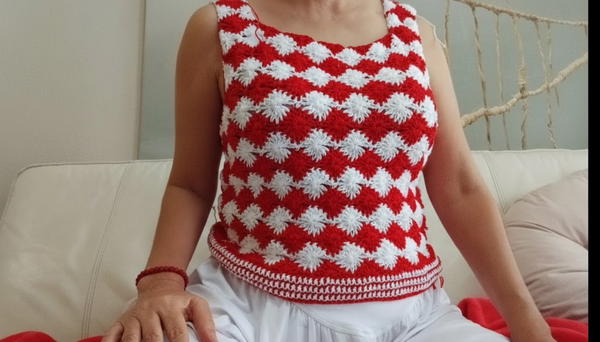
The most unique feature is that you can make the top by hand and add your own details, such as a ribbon or button, showing off your creativity and skill. A crochet tank top is not just clothing—it’s a piece of art you can wear every day.
Lacy Crochet Tank Top
Skill Level:
Intermediate to Advanced
Materials
- Yarn: Cotton, light (Category 3, DK or sport weight). 200g total; 100g each of two colors (e.g., red and white).
- Hook: US size D/3 (3.0mm) or size needed to meet gauge.
- Notions (Optional):
- Yarn needle for weaving in ends
- Buttons (if you wish to join at the sides with buttons)
- Stitch markers
- Ribbon (for bow-back closure)
- Measuring tape
- Gauge: Use the screen measurements or swatch for final garment size and fit.
Key Abbreviations (US crochet terms):
| Abbreviation | Meaning |
|---|---|
| ch | chain |
| sc | single crochet |
| dc | double crochet |
| sl st | slip stitch |
| sp(s) | space(s) |
| st(s) | stitch(es) |
| rep | repeat |
| RS | right side |
| WS | wrong side |
Special Stitches:
- Fan: 7 dc in the same stitch.
- Cluster (cl): A group of partially completed dc closed together as instructed.
- Color change: Work final yarn-over of last st in old color with new color.
Special Notes
- The top is made in two identical or complementary rectangles (front and back) seamed at the sides.
- For a bow/tie-back: Make the back piece shorter or rectangular, add ribbon or crocheted ties.
- Fit and neckline/strap length may be adjusted for personal preference.
Pattern Instructions
1. Prepare the Foundation Chain
a. With Color A, ch a multiple of 8 plus 1 (or as per your measurement for bust width).
• Standard sizes and measurements are shown in the video (reference or adapt as desired).
• For working in rows: foundation chain = (8 × n) + 1.
2. Row 1 (WS):
- Ch 1 (does not count as st), starting in 2nd ch from hook, sc in each ch across to end.
- Tip: You may insert your hook into the back bump of each ch for a neater bottom edge.

3. Rows 2–8: Stripe Section
Rows 2–8 (total 7 rows):
- For each row, change color (alternate Colors A and B as desired; first change at end of Row 1).
- Ch 1, turn, sc in each st across.
- Carry or fasten off yarn as preferred for neat edges.
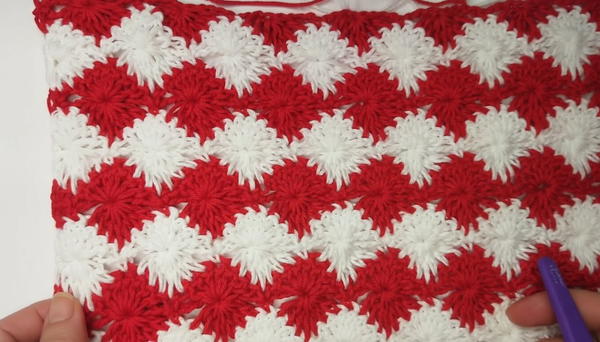
4. Row 9: Fan Stitch Row
- Change to Color A.
- Ch 3 (counts as first dc), dc in same st.
- [Skip next 3 sts, in next st work 7 dc (fan), skip 3 sts, sc in next st]; rep from * to end.
- End with: skip 3, 2 dc in last st.
- Fasten off and change to Color B.
5. Row 10: Cluster Row
- Join Color B in first st, ch 3 (counts as dc), dc in same st.
- Cluster across top of previous fan (work 1 partially-finished dc in each of 4 consecutive sts across top of fan, yo, pull through all loops to close cluster), ch 3, sc in next st (top of fan), ch 3, cluster in next 4 sts; rep to end.
- End with 2 dc in last st. Fasten off, change to Color A.
6. Row 11: Fan Stitch Row (as Row 9)
- Repeat Row 9 in Color A, aligning fans above clusters and sc in between.
7. Row 12: Cluster Row (as Row 10)
- Repeat Row 10, again in contrasting color.
8. Repeat Fan and Cluster Rows
- Alternate these as established, alternating your color stripes (7 or as desired for top length).
- Your sequence will be:
Row 1: sc
Rows 2–8: sc, alternate colors
Row 9: Fan (dc), Color A
Row 10: Cluster, Color B
Row 11: Fan, Color A
Row 12: Cluster, Color B
Continue this sequence until desired top length (to underarm).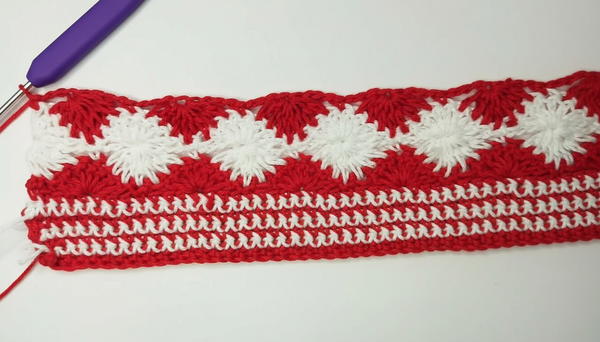
9. Shape Armholes
- When you reach underarm:
- On the next RS row, join yarn at edge and skip enough stitches on both ends to form armholes (usually 1 or 2 fans wide, adjust for size).
- Only work the central stitches/sections for the front chest and neckline shaping from here on.
- Tip: Mark armhole edges with stitch markers.
10. Neckline Depth and Strap Formation
- Continue rows in pattern (fans and clusters), only over the central front stitches for desired neckline depth (number of rows).
- To form straps:
- At each neckline top, work in pattern (or in sc for a denser strap) for desired strap width (typically 3–5 sts wide).
- Ch the length needed for each strap (measure over shoulder).
- Finish off.
- Repeat for both sides.
11. Back Piece Options
- Option 1: Make identical to front.
- Option 2 (Tie-back):
- Work a simple rectangle to underarm height, then finish.
- Add buttonholes, sew on buttons at sides, or crochet/attach ribbon ties at top corners for bow closure.
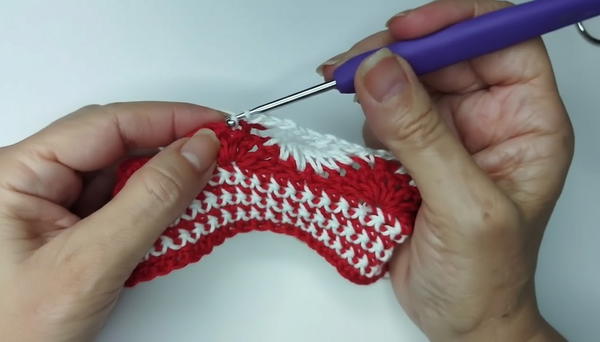
12. Finishing
- Seam sides if desired (leave armhole open).
- Sew on buttons or ties as determined.
- Edging:
- Using Color A or B, work 1 round of sc evenly around entire top (lower edge, armholes, neckline) to neaten edges.
- Fasten off, weave in ends.
13. Blocking
- Gently wet or steam block your top to open up lace fans and ensure even size.
Conclusion
This airy, striped tank top combines simple construction with elegant lace fans and clusters for a summery garment. With modular front and back pieces, it can be easily customized in length, color, and back style (buttoned, sewn, or ribbon-tied). Alternate color striping and fan/cluster rows produce a visually striking and comfortable top, perfect for layering or wearing alone.
Pattern Correction & Tips
- Correction: In fan/cluster rows, always align the fans directly above previous clusters (and vice versa) for a continuous pattern.
- Tip: When joining yarn for color changes, always work the final yarn-over of the previous st in the new color. This prevents color "jogs."
- Tip: Try on as you go, especially before shaping armholes and neckline, for best fit. Adjust numbers of stitches or rows as needed for your intended size.
- Tip: Use soft, non-stretchy cotton for best drape and wearing comfort.