Celebrate the season with this Free Crochet 3D Christmas Wreath Square Pattern, filled with festive detail and handmade charm for joyful creations.
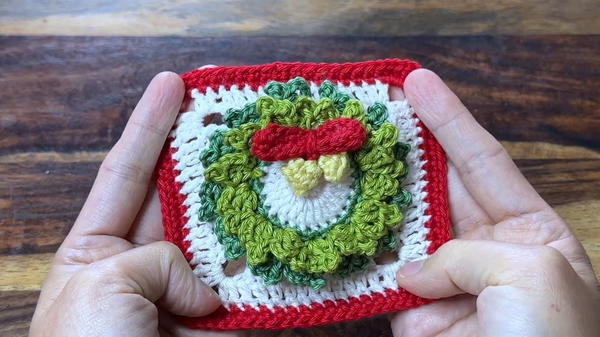
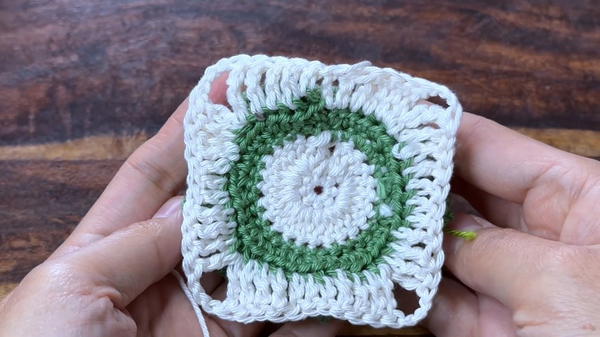
The charm of holiday décor often begins with small, thoughtful pieces that carry the warmth of the season. The Free Crochet 3D Christmas Wreath Square pattern brings that festive spirit to life, combining texture, color, and detail in a way that feels both cheerful and timeless. Each square features a raised wreath at its center, forming a soft three-dimensional look that stands out beautifully on blankets, wall hangings, or decorative pillows.
Spark Crochet 3D Christmas Wreath Square You’ll Treasure
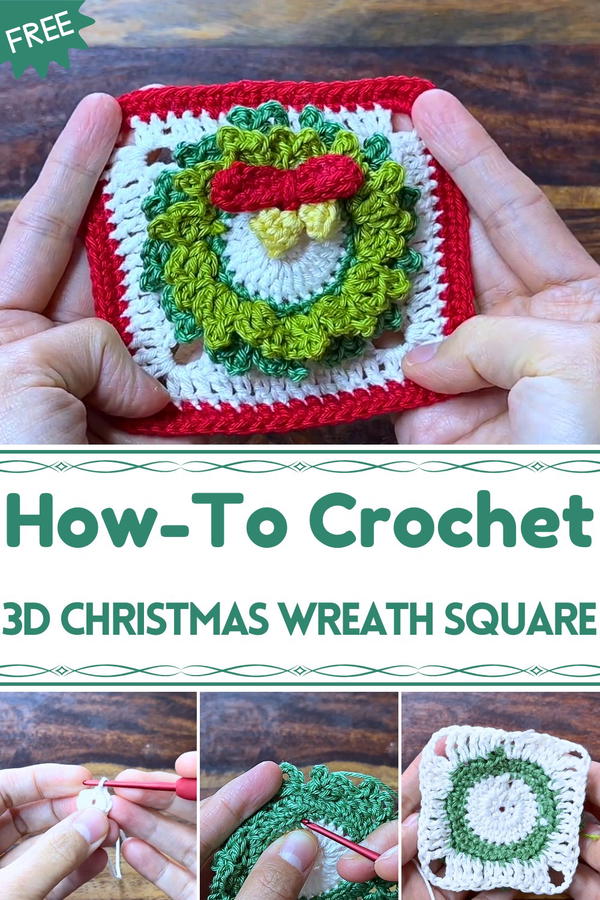
The layered stitches give it depth and richness, while the combination of green, red, and neutral tones captures the traditional Christmas palette perfectly. Lightweight yet sturdy, these squares hold their shape well, making them ideal for long-lasting projects. Their versatile structure allows easy joining, letting each piece connect seamlessly into larger arrangements or remain as standalone décor.
Beyond its festive appeal, this pattern offers relaxation and satisfaction in every stitch, turning ordinary yarn into something joyful and meaningful. Perfect for gifting or decorating, the finished squares bring texture and color to any holiday space. With charm, warmth, and creative detail, this crochet wreath square adds a touch of handmade beauty to seasonal decorations, reflecting the cozy joy and spirit of Christmas in every stitch.
Special Features
- Christmas Theme: Perfect for holiday decorations and gifts.
- Layered Wreath: The granny square includes a detailed wreath with two layers of petals.
- Decorative Elements: Option to add bells and a bow for extra festivity.
- Textured Design: Utilizes various crochet stitches to create a textured and visually appealing pattern.
Level of Difficulty
This project is suitable for intermediate crocheters. Basic knowledge of crochet stitches and techniques such as the magic ring, single crochet, double crochet, and treble crochet is needed. The video provides clear instructions to help guide you through more complex steps.
Materials Needed
- Yarn: Various colors for the wreath, bells, and bow.
- Crochet Hook: Specific size not mentioned; use a hook suitable for your yarn weight.
- Scissors: For cutting yarn.
- Darning Needle: To sew pieces together and weave in ends.
- Measuring Tape: To ensure correct dimensions.
Step-by-Step Details
1. Creating the Magic Ring
- Wrap Yarn Around Fingers: Wrap the yarn around your fingers twice.
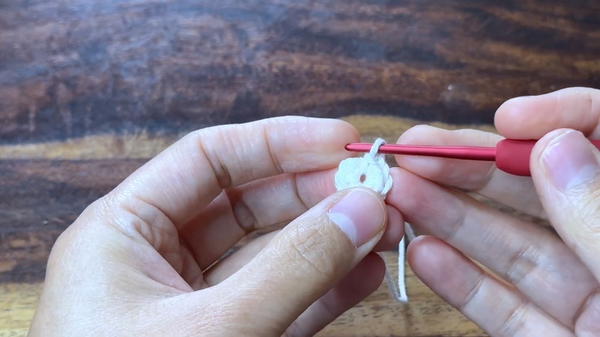
- Insert Hook and Pull Through Loop: Insert the hook, pull through a loop, and chain one.
- Chain One: For the single crochet stitch, chain one at the beginning of the round.
- Work Single Crochets into the Ring: Make eight single crochets into the ring.
2. Tighten the Magic Ring
- Identify the Moving Strand: Pull on the yarn tail and observe which strand of the double magic ring moves.
- Pull Firmly: Pull the identified strand to close the inner circle.
- Pull Tail Nice and Tight: Ensure the ring is securely closed and tight.
3. Round One - Slip Stitch
- Slip Stitch: Slip stitch to the very first single crochet to finish round one.
4. Round Two - Double Crochets
- Chain Three: Chain three, which counts as the first double crochet.
- Make Three Double Crochets: Make three double crochets in each stitch across the round, working over the top of the yarn tail.
- Total Stitches: Continue until you have reached 24 stitches.
5. Round Three - Single Crochets
- Switch Yarn: Join new yarn.
- Pattern: Make two regular single crochets followed by an increase. Chain one at the beginning of the round (does not count as a stitch).
- Work Single Crochets: Continue until the end of the round and join to the back loop of the first single crochet.
6. Round Four - Half Double Crochets
- Chain Two: Chain two, which counts as a half double crochet. Work a half double crochet in the same stitch.
- Pattern: Work a half double crochet in each of the next three stitches, followed by an increase in the next stitch.
- Join with Slip Stitch: Join with a slip stitch, taking only the front loop.
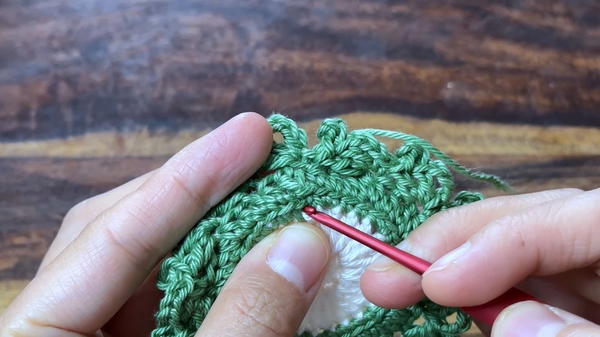
7. Round Five - Wreath Petals
- Chain One: Chain one as the beginning chain in the same stitch. Make a single crochet.
- Petals: Chain three, double crochet, chain three, and pico. Repeat this pattern 12 more times, skipping two stitches (front loop only).
- Slip Stitch: Slip stitch to the first stitch to complete the round.
8. Round Six - Second Layer of Wreath
- Pattern: Repeat the petal pattern, but skip just one stitch at first, then skip two stitches. Repeat until the end.
9. Round Seven - Forming the Square
- Back Loops of Round Four: Insert the hook into the back loops of round four.
- Double Crochet: Chain three (counts as a double crochet), then double crochet in the next stitch.
- Treble Crochets: Make a treble crochet in each of the following three stitches.
- First Corner: Work a double treble crochet in the next stitch, chain three, and make another double treble crochet in the same stitch.
- Repeat for Sides: Continue with three treble crochets, followed by double crochet in each of the next three stitches.
10. Enlarging the Square
- Double Crochet: Make a double crochet in each stitch.
- Corners: In each corner, make two double crochets, chain three, and two more double crochets.
- Border: Border the square with two rounds of single crochets, increasing in each corner by working three stitches in the third stitch of five.
11. Making Bells
- Magic Ring: Create two rounds of six single crochets in the magic ring.
- Close Ring: Close the ring and join to the first single crochet stitch.

12. Crafting the Bow
- Chain 16: Join in the first chain.
- Single Crochet Rounds: Work two rounds of single crochets.
- Secure: After the final joining, chain six, wrap around the piece, and make a slip stitch to attach. Chain one to secure and work away the tails.
Tutor’s Suggestions
- Work Slowly: Take your time to ensure stitches are correct, especially when working with magic rings and loops.
- Practice Techniques: Familiarize yourself with magic rings, single crochets, and double crochets if you are not already comfortable with them.
- Personal Touch: Customize colors and embellishments to make the project uniquely yours.
Uses of the Granny Square
- Holiday Decoration: Add to your Christmas decorations, tree, or garlands.
- Gift Enhancement: Use as an embellishment on gift wraps.
- Home Décor: Incorporate into festive home décor items such as cushions or throws.
Tip
When working with magic rings, ensure the ring is tightened securely to avoid loosening. Practicing the magic ring technique beforehand can help achieve a neat finish.
Conclusion
This Christmas wreath granny square is a delightful addition to your holiday crochet projects. By following the detailed steps provided by Tiny Elephant, you can create a beautiful and festive square complete with optional decorative elements.


