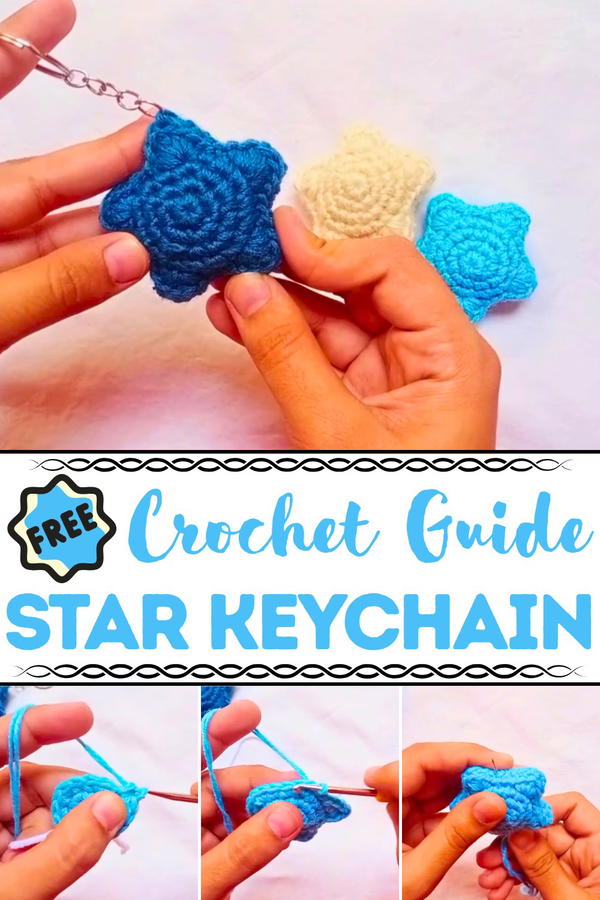
Shine bright with the Crochet Star Keychain pattern, a playful and charming accessory that keeps your keys and essentials stylishly close.
Twinkling stars have always captured attention, inspiring small moments of wonder in everyday life. The Crochet Star Keychain pattern transforms that celestial charm into a tiny, practical accessory that brings joy wherever it goes. Each keychain features a soft, textured star with defined points, offering a delightful tactile experience while adding a touch of elegance to keys, bags, or backpacks. Its compact size makes it convenient to carry, yet eye-catching enough to make ordinary items feel special.
Tiny Crochet Star Keychain Full of Personality
Durable yarn ensures long-lasting use, maintaining shape and softness through daily wear, while its lightweight construction allows for effortless portability. The keychain is perfect for gifting, serving as a charming keepsake for friends, family, or anyone who appreciates whimsical, handmade accessories. Working on this project provides a calming, hands-on experience, offering both satisfaction and a sense of accomplishment as a functional and attractive piece comes to life.
Beyond practicality, the Crochet Star Keychain adds a subtle sparkle to everyday routines, turning mundane tasks like unlocking doors or finding a bag into moments of delight. Combining beauty, utility, and a touch of playful charm, this keychain is a perfect small accessory that brightens daily life and adds personality to simple belongings.
Materials Needed
- Yarn: Scrap yarn is ideal, but any yarn of your choice can be used. Ensure you have enough for two stars and stuffing.
- Crochet Hook: Choose a size that matches the yarn weight (e.g., 3.5 mm or 4 mm).
- Scissors: For trimming yarn.
- Yarn Needle: For sewing star halves together and weaving in ends.
- Stuffing Material: Use scrap yarn, fiberfill, or anything soft available.
- Optional Decorations: Add a keychain ring, eyes, or other embellishments for customization.
Special Features
- Three-Dimensional Puffy Design: The final creation is a soft and stuffed star that is cute and compact.
- Multi-Functional: Can be used as a keychain, ornament, or decorative item.
- Scrap Yarn Project: Ideal for using leftover yarn, making it sustainable and cost-effective.
- Beginner-Friendly with Clear Guidance: Each step is explained slowly and thoroughly, especially for those new to crocheting.
- Customizable Details: Add eyes, a mouth, or other features to turn it into a unique animal or character.
Level of Difficulty
Beginner to Intermediate:
- Basic stitches are beginner-friendly, such as single crochet, half-double crochet, slip stitch, and working in rounds.
- Sewing the parts together and stuffing the star requires minimal hand-crafting skills and patience, which might push beginners slightly toward intermediate-level crochet.
Step-by-Step Instructions
Part 1: Creating the Star Base
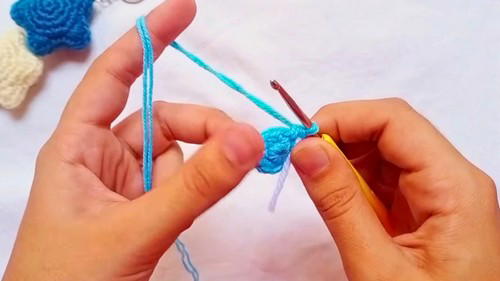
1. Start with a Magic Ring
- Create a magic ring, adjusting it tightly.
2. Work 5 Single Crochets into the Ring
- Insert your hook into the magic ring and work 5 single crochet (SC) stitches into it. Pull the yarn tight to close the ring fully.
3. Increase Stitches into Each Stitch
- Work a single crochet (SC) into the first stitch, followed by another single crochet into the same stitch (increase).
- Repeat this pattern of increasing (2 SC into each stitch) into all 5 stitches for a total of 10 stitches.
4. Mark Your Stitch for the Next Round
- Use a stitch marker or a yarn in a contrasting color to mark your first stitch so you can easily track rounds.
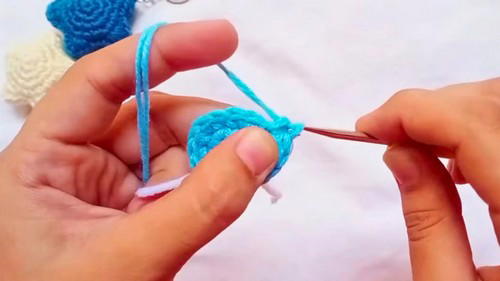
5. Pattern Progression
- Work the following rounds with varying patterns:
- Round 1: 1 SC, followed by an increase (2 SC in one stitch). Repeat all around.
- Round 2: 2 SC, followed by an increase. Repeat all around.
- Continue increasing evenly until you have 20 stitches at the end.
2: Forming the Star Bumps
1. Start the Bump Pattern
- In the same stitch where your last increase was made, work the following stitches to form a bump:
- Single crochet → Half double crochet → Double crochet → Half double crochet → Single crochet — all in the same stitch.
2. Add Slip Stitches
- Work three slip stitches (SL ST) into the next three stitches to separate the bumps.
3. Repeat the Bump Pattern
- Repeat the bump sequence on every fourth stitch:
- SC → HDC → DC → HDC → SC, all in the same stitch, followed by three slip stitches.

- SC → HDC → DC → HDC → SC, all in the same stitch, followed by three slip stitches.
- Continue until you create five bumps.
4. Finish the Round
- End by working two slip stitches into the remaining stitches of the round.
5. Cut the Yarn
- Leave a long tail for sewing the pieces together later.
3: Making the Second Star Piece
Repeat the above steps with shorter yarn tails (since this second piece doesn’t require a long tail for sewing).
4: Assembling the Puffy Star
1. Begin Sewing the Two Halves
- Align the pieces together, ensuring the bumps match on both sides.
- Insert stuffing material (scrap yarn or fiberfill) between the two halves before sewing completely.
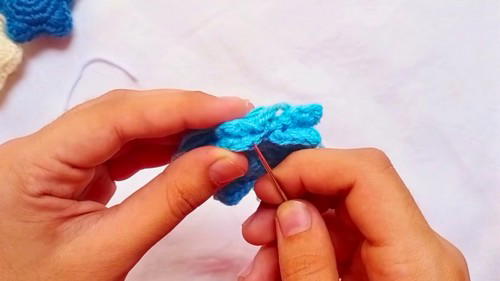
2. Use Only the Back Loops
- While sewing, work through only the back loops of each stitch on both stars. This ensures the front loops remain neat and define the star's edges.
3. Continue Sewing and Stuffing
- Sew around the edge of the star until completely closed. Add more stuffing incrementally to ensure the star remains plump but proportional.
5: Finishing Touches
1. Weave the Ends
- Securely weave the yarn ends by inserting your needle from one bump to another, hiding the excess yarn.
2. Trim Excess Yarn
- Cut any visible yarn ends. Use scissors to push leftover yarn inward for a clean finish.
3. Add Optional Decorations
- You can attach a keychain ring or embroider features like eyes and a mouth to customize the star further.
Tutor's Suggestions
- Slow and Steady: Take your time with the bumps, as they require multiple stitches in the same space and can be tight to work with.
- Mark Your Stitches: Use stitch markers or contrasting yarn to avoid losing track of important stitches, especially when working in rounds.
- Use Scrap Yarn: The instructor emphasizes that this project is designed with scrap yarn in mind, making it eco-friendly and cost-effective.
- Focus on the Back Loops: Only sew into the back loops when joining the halves to ensure the edges remain clean and defined.
Uses of the Puffy Star
- Keychain: Attach to your keys or bag for a cute personalized accessory.
- Decoration: Use as a Christmas tree ornament or part of other festive décor.
- Gift: A handmade craft perfect for gifting to kids, friends, or loved ones.
- Toy Customization: Embellish with a face to make it look like an animal or character.
Tip for Success
To ensure a uniformly plump star, stuff the star carefully and evenly. Avoid overstuffing, as it can distort the shape, and under-stuffing can make the star lose its puffiness.
Conclusion
The crocheted star is a delightful project that combines creativity, sustainability, and functionality. It's beginner-friendly yet allows room for customization for more advanced crocheters.


