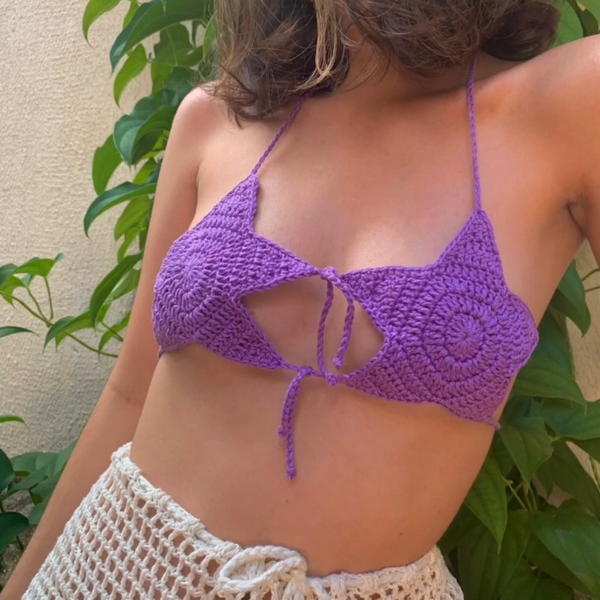
Glow with confidence using this Crochet Top Pattern full of airy stitches fresh style and an easy piece that fits casual days summer looks beautifully.
Add a touch of handmade charm to your everyday style with this beautifully crafted summer top! Light and breathable, it keeps you cool while showing off a delicate, eye-catching texture made from simple, neat stitches. The design embraces comfort without losing its stylish appeal, making it perfect for outings, casual gatherings, or relaxing at home.
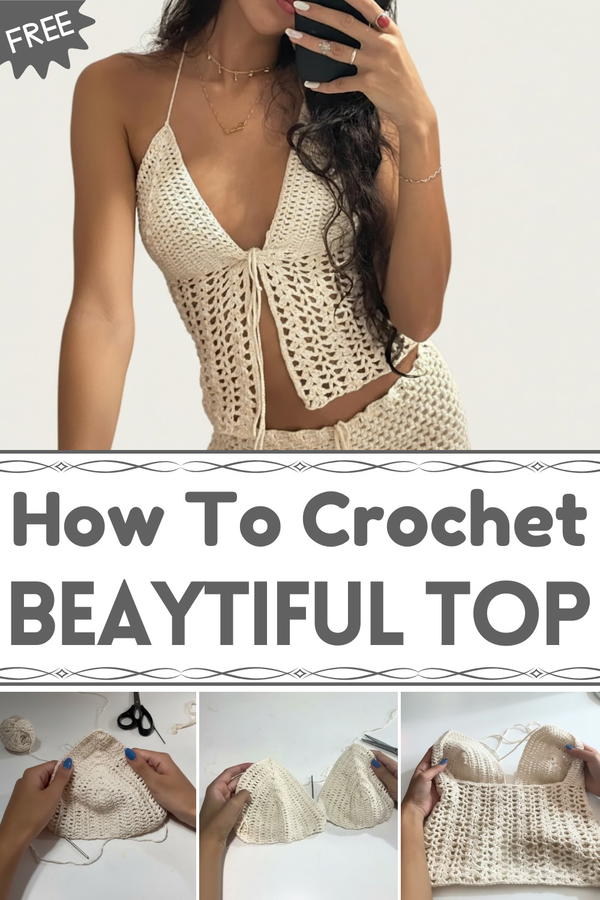
Easy Crochet Top Pattern for Casual and Chic Everyday Wear
Its versatile look pairs well with different outfits, and you can easily choose your favorite colors to make it truly your own. Soft to the touch and gentle on the skin, this top combines practical comfort with a fresh, cheerful appearance. Whether worn alone on a sunny day or layered when it’s cooler, it brings a joyful, homemade feel to your wardrobe. Easy to create and customize, this piece invites you to enjoy the beauty of handmade fashion every day.
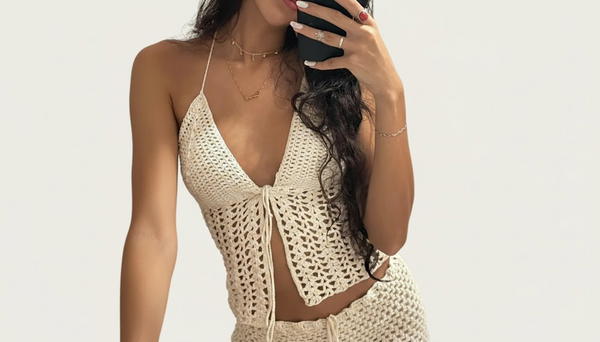
Crochet Bra Cup Top
Materials
- Charme yarn (natural color or preferred color)
- Crochet hook size 2.5 mm (recommended for tighter stitch)
- Scissors
- Measuring tape
Pattern Steps
Bra Cup (Make 2)
Round 1: Starting Chain & Base
- Make an initial knot.
- Ch until you reach approximately 15 cm (adjust chain for desired cup width).
- Add 2 more chains to start the height for the next row.
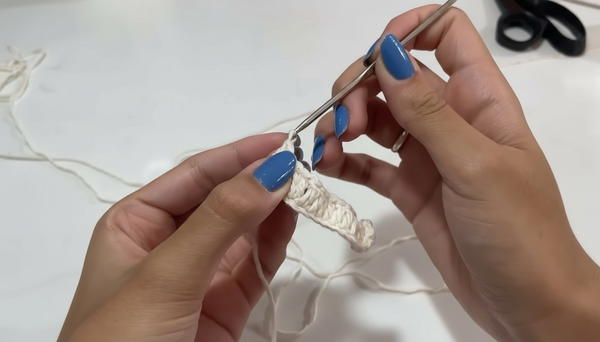
Round 2: First Double Crochet Row
- Count 3 chains from the hook – this counts as your first dc.
- In the 4th chain from the hook, make your first dc.
- Continue making 1 dc in each chain across until the end.
- At the end, make 2 dc in the last chain space.
- Join with a sl st in the top of the starting 3-ch.
Round 3 and Following: Building Up the Bra Cup
Ch 3 (counts as first dc), turn your work.
Continue making dc stitches across the row.
When you reach the last stitch, make 2 dc in the same stitch (corner shaping).
Make fans (2 dc, ch 2, 2 dc) spaced with separated chains to shape the cup (refer to fan pattern below).
- Fan sequence (in one stitch): 2 dc, ch 2, 2 dc.
- Alternate fans with chains and single dc stitches to create shaping.
Continue making dc stitches until last stitch.
Finish the row with a sl st in the 3rd chain of previous row chain.
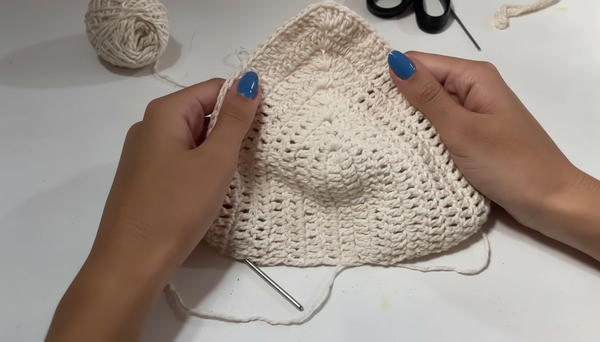
Repeat Rows:
- Continue alternating rows with fans and rows of simple dc stitches until your cup reaches desired height (Ester did 18 rows).
- Ensure fans align vertically, and chain spaces are consistent to keep shape even.
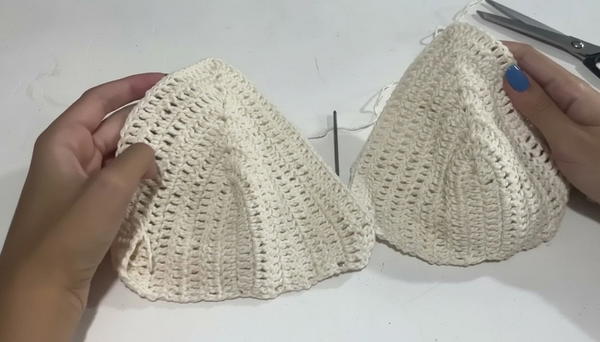
Joining the Cups & Back Strap
Back Strap Chain:
- With the thread attached to one bra cup, chain the desired length to fit your back (Ester chained ~25 cm).
- Join with a sl st to the second bra cup’s edge to form the back strap.
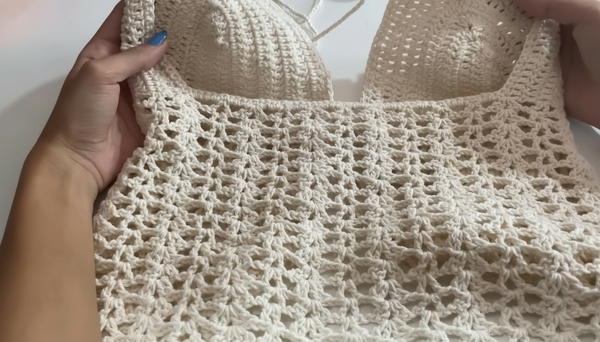
Bottom Band & Finishing Edges
Single Crochet Edging:
- Starting from the bottom edge, work sc stitches evenly around entire piece to give a neat finish.
- Work sc into chain spaces and across edges, including cups and back strap, to create a uniform border.
Straps and Front Tie
Straps:
- From the top of each bra cup (back side), chain the desired length for the neck straps (Ester chained ~200 ch, adjust as needed).
- Sew or tie the straps securely for neck fastening.
Front Tie:
- Using yarn tail or extra yarn, create a long chain for the tie located between the cups.
- Attach it to the bottom center of cups with a sc.
- Tie into a bow or knot for decorative and functional closure.
Final Finishing
- Weave in all loose ends securely.
- For added security on the front tie, thread the yarn strip through a few chain stitches multiple times, then tie off tightly to prevent unraveling.
Special Features
- Beginner-friendly with simple dc and chain combinations.
- Shaping by fans and chain spacing creates flattering bra cup shape.
- Adjustable back strap and neck ties for customized fit.
- Single crochet edging adds professional finish.
Difficulty Level
Beginner to Intermediate
Perfect for those new to crochet but comfortable with double crochet and basic shaping techniques.
Tutor’s Suggestions
- Use a 2.5 mm hook for a firmer texture that holds shape.
- Measure chain length carefully for each person’s size.
- Keep fans aligned and spaced equally to maintain symmetry.
- When sewing straps and ties, ensure knots are tight to avoid loosening.
- Feel free to customize colors and yarn weights; adjust chain lengths accordingly.
Uses
- Stylish summer or festival top.
- Beachwear or casual layering.
- Boutique or handmade market item.
Tip
If your bra cups are not staying flat, count stitches on both sides carefully to ensure equal numbers and perfect symmetry. Blocking the final piece can help smooth and shape it.
Conclusion
This crochet bra cup top by Ester is an elegant and approachable project for all levels, combining structured shaping with simple stitches. With careful measuring and attention to detail, you can create a flattering and beautiful top for yourself or your customers.