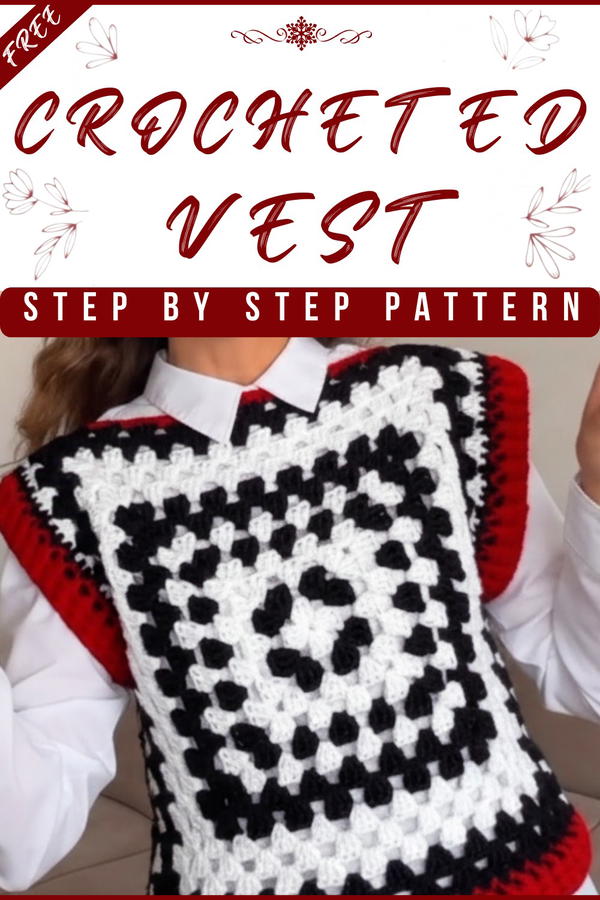
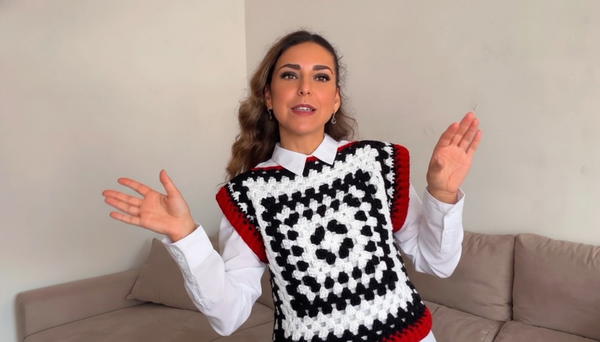
Do you want to add something simple yet stunning to your wardrobe? A crochet vest is the perfect choice! With its lightweight design and unique patterns, it brings a touch of elegance to any outfit. Whether you wear it over a casual dress, a tank top, or even a t-shirt, this piece stands out beautifully. The intricate stitches give it a handmade charm, making it both stylish and meaningful.
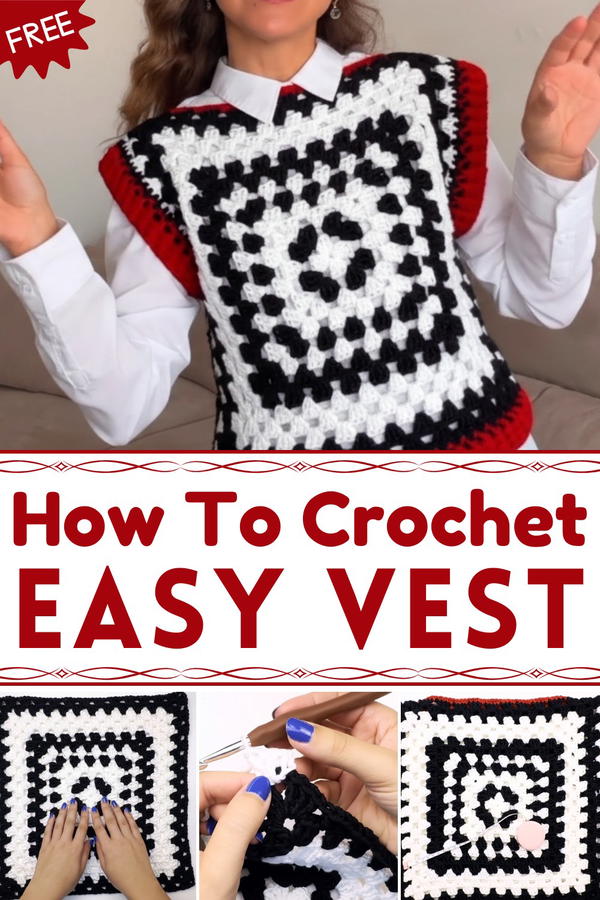
Free Crochet Vest Ideas That Look Amazing
Not only is it great for adding style, but it’s also practical. It works as a light layer for cooler evenings or as a decorative piece for a polished look. Available in endless designs—like floral, modern geometric, or classic openwork, it can be made in any color to suit your personality. Perfect for anyone who loves comfort mixed with beauty, a crochet vest brings creativity and coziness together in one stunning piece.
Materials Needed
To recreate this vest, gather the following:
Yarn:
- Hobby Yarn (Circle HBY)
- Color 1: Red (1 skein)
- Color 2: Black (2 skeins; part of the second skein will remain unused)
- Color 3: White (2 skeins; part of the second skein will remain unused)
- Features of Hobby Yarn: Anti-pilling and "Easy Pull" for smoother use and less tangling.
Tools:
- Crochet Hooks:
- 5.5 mm for the Granny Squares and base preparation.
- 4.5 mm for ribbed sections (accordion stitch).
- Tapestry Needle: For finishing and seaming.
- Stitch Markers: Essential for marking the neckline, armholes, and other key areas.
- Scissors.
Pattern Instructions
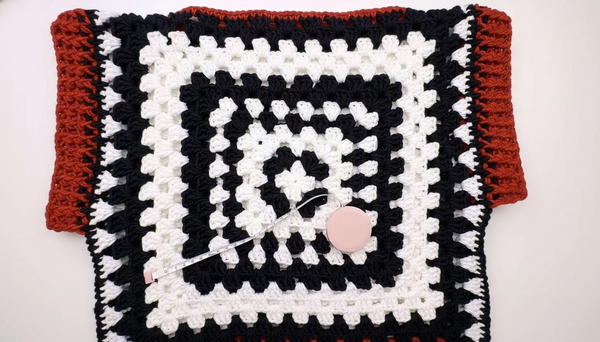
1. Make the Granny Squares
(a) Determine Size:
- For a Size Small (S), each Granny Square should measure 39 cm x 39 cm (approx. 13 rows).
- Adjust the number of rows for custom sizes:
- Measure your bust circumference and divide it by two. Each square should match or slightly exceed this half-measurement, accounting for some seams and ease.
(b) Creating the Granny Square:
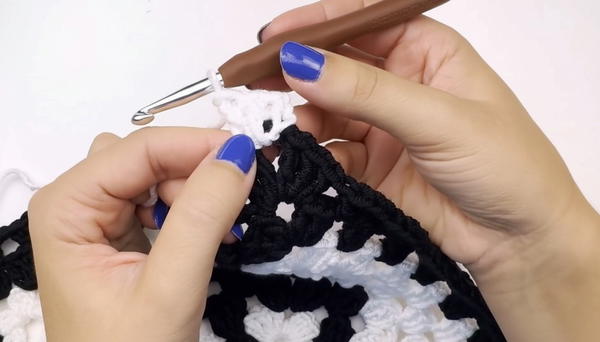
- This tutorial assumes basic knowledge of creating a Granny Square. If unfamiliar, refer to a separate tutorial for detailed instructions.
- Assemble your Granny Squares in your preferred combination of red, black, and white yarn or follow the sample: black as the dominant color, bordered with white and red.
2. Add Wide Edges to Squares
Before seaming, add edges to both squares to expand them.
(a) Side Expansion:
- Use white and black yarn.
- Attach white yarn randomly on one side of the square.
- Work one row of closed double crochet (dc) stitches across one side. (In the corner spaces, create 3 dc followed by 1 chain.)
- After completing the white row, switch to black and repeat the same process.
Tip: These added rows should contribute to the total width necessary for your vest. Add more rows as needed for larger sizes.
(b) Leaving Neckline Clearance:
- Do not add rows to the top or bottom edges to leave space for the neckline. The finished Granny Squares must only have added rows on their left and right sides.
3. Seam Front and Back Granny Squares
(a) Mark Armholes and Neckline:
- Use stitch markers to define the following:
- Armholes: Leave a 23 cm gap on each side (adjust based on your preference).
- Neckline: Leave a 26 cm gap at the top (or customize it to fit comfortably).
(b) Assemble the Squares:
- Turn the Granny Squares inside out to join them.
- Use a slip stitch join or a tapestry needle to stitch along the shoulders and sides below the armholes.
- When working with the slip stitch, grab only the top loops of stitches on both sides to create a decorative ridge when the vest is turned right side out.

Note: Test fit the vest after marking. Adjust necklines or armholes according to your comfort preferences.
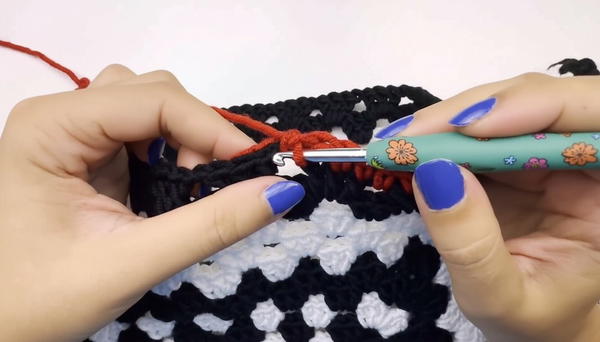
4. Neckline Finish
- Use red yarn and a 4.5 mm hook for the neckline border.
- Attach the yarn to a random location on the neckline.
- Work single crochet (sc) stitches around the entire neckline, one stitch per chain.
- For clean connections, work 3 sc into corners for smoother transitions.
- Once complete, fasten off and use the tapestry needle to weave in the tail.
5. Add Ribbed Finishes (Accordion Stitch)
(a) Sleeves (Armholes):
- Begin by attaching red yarn to the armhole.
- Prepare the base with one row of double crochet (dc).
- Switch to the 4.5 mm hook and create the accordion/ribbed effect by alternating:
- Front Post Double Crochet (FPdc): Yarn over, insert the hook around the front of the post from right to left, yarn over again, and finish your dc.
- Back Post Double Crochet (BPdc): Yarn over, insert the hook around the back of the post, yarn over, and finish your dc.
- Continue this pattern (FPdc, BPdc) around the armhole for 3 rows (approx. 4 cm at 3 rows).
- Use a slip stitch to join the round and fasten off.
(b) Bottom Hem:
- Work a dc preparation row across the entire bottom hem of the vest using a 5.5 mm hook.
- Once complete, switch to a 4.5 mm hook and repeat the FPdc/BPdc alternating pattern for the desired number of rows (recommended: 3-4 rows for a neat look).
- Fasten off and weave in ends.
Final Steps
- Ensure all loose threads are woven in with the tapestry needle.
- Steam block or lightly wash and flat-dry the vest for an even and professional finish.
Tips for Success
Sizing Adjustments:
Add or remove rows to each Granny Square and additional rows per side based on your body measurements.Tension Matters:
Adjust the hook size if your stitches are too tight/loose to achieve the desired measurements.Customization:
- Switch up colors to suit your personal style.
- Use variegated or gradient yarn for a unique look.
Conclusion
Congratulations! You’ve completed a stylish and versatile crochet vest with a modern edge. This project effectively combines basic Granny Square techniques with simple finishing methods to create a garment that’s both chic and practical.
Special Words
This vest has a simple construction formed by two Granny Squares (front and back), seam details, ribbed finishes for the sleeves and hem, and a border along the neckline. Follow this clear step-by-step tutorial for each component.
Crochet Vest Pattern
This guide outlines the complete steps for making a beautiful and modern crochet vest as described in the video transcription. This vest is constructed using Granny Squares, a ribbed hem (accordion stitch), and other simple yet elegant finishing techniques. It’s perfect for beginners looking to create a stylish and practical garment while experimenting with basic crochet techniques.