Sweeten your winter look with this Free Crochet Candy Cane Bucket Hat Pattern, perfect for festive flair and cozy handmade style.
Winter days often call for something cheerful to brighten the chill, and a touch of handmade charm can make all the difference. The Crochet Candy Cane Bucket Hat pattern brings festive style and cozy comfort together in one delightful accessory. With its signature red and white stripes, this hat adds a playful seasonal twist while maintaining a polished, wearable look.
Free Crochet Candy Cane Bucket Hat You Can Try Today

The smooth stitch work gives it a soft yet structured form, allowing a comfortable fit that suits different head sizes with ease. Perfect for casual outings, holiday events, or gifting, it combines warmth with lightness, ensuring comfort throughout the day. The color contrast captures the joyful spirit of the season, making it a standout piece that pairs beautifully with winter outfits.
Its durable texture holds shape while staying breathable, offering practicality and charm in equal measure. Subtle detailing around the brim enhances its neat appearance, giving it a refined finish without losing its fun appeal. Beyond its visual beauty, this hat reflects thoughtfulness and care, turning a simple project into a meaningful addition to any wardrobe.

Special Features
- Swirl Design: The hat features a creative spiral pattern at the top, giving it a fun and unique candy cane aesthetic.
- Dual Color Pattern: Alternates between red and white yarn for a festive striped effect.
- Customizable Sizing: Gabrielle provides a sizing chart and instructions on how to accurately measure your head for a perfect fit.
- Bucket Hat Rim Design: Includes instructions for a charming outward-flared brim, adding a playful and functional touch to the hat.
- Versatile Styling: The hat can be worn with the red or white side facing front, depending on your preference.
Materials Needed
- Yarns:
- Red and white yarn (Gabrielle recommends soft yarn; brand-specific details are in her video).
- Crochet Hook:
- Gabrielle uses a 4.5mm hook, but you can adjust based on your preferred tension.
- Scissors:
- For cutting yarn at the end of each section.
- Stitch Markers:
- Safety pins, yarn scraps, or store-bought markers to track row transitions.
- Tapestry Needle:
- Helpful for weaving in loose ends at the end of the project.
- Measuring Tape:
- Optional but useful for precise sizing.
Step-by-Step Instructions
Step 1: Measuring Your Head Size
- Use a measuring tape to determine your head circumference. Gabrielle recommends measuring your head by placing the tape slightly above your ears and covering your eyebrows.
- Reference Gabrielle's sizing chart for age-based standard sizes if you don’t have a measuring tape. If your head size measures 21.5 inches, follow her detailed example.
Step 2: Starting the Hat with a Magic Circle
- Form the Magic Circle: Wrap the yarn around your fingers to create a loop and secure it with your hook.
- Create Stitches within the Circle:
- Single Crochet: Insert hook under the circle, yarn over, pull through, and complete the stitch.
- Half Double Crochet (HDC): Yarn over, go into the magic circle, pull up, and complete the stitch through all three loops on the hook.
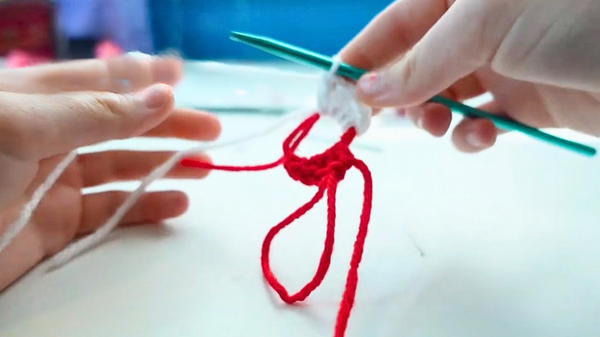
- Double Crochet (DC): Yarn over, go into the circle, pull up, and complete the stitch by pulling through two loops twice.
- Add a sequence of stitches made up of single crochets, half double crochets, and double crochets to form the center of the hat's crown.
- Switch Colors:
- Grab your white yarn and use it to continue the pattern, starting after the last double crochet of the red yarn.
Step 3: Closing the Magic Circle
- Pull the tail of the magic circle until it closes tightly, forming the base of the hat.
- Gabrielle recommends weaving in loose ends at this stage to keep your work tidy.
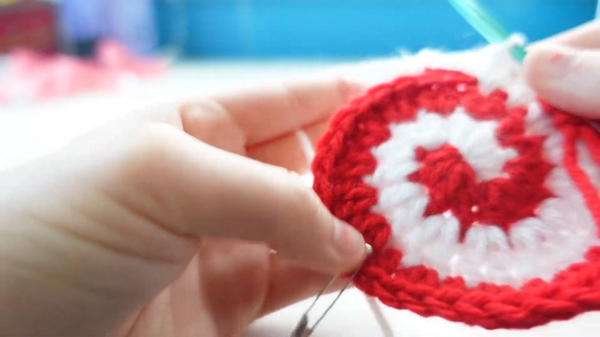
Step 4: Expand the Spiral
- Use Double Crochet Increases:
- Insert your hook into the designated stitch and complete two double crochet stitches in the same space to increase size.
- Perform increases every few stitches in the first row of the red section.
- Alternate Colors: Switch back to white after completing the red stitches, using the same increase pattern in the white section.

Step 5: Spiral Formation Through Continuous Increases
- Track Progress Using Stitch Markers:
- Place a stitch marker after the last stitch of each row to keep track of where rows begin and end as increases continue.
- Gradually expand the spiral:
- Row 1: Increase every 3 stitches.
- Row 2: Increase every 4 stitches.
- Row 3: Increase every 5 stitches.
- Continue increasing by adding one stitch in between increases with each row until the hat measures 6.75–7 inches in diameter, as recommended for a 21.5-inch head circumference.
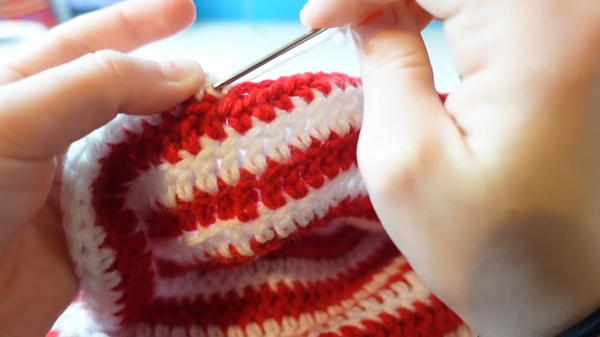
Step 6: Creating the Bucket Hat Rim
- Front Loop Double Crochets:
- To make the bend for the hat brim, work double crochets into the front loops only. This technique creates a natural outward flare.
- Add 4 rows of front-loop-only double crochets.
- Normal Double Crochets for Structure:
- After completing the outward bend, switch back to regular double crochets for the remaining rows.
- Continue alternating red and white sections without increases, ensuring the brim reaches the desired width.
Step 7: Weaving Loose Ends
- Use a tapestry needle to carefully weave in all loose ends.
- Gabrielle suggests threading yarn through stitches of the same color to maintain a polished look.
Level of Difficulty
- Intermediate: While many steps involve basic stitches such as single crochet, half double crochet, and double crochet, techniques like front loop-only stitching, alternating colors, and measuring for custom sizing make this project better suited for those who have a little crochet experience.
Tutor's Suggestions
- Keep Tension Consistent: Tight stitches may make switching colors and creating increases more difficult.
- Experiment with Yarn Choices: Gabrielle suggests using a soft yarn but encourages viewers to try different brands for varied textures.
- Customize Your Hat: Adjust the number of rows or play with colors to create different themes (e.g., green and white for mint or blue and white for winter!).
Uses
- Holiday Accessory: Perfect for festive celebrations in December.
- Gift Idea: A thoughtful handmade gift for a loved one.
- DIY Decoration: Use the hat as a decorative centerpiece or fun holiday photo prop.
A Handy Tip
When switching yarn colors, leave a slightly longer tail to make weaving ends easier. Consider weaving ends as you go to reduce finishing time.
Conclusion
Gabrielle's Candy Cane Crochet Hat Tutorial is an engaging project that combines simplicity and creativity, ideal for crocheters looking to make festive accessories. The spiral pattern, dual-color design, and customizable size make this hat a fun and functional addition to holiday wardrobes.


