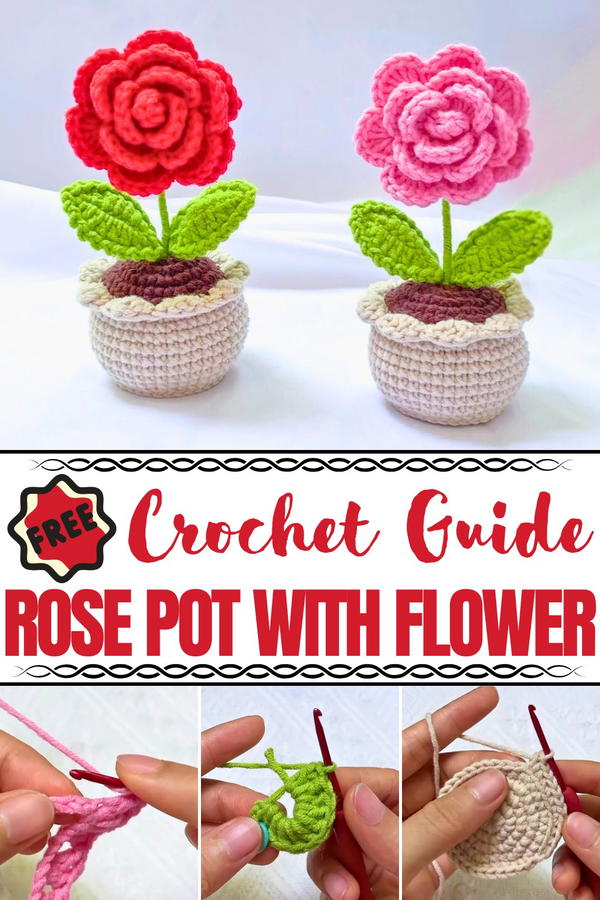
Bloom creativity with this Crochet Rose Pot With Flower pattern, a charming design to everlasting blossoms for home or gifting.
Roses have long been admired for their delicate beauty, yet their fleeting nature often leaves us longing for more. The Crochet Rose Pot With Flower pattern offers a lasting version of this beloved bloom, turning yarn into a graceful arrangement that never fades. Each petal is shaped with fine detail, resting in a pot that radiates homely charm, making it both visually appealing and meaningful. Unlike fresh roses that wither, these blossoms hold their form, bringing a touch of elegance to any room throughout the seasons.
Romantic Crochet Rose Pot With Flower Fro Home Accent
The softness of the yarn gives them a comforting texture, while the arrangement’s depth and structure reflect the natural allure of a real rose. Perfect for brightening tables, desks, or shelves, this piece also carries sentimental value as a thoughtful handmade gift. It is especially cherished by those who love flowers but prefer something permanent and care-free.
With no need for watering or sunlight, it remains flawless while offering the same joy as a living plant. Suitable for both modern and traditional interiors, it effortlessly enhances any setting with its charm. The Crochet Rose Pot With Flower pattern stands as a timeless keepsake that unites beauty, function, and sentiment.
Materials Needed
- Five-ply Cotton Yarn: For the petals (main color), seles, leaves, and soil.
- DK Yarn: For extra details.
- 2.5 mm Crochet Hook: Ideal for working with cotton yarn.
- Branch Wire (18–20 cm): For the stem.
- Stitch Marker: To keep track of rounds.
- Milk Glue: For attaching parts securely.
- Fiberfill Stuffing: For stuffing the pot.
- Scissors and Darning Needle: For assembly and cleanup.
- Optional Gravel/Stones: To add weight for sturdiness.
Special Features of the Crochet Rose
- Realistic Elements: Includes petals, seles (sepals), leaves, soil, and pot, all meticulously detailed.
- Beginner-Friendly Project: With a focus on basic crochet stitches and simple assembly techniques, the process is both accessible and enjoyable.
- Customizable Styles: The design can be tailored using different yarn colors and sizes based on your preferences.
- Versatile Use: Makes a perfect gift, table decoration, or centerpiece for special occasions.
Level of Difficulty
This project is beginner-friendly, and the pattern uses simple stitches like single crochet, double crochet, half-double crochet, and slip stitch. It also introduces basic techniques like using a magic ring and handling wires. While assembling requires some precision, the steps are explained clearly, ensuring a smooth crocheting experience.
Step-by-Step Instructions
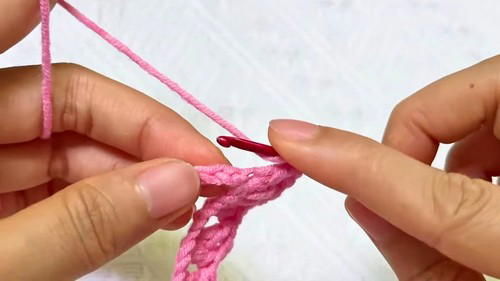
1. Making the Rose Petals
- Start with a slip knot and make 52 chains.
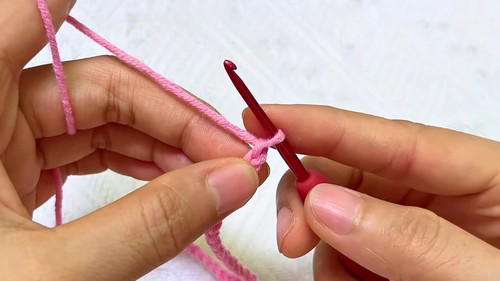
- Row 1: Begin in the 7th chain from the hook and make a double crochet. Skip two chains, and in the third chain, make a V stitch (double crochet, chain two, double crochet). Repeat this pattern until the end, creating a total of 15 V stitches.
- Row 2: Turn your work and make chain one. Work six double crochets into the chain-two space of the first V stitch. Chain one, then make a single crochet in the space between V stitches. Repeat across, forming individual petals. Finish with six double crochets in the last chain-two space, chain one, and slip stitch to secure.
2. Making the Seles (Sepals)
- Start with a magic ring, chain one, and crochet 10 double crochets into the ring. Pull the yarn to close, slip stitch into the first stitch, and fasten off.
- For each sele: Chain six, then work a slip stitch, single crochet, half-double crochet, and two double crochets along the chain. Skip one stitch at the base and slip stitch into the next stitch. Repeat five times to create five seles.
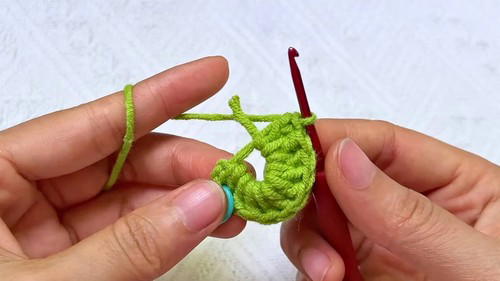
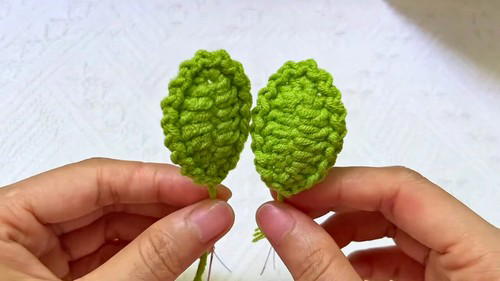
3. Creating the Leaves
- Begin with a slip knot and make 9 chains. Prepare a piece of wire (18 cm) for structure and crochet around it.
- Work single crochet in the second chain, half-double crochet in the next, and double crochet in the next three chains. Transition back to half-double crochet and finish with three single crochets in the last chain.
- Turn and work along the opposite side of the chain: Start with a half-double crochet, then three double crochets, followed by one more half-double crochet. End with a single crochet. Slip stitch into the first stitch to complete the leaf.
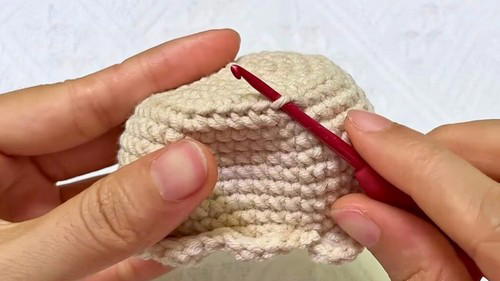
4. Making the Pot
- Use a magic ring to begin and crochet 7 single crochets into it. Pull to close and slip stitch into the first stitch.
- Gradually expand the pot with rounds of increases:
- Round 2: Make two single crochets in each stitch (14 total).
- Round 3–5: Alternate between single crochets and increases.
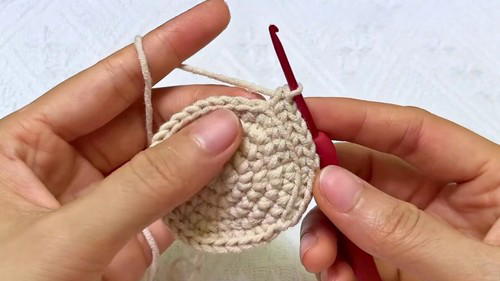
- Round 6: Single crochet into the back loop only to define the pot’s base. Continue shaping with simple single crochets until completing round 13.
- Round 15: Use front loops only to create decorative ridging at the rim by alternating four double crochets and single crochet stitches around the pot.
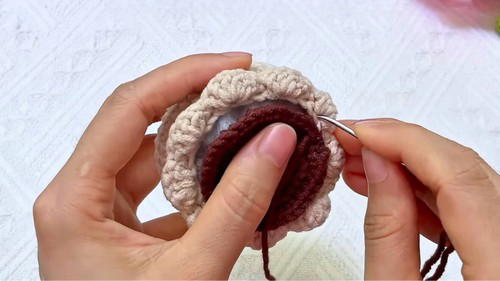
5. Making the Soil
- Start with another magic ring and crochet 14 single crochets. Gradually increase and shape it just like the pot. Leave a small hole in the center for the branch stem to fit through. Sew the soil to the pot using a long yarn tail.
Assembly
1. Attaching the Rose to the Stem
- Add milk glue to the wire stem and wrap the completed rose petals snugly around the top. Use glue intermittently as you wrap for stability.
- Insert the branch through the center hole in the seles, aligning them properly, and glue them into place.
2. Adding Leaves
- Glue two leaves onto the lower part of the stem, wrapping their tails securely with yarn.
3. Final Touches
- Insert stones into the pot for sturdiness, carefully pack fiberfill stuffing, and place the soil on top. Secure with tight stitches to hold it all together.
- Insert the stem into the soil's center hole, fixing it firmly in place, and trim excess wire.
Tutor’s Suggestions and Tips
- Precision is Key: Take your time to align petals, sepals, and leaves perfectly for a polished look.
- Use Milk Glue: It ensures a secure attachment for delicate pieces like the petals and seles to the stem.
- Sturdy Pot: Add gravel or stones to enhance stability, especially if using the rose as a decorative centerpiece.
Pro Tip
Wrap the wire stem snugly with yarn before attaching elements. This creates a smooth, sleek look while also hiding the sharp edges of the wire.
Uses of the Crochet Rose
- Home Décor: Brighten your living spaces or workstations.
- Gift: A thoughtful handmade gesture for friends and family.
- Event Display: Perfect as centerpieces for weddings, tea parties, or anniversaries.
Conclusion
Making a crochet rose in a pot is more than just a project—it's an art form that brings beauty and joy to any space. With detailed petals, leaves, and a realistic pot, this beginner-friendly project ensures stunning results every time. The step-by-step process allows you to create a masterpiece, whether for yourself or someone special.


