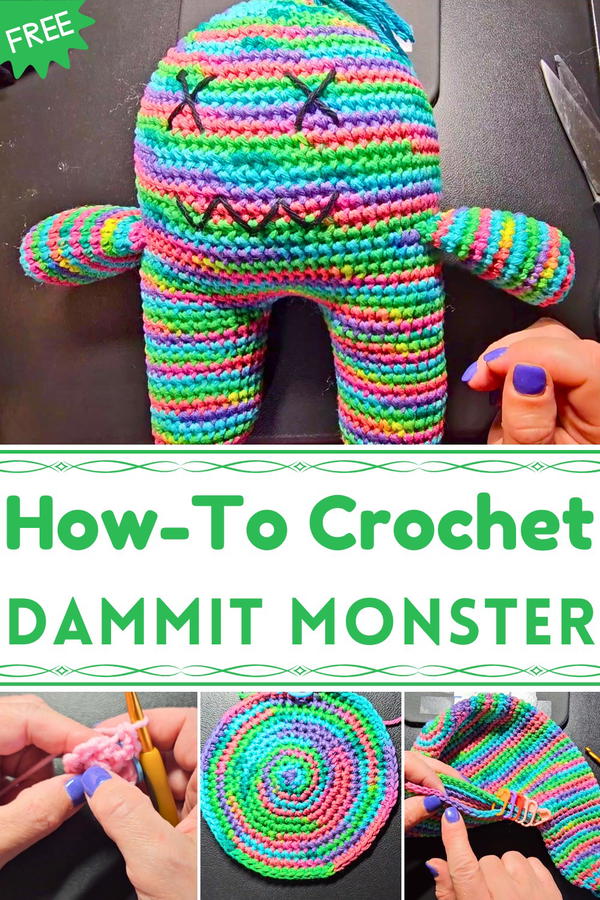
Squash stress in style with this Free Crochet Dammit Monster Pattern, ideal for making funny handmade toys that bring humor and a playful touch anywhere.
Stressful days often call for a bit of humor and a playful outlet, and that’s where quirky creations can bring unexpected relief. The Free Crochet Dammit Monster Pattern captures this idea perfectly, turning frustration into fun with a soft, squeezable companion. With its exaggerated features, cheerful expression, and approachable size, this monster becomes more than just a toy, it’s a small, huggable stress reliever that encourages lighthearted interaction whenever tension arises.
Quick Crochet Dammit Monster Pattern That Brings Smiles
This monster serves multiple purposes beyond its amusing appearance. Its soft, durable yarn makes it ideal for squeezing during stressful moments, offering a tactile way to release tension. It can also act as a whimsical décor piece on desks, shelves, or nightstands, adding personality to workspaces or living areas. For those seeking a humorous gift, the Dammit Monster is a thoughtful option, combining playfulness with practicality to brighten someone’s day.
Additionally, creating the monster provides a sense of satisfaction and calm for crocheters, turning a few hours of focused work into a tangible, cheerful result. The Free Crochet Dammit Monster Pattern successfully merges humor, function, and handmade charm, transforming stress into smiles and making it a delightful companion for both relaxation and playful expression.

Materials Required
- Cotton Yarn (4-ply): Cotton is highly recommended for its strength and durability, as the monster is designed for rough handling (e.g., throwing or hitting surfaces). Examples include Loops and Threads Bright Jewels or a similar sturdy cotton yarn.
- Hook: A 4 mm crochet hook is advised, though a larger size may be used for practice or demonstration purposes.
- Stuffing: Use enough stuffing to make the monster sturdy but not rock-solid. It should be soft enough to punch or throw without causing damage.
- Tapestry Needle: For sewing and weaving in ends.
- Optional Tools: Stitch markers for sectioning rows and maintaining count.
Step-by-Step Instructions
1. Starting the Head
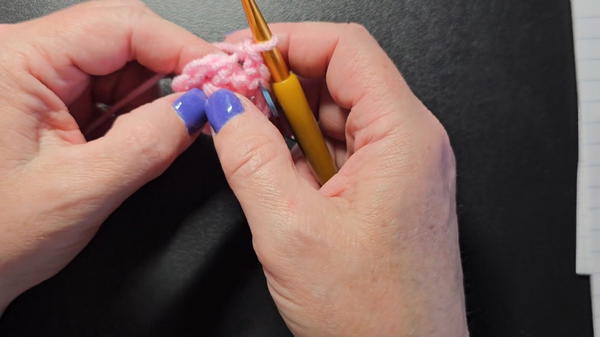
- Begin with a magic ring. Alternatively, use a chain-3 loop (chain 3, slip stitch into the first chain to form the ring).
- Round 1: Place 6 single crochets (sc) into the center of the ring.
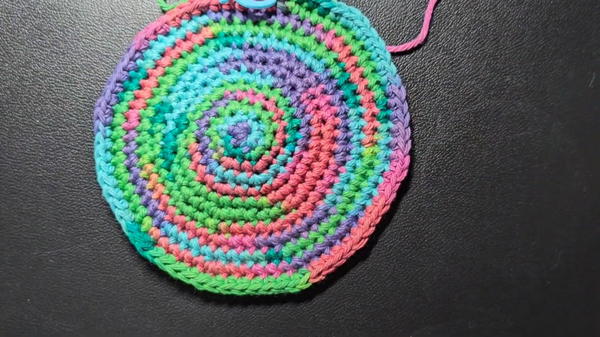
- Round 2: Work 2 sc in each stitch (12 stitches total). Use the front loop only for all stitches.
- Round 3: Alternate 1 sc and 2 sc (increase). Repeat around (18 stitches total).
- Round 4 and Beyond: Continue increasing using the staggered increase method, ensuring your work remains round.
- For example, in Round 5, you would work 1 sc, 1 sc, and then 2 sc. In Round 6, you alternate 3 sc and 2 sc. This staggering prevents the common hexagon shape of amigurumi.
- Increase until you reach 72 stitches in total.
2. Forming the Body
- Once the increases are complete, crochet stitch for stitch (no further increases) to create the length of the monster's body.
- Complete 20 rows of single crochet (front loop only). Adjust to 22 rows if desired.
- Once finished, move on to shaping the legs.
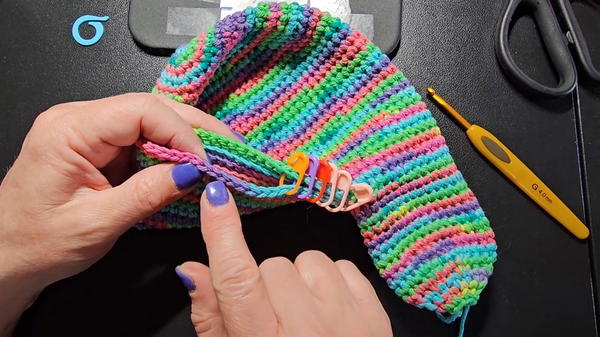
3. Adding the Legs
- Count 30 stitches from the base and mark them — the project is split into two sections for creating the legs.
- Attach your yarn for each leg and work in the round:
- Crochet 30 stitches in the round, completing 12 rows for each leg.
- Decrease gradually to shape the legs into a rounded finish, leaving an opening to stuff.
- Stuff the body and legs with filling until firm but not rock-hard, then sew the openings shut.
4. Creating the Arms
- Begin with a magic ring and 6 sc.
- Increase over the next rows to 24 stitches, and then work 11 rows stitch-for-stitch to form the arms.
- Add a small amount of stuffing to the bottom of each arm (avoid overstuffing).
- Attach the arms to the body by sewing securely into place, stitching through the front loop for a seamless finish.

5. Customizing the Face and Hair
- Create the face using black yarn (for safety, avoid plastic features such as buttons).
- Add simple features like X-shaped eyes or a stitched mouth.
- For hair, use a thin hook (around 1.9 mm) to knot strands of yarn onto the head.

Special Features
- Staggered Increase Method: This ensures a perfectly round shape without visible seams or the typical hexagonal appearance seen in amigurumi.
- Durability: Made with cotton yarn, the Damn It Monster can handle being punched, thrown, or hit against furniture.
- Customizable Details: You can personalize the monster with different face designs, hair, or colors.
Tutor’s Suggestions
- Material Choice: Cotton yarn is critical for durability. Avoid acrylic yarn for this project, as it may weaken from repeated use.
- Take Your Time with Staggered Increases: The staggered increase method is an important technique for achieving the round shape. If you’re new to it, practice slowly or rewatch the tutorial.
- Stuffing Wisely: Ensure the stuffing is firm but not overly compact, as a too-hard monster won’t absorb the impact effectively.
Level of Difficulty
The pattern is intermediate due to the staggered increase method and precision required in assembling the parts. However, beginners can attempt it with practice and patience, especially if they follow the tutorial closely.
Uses
- Stress Relief: Punch, throw, or squish the Damn It Monster to relieve tension during stressful situations.
- Gift Idea: This monster makes a unique handmade gift for friends, coworkers, or family members looking for humor and a bit of stress relief.
- Home Decor: Even when it's not in use, the monster is a fun and quirky decoration.
Pro Tip
When working with multicolor yarn, align the colors deliberately for a balanced look across the monster. If parts of the yarn create asymmetry, adjust the placement of colors by cutting the yarn and restarting.
Conclusion
The Damn It Monster Crochet Pattern is equal parts fun and functional. Designed as the ultimate stress-relieving toy, it brings joy to crafting enthusiasts and relief to anyone needing a creative outlet for their frustration.


