• Skip to primary navigation
  • Skip to main content
  • Skip to primary sidebar
Mint Design Blog logo
  • Home
  • Crafts
  • DIY Projects
    • DIY Gym Equipment plans
  • Crochet
  • Sewing
  • DIY Vehicle Projects
  • DIY For Animal
menu icon
go to homepage
search icon
Homepage link
  • DIY Projects
  • Crafts
  • Crochet
  • Sewing
  • DIY For Animal
  • DIY Gym Equipment plans
  • DIY Vehicle Projects
  • Gardening
×
Crochet

Whimsical Crochet Heart Pattern That Brings Smiles

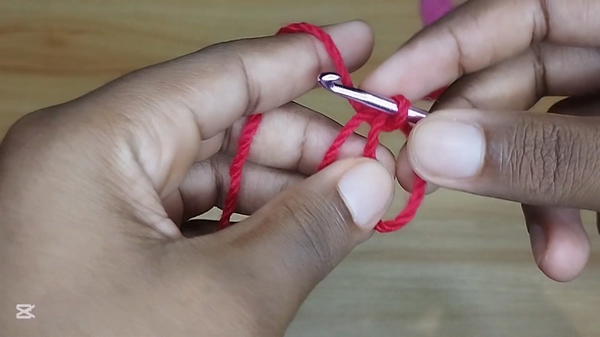
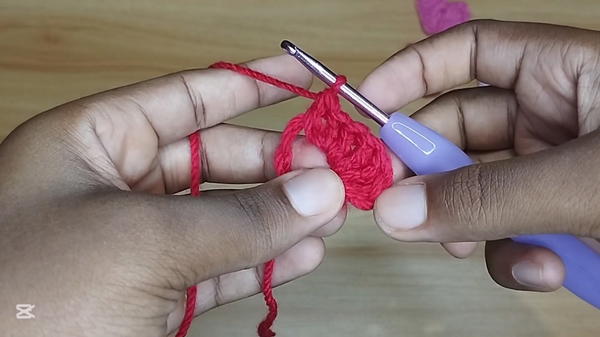
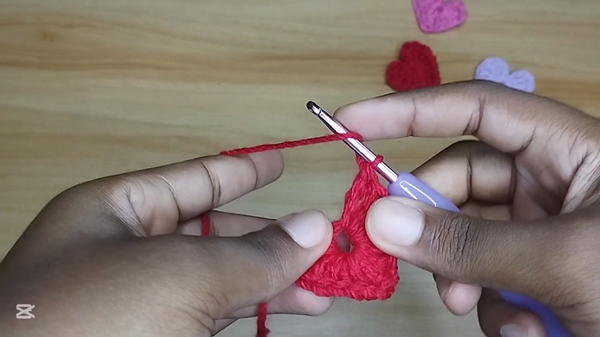
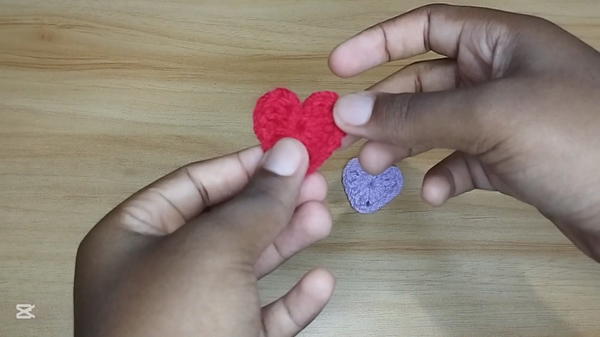
Share sweet vibes with this Free Crochet Heart Pattern, bringing warmth, charm, and a touch of love to décor, gifts, or personal keepsakes.

Symbols of love and affection have long been expressed through small, tangible tokens, from charms and keepsakes to decorative accents. Hearts, in particular, carry universal meaning, representing care, warmth, and connection in a simple yet powerful form. The Free Crochet Heart Pattern provides an opportunity to craft these timeless symbols with yarn, transforming them into versatile items that serve both practical and decorative purposes.

Fun Crochet Heart Pattern That’s Perfect for Home Decor

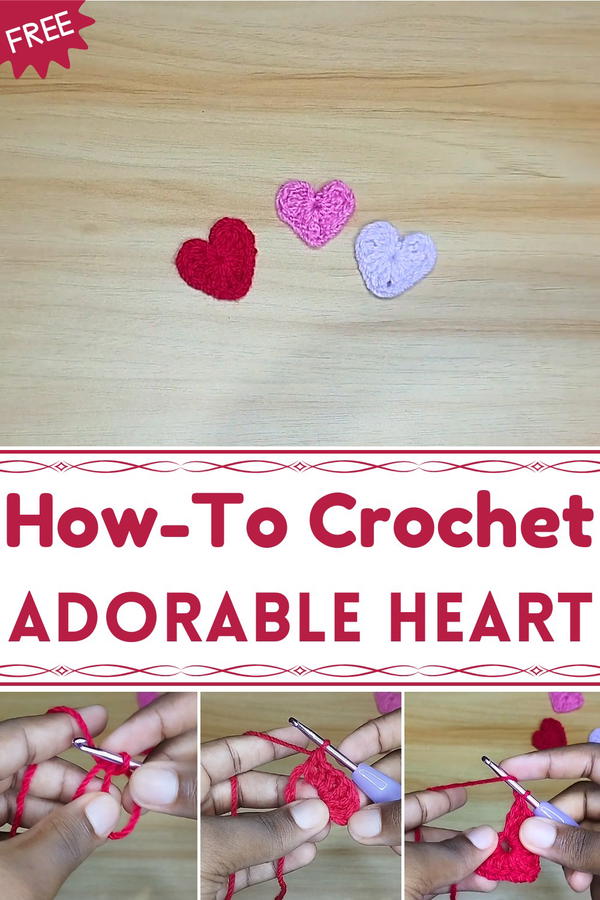
Crochet hearts can be used as appliqués on clothing, accessories, or home décor, adding a handmade touch that conveys thoughtfulness. They are also ideal for gift embellishments, keychains, or ornaments, offering a personal and charming accent for special occasions. The pattern’s flexibility allows for experimentation with sizes, colors, and stitch variations, so each heart reflects individual taste and intention.

Lightweight and durable, they can be attached, displayed, or gifted without worry of damage, making them lasting keepsakes. Working on these hearts also provides a rewarding hands-on experience, fostering focus, precision, and creativity. Each finished piece becomes more than just a decorative item; it embodies warmth, connection, and personal expression. These crochet hearts offer a small but meaningful way to bring beauty, sentiment, and handcrafted charm into everyday life and special moments alike.

Special Features

  1. Magic Ring Base: The project begins with a magic ring, providing a neat and adjustable foundation.
  2. Symmetry: The design mirrors itself to create a balanced miniature heart.
  3. Versatility: The finished miniature heart can be woven into garments, used as an applique, or displayed as a small decoration.
  4. Beginner-Friendly: The tutorial uses basic stitches like triple crochets, double crochets, chains, and slip stitches, explained patiently for newcomers.

Materials Needed

  1. Yarn: A lightweight or medium yarn in your chosen color.
  2. Crochet Hook: The recommended hook size for your yarn.
  3. Scissors: For cutting the yarn at the end.
  4. Tapestry Needle: For weaving in loose ends after completing the project.

Level of Difficulty

Beginner-Friendly: This project is ideal for those just starting their crochet journey. The tutorial carefully explains each step, including how to create the magic ring, complete stitches, and assemble the heart.


Step-by-Step Instructions

Step 1: Create the Magic Ring

  1. Take the shorter side of your yarn and cross it over the working yarn, forming a circle.
  2. Insert your hook through the circle, yarn over, and pull up a loop.
  3. Hold the magic ring securely, as it is still loose at this stage.

Step 2: Chain 2 to Secure the Ring

  1. Chain 2. This secures the magic ring, so you can now let it go without worrying about it unraveling.

Step 3: Make Triple Crochets (First Half)

  1. First Triple Crochet:
    • Yarn over twice so that three loops are on your hook.
    • Insert the hook into the center of the magic ring. Yarn over and pull through. You should now have four loops.
    • Yarn over and pull through the first two loops, leaving three loops on the hook.
    • Yarn over and pull through two loops again, leaving two loops. Finally, yarn over and pull through the last two loops.
    • This completes your first triple crochet.
  2. Repeat this process two more times to create a total of three triple crochets.

Step 4: Make Double Crochets

  1. First Double Crochet:
    • Yarn over once.
    • Insert the hook into the center of the magic ring. Yarn over and pull through, leaving three loops on the hook.
    • Yarn over, pull through two loops, leaving two loops on the hook.
    • Yarn over again and pull through the remaining two loops.
    • This completes your first double crochet.
  2. Repeat this process two more times to create a total of three double crochets.

Tip: As you stitch, move your completed stitches closer together to avoid gaps.

Step 5: Chain 1 and Make One Triple Crochet

  • After finishing the double crochets, chain 1.
  • Make one triple crochet into the magic ring, following the same process as before.

Step 6: Tighten the Magic Ring

  • Pull on the starting end of the yarn to reduce the size of the magic ring.

Step 7: Mirror the Design (Second Half)

  1. For this step, replicate what you’ve just done in reverse:
    • Start with Three Double Crochets.
    • Follow with Three Triple Crochets.
  2. Keep pulling the finished stitches closer together as you go to ensure symmetry.

Step 8: Finish the heart

  1. Chain 2: Just like at the beginning, make 2 chains to complete the project.
  2. Slip Stitch: Insert your hook into the center of the magic ring, yarn over, pull through, and then pull through the loop on the hook. This secures the stitches.
  3. Fasten Off: Chain 1, cut the yarn, and pull the end through the loop to fasten off.

Step 9: Close the Magic Ring

  • Pull the starting end of the yarn tightly to close the magic ring completely and form the base of the heart.

Step 10: Weave in Loose Ends

  1. Use a tapestry needle to weave the loose ends into the stitches.
  2. Trim any excess yarn for a neat finish.

Tutor’s Suggestions

  1. Hold Your Magic Ring Securely: During the first few steps, keep a firm grip on the magic ring to avoid it loosening or unraveling.
  2. Keep Stitches Even: Push completed stitches together to avoid gaps and maintain an even appearance.
  3. Practice the Triple Crochet: If you’re new to triple crochets, practice the motion independently before starting the project.

Uses

  • Decorative Accent: Attach the miniature heartto scarves, beanies, or other garments.
  • Applique: Use it as an embellishment for bags, blankets, or sweaters.
  • Ornament: String a loop through it to hang as a keychain or holiday ornament.
  • Craft Gift: Include as part of handmade gifts or crochet sets.

Tip

When working with a magic ring, ensure you are tugging gently but firmly on the starting end to close it completely. This ensures that your stitches appear snug, and the heart base is tidy.


Conclusion

This miniature Crochet Heart is a quick and fun project that even beginners can enjoy. By mastering basic skills like the magic ring, double crochet, and triple crochet, you can create an adorable and versatile decorative piece.

More Crochet

  • Crochet Amigurumi Heart Pattern
    Sweet Crochet Amigurumi Heart to Brighten Any Occasion
  • Crochet Disgust Amigurumi Pattern
    Fun and Quirky Crochet Disgust Amigurumi to Try
  • Timeless Crochet Christmas Tree Ornament for Holiday Charm
  • Crochet Succulent Pot Amigurumi Pattern That Sparks Joy

Sharing is caring!

0 shares

Primary Sidebar

Latest Post

  • Elegant Crochet Cushion Cover Pattern That Adds Instant Style
  • Unique Crochet Snowflake Amigurumi Ornament for Christmas Trees
  • Crochet Cute Tiger Amigurumi Pattern (1)
    Miniature Crochet Tiger Amigurumi Full of Personality
  • Crochet Minion Keyring Pattern
    Eye-Catching Crochet Minion Keyring with Cheerful Look

Footer

↑ back to top

About Mint Design Blog

Mint Design Blog

Mintdesignblog.com is a site dedicated to DIY crafts and DIY projects. We believe that crafting is more than just a hobby - it's a way to add a touch of creativity to your life. We have something for everyone, from art and decor to projects and parties. Our goal is to provide you with inspiration, tips and tricks to help you make the most of your crafting experience.

Copyright © 2022 Mint Design Blog - DIY Projects and Crafts

About Us | Contact Us | Privacy Policy

0 shares