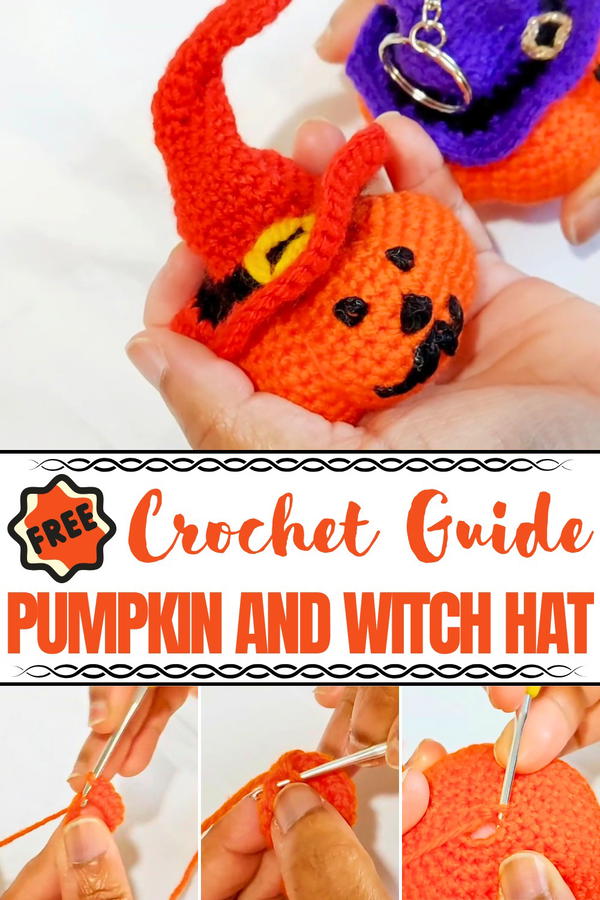
Cast festive magic with this Crochet Pumpkin And Witch Hat pattern, a whimsical design to spark Halloween charm for décor or thoughtful gifts.
A pumpkin paired with a witch hat has long been a playful symbol of Halloween, combining the warmth of harvest with the fun of festive magic. The Crochet Pumpkin And Witch Hat pattern brings this pairing to life in a charming and lasting form, making it a piece that can be enjoyed season after season. The pumpkin, with its rounded curves and detailed ridges, is complemented by the pointed hat with its whimsical brim, together creating a decoration full of character.
Chic Glow Crochet Pumpkin And Witch Hat with Whimsical Spirit
Unlike real pumpkins that fade away, this version remains bright and intact year after year, ready to bring joy whenever autumn arrives. Its lightweight size makes it easy to display on mantels, shelves, or dining tables, and it pairs beautifully with other seasonal decorations. Beyond personal use, it also makes a thoughtful gift, sharing the playful spirit of Halloween with loved ones.
The soft texture of yarn adds warmth and charm, giving it a cozy feel that enhances any festive space. Whether used as a centerpiece or a small accent, it adapts easily to rustic, modern, or themed décor. With beauty, durability, and seasonal cheer combined, the Crochet Pumpkin And Witch Hat pattern is a timeless keepsake to treasure.
Materials Needed
- Hook Sizes:
- 2.5 mm crochet hook for the pumpkin body.
- Yarn:
- Orange acrylic yarn for the body.
- Black cotton triple yarn for the face details (eyes, nose, and mouth).
- Toy Stuffing: Polyfill or fiber stuffing for shaping the pumpkin.
- Darning Needle: For the sewing details and shaping the carved edges.
- Scissors: For cutting yarn and trimming excess.
- Optional Keyring: To convert the pumpkin into a keychain.
Special Features
- 3D Pumpkin Design: The final piece includes carved edges for a realistic pumpkin look.
- Versatile Use: Can be made into a keyring, hanging decor, or used as a Halloween ornament.
- Customizable: Personalize the face with embroidered eyes, nose, and mouth, and optionally add a witch hat.
- Invisible Decreases: A seamless technique to create a smooth, professional finish.
- Compact and Lightweight: Easy to carry or hang, making it perfect as a gift or accessory.
Level of Difficulty
The project is beginner-friendly but requires attention to detail for carving the pumpkin edges and embroidering the facial features. Techniques like creating the magic ring, single crochets, invisible decreases, and shaping may challenge complete beginners but are explained clearly in the tutorial. Intermediate crocheters will find it easier to follow along.
Step-by-Step Instructions
1. Start with the Pumpkin Base
Create a Magic Ring
- Use orange yarn to make a magic ring.
- Work 6 single crochets (SC) into the magic circle.

Rows 2–8: Building Up the Pumpkin’s Shape
2: Make 2 SC in each stitch (increase) to reach 12 SC.
3: Alternate between 1 SC and 2 SC (increase) for 18 SC.
4: Work 1 SC in the first two stitches, then 2 SC in the third stitch (increase) for 24 SC.
5: Alternate 3 SC and 2 SC (increase) for 30 SC.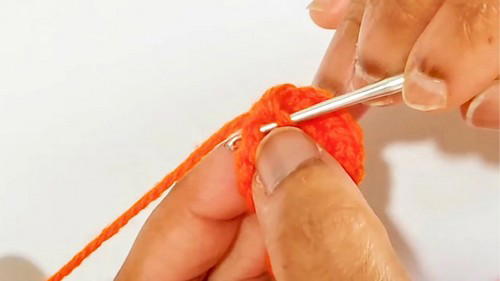
6: Work 4 SC and 2 SC (increase) for 36 SC.
7: Alternate 5 SC and 2 SC (increase) for 42 SC.
8: Work 6 SC and 2 SC (increase) for 48 SC.
At the end of Row 8, your pumpkin will have a rounded and full structure.
2. Adding Height to the Pumpkin
9–13: Work 1 SC into each stitch (no increases) for five rows. This builds the pumpkin’s body height.
3. Start Decreasing the Pumpkin
14: Make 6 SC and then an invisible decrease. Repeat across the row.
15: Make 5 SC and an invisible decrease. Repeat across the row.
16: Alternate 4 SC and an invisible decrease.
17: Make 3 SC and an invisible decrease.
4. Stuff the Pumpkin and Finish Decreasing
- Add toy stuffing firmly to the body. Ensure all corners and edges are filled without gaps.
- 18: Alternate 2 SC and an invisible decrease.
- 19: Alternate 1 SC and an invisible decrease.
- 20: Make only decreases until 6 stitches remain.
Tie off the yarn, leaving a long tail for carving.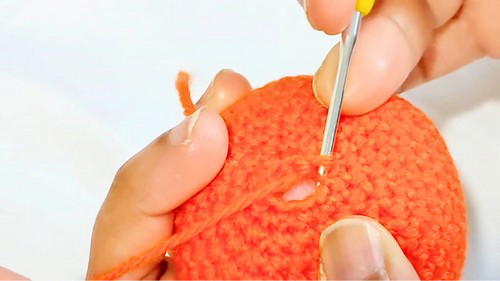
5. Carve the Pumpkin Edges
- Use the darning needle and long tail to define the edges of the pumpkin.
- Identify the increases made in earlier rows (visible lines in the pumpkin).
- Bring the tail from the bottom of the pumpkin to the top, pulling tightly to create indents.
- Repeat on all sides of the pumpkin for a carved look. Secure the tail and hide the ends.
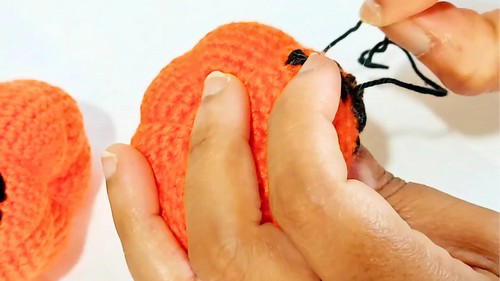
6. Adding Facial Features
Eyes
- Using black cotton yarn, embroider triangular-shaped eyes into the front of the pumpkin. Ensure no orange gaps are visible between the stitches.
Nose
- Create a small, triangular-shaped nose directly below the eyes.
Mouth
- Shape the mouth using black yarn, sewing carefully to ensure accuracy.
- Fill the outline with black thread to create a solid look.
7. Optional Witch Hat
- Follow the tutorial for creating the miniature witch hat (link provided in the video).
- Attach the hat to the pumpkin by sewing around its edges.
8. Final Touches
- Attach a keyring if desired, through the top of the pumpkin.
- Alternatively, use it as a decoration by placing it on a table or hanging it up.
Tutor’s Suggestions
- Stuff Firmly: Ensure stuffing is evenly distributed to maintain the shape of the pumpkin. Push the filling deeply into corners to avoid gaps.
- Carve Edges Carefully: Pay attention to the visible increase lines to create realistic pumpkin indents.
- Avoid Gaps in Embroidery: Ensure stitches are tight and the orange yarn does not show through facial features.
Uses of the Pumpkin Keyring
- Keychain: Attach it to keys for a festive touch.
- Halloween Decor: Use as a spooky theme decoration on tables or shelves.
- Bag Charm: Add to bags or backpacks for a seasonal accessory.
- Gift: Perfect as a handmade gift for friends and family.
Pro Tip
Always tighten your stitches when embroidering facial features to create smooth details without gaps. For added security, tie knots at the back of the embroidery and hide them inside the pumpkin.
Conclusion
This crochet pumpkin keyring project is a wonderful way to celebrate Halloween while practicing and improving your crochet skills. From the magic ring to carving edges and embroidering features, every step contributes to a fun and festive design. Whether gifting to loved ones or creating for personal use, this pumpkin is sure to bring joy and charm to the season.


