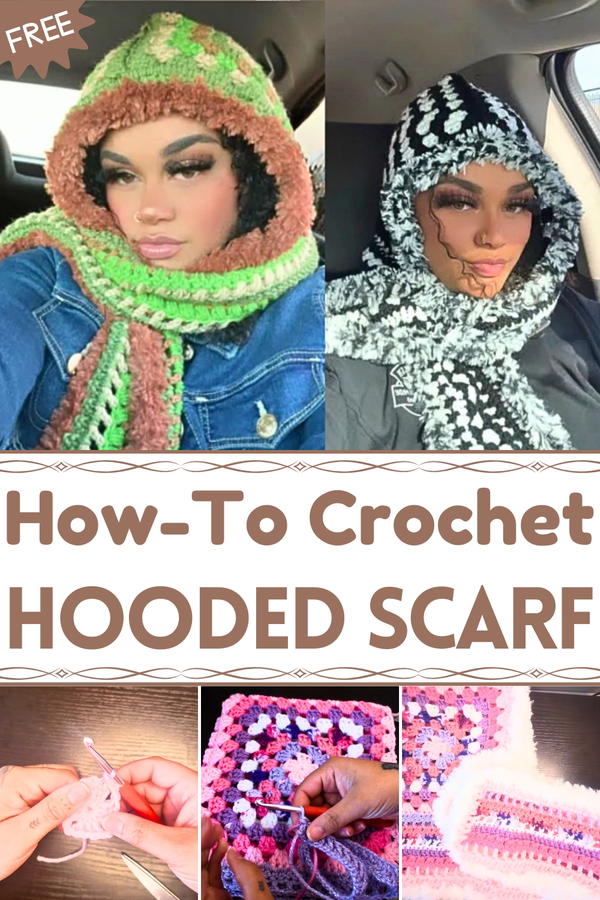
Blend warmth and style with this Crochet Hooded Scarf pattern, a cozy piece that offers comfort, charm, and versatility for any season.
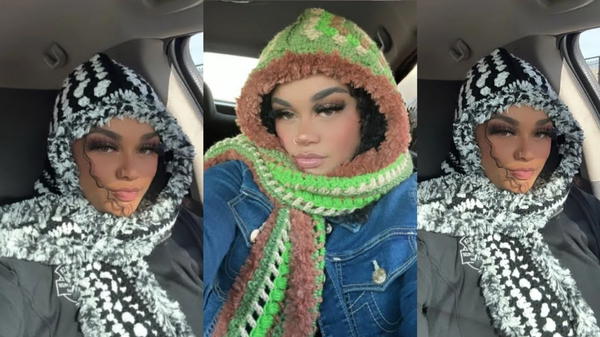
On chilly days when the wind carries a crisp bite, nothing feels more comforting than wrapping up in warmth that also carries style. The Crochet Hooded Scarf pattern offers just that—a thoughtful combination of practicality and elegance in one timeless accessory. Unlike ordinary scarves, this piece provides both coverage for the neck and a soft hood to shield the head, making it an all-in-one solution for staying cozy while looking refined.
Modern Crochet Hooded Scarf that Elevates Outfits
Its structure highlights versatility, allowing it to be worn casually over everyday outfits or paired with more polished attire for an added layer of charm. The hood frames the face gently, while the scarf drapes naturally across the shoulders, offering both warmth and sophistication. Its adaptability makes it suitable for outdoor strolls, seasonal outings, or simply adding comfort during colder days indoors.
Beyond its stylish appearance, the hooded scarf is lightweight enough to carry easily yet substantial enough to offer lasting protection from the elements. It doubles as a thoughtful handmade gift, practical for those who appreciate beauty tied with function. With its balance of comfort and elegance, the Crochet Hooded Scarf pattern brings a timeless accessory that enhances both warmth and personal style effortlessly.
Materials Needed
- Yarn: Burnette fluffy yarn (or any yarn of your choice).
- Crochet Hook: 8mm crochet hook (or a size that matches your yarn).
- Scissors: For trimming loose ends.
- Yarn Needle: For weaving in the ends.
Special Features
Multi-Purpose Design:
The hooded scarf functions as a single accessory that keeps both the head and neck warm while also being stylish.Modular Construction:
The project consists of individual granny squares for the hood, making it beginner-friendly and easier to manage.Customizable Scarf Portion:
The scarf portion offers the freedom to include various stitches, such as mesh rows, puff stitches, front/back post stitches, etc., based on personal preferences.Optional Fur Trim:
A fur border adds a soft, luxe touch to the finished piece, though it is entirely optional.Budget-Friendly:
It uses weight 4 acrylic scrap yarn, making it a cost-effective project.
Level of Difficulty
Advanced Beginner to Intermediate:
This pattern is well-suited for crocheters with basic knowledge of granny squares and double crochet stitches. The added texture techniques for the scarf portion, such as front and back post double crochet, bring an intermediate-level challenge. Frequent color changes and border attachment offer an opportunity to enhance your skills.
Step-by-Step Instructions
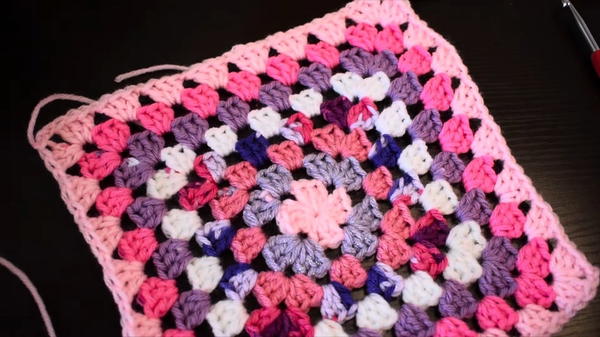
1. Start with Two Granny Squares for the Hood
Create a Magic Ring:
- Wrap yarn around your fingers to form an “X.” Insert the hook under the first strand, pull up the second strand, and create a loop to start a magic circle.
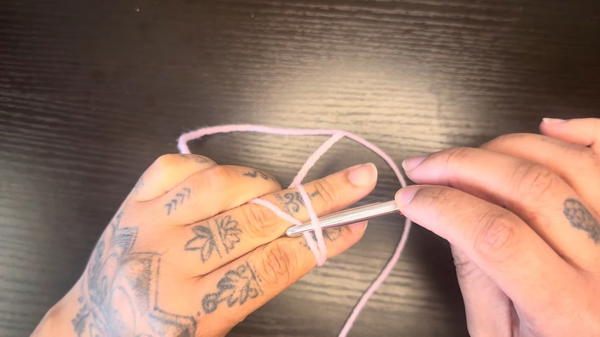
- Wrap yarn around your fingers to form an “X.” Insert the hook under the first strand, pull up the second strand, and create a loop to start a magic circle.
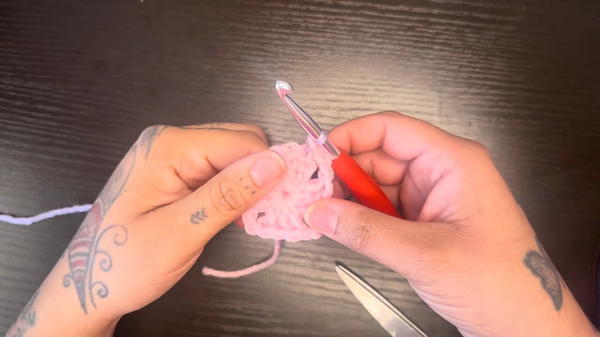
Foundation Round:
- Chain 3, which counts as your first double crochet.
- Place 2 double crochets in the ring, then chain 2.
- Repeat 3 double crochets, chain 2, until you have 4 clusters of double crochets separated by chain 2 spaces.
- Pull the tail to tighten the ring.
Adding Colors:
- Cut the yarn and attach a new color using a secure knot, tying the old working yarn to the new color. Cut extra yarn after securing.
Building Rows:
- For each round, chain 3 (as the first double crochet), place 2 double crochets in the first corner, chain 1, and repeat the granny square pattern (3 double crochets, chain 2 for corners).
- Continue this pattern, expanding the square and alternating colors every round, until you have 8 rounds in total.
Repeat:
- Make a second granny square following the same steps.
- Make a second granny square following the same steps.
2. Join the Granny Squares to Form the Hood
- Place the two granny squares with the right sides facing inward (tails outward).
- Use slip stitches to join two sides: the top and one side (leave the bottom and front open). Use the back loops of each stitch for cleaner seams.
- Fasten off, turn the hood right side out, and secure the ends.
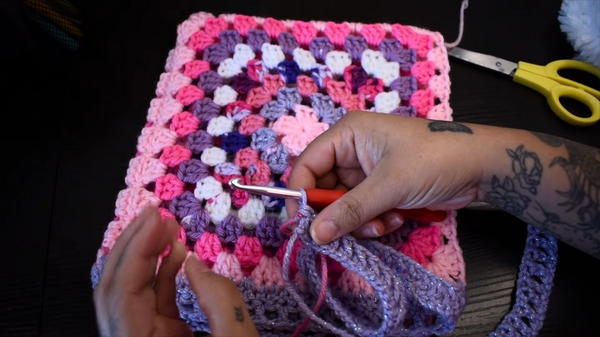
3. Attach the Scarf to the Hood
- Attach yarn to a corner of the open end of the hood.
- Chain 60 stitches for the first side of the scarf (or adjust to your desired length, ensuring it’s an even number).
- Work double crochets along the open edge of the hood, ensuring even stitches across.
- Chain 60 stitches for the second side of the scarf.
4. Add Rows to the Scarf
Row 1 (Mesh Row):
- After chaining 2, skip 2 stitches, double crochet into the next stitch. Continue with a pattern of chain 1, skip 1 stitch, double crochet into the next.
Row 2 (Double Crochet):
- Work 2 double crochets into each chain 1 space of the previous mesh row.
Row 3:
- Double crochet across the row for a cleaner, finished look.
Row 4 (Front & Back Post Stitch):
- Alternate front post double crochet and back post double crochet for added texture.
Row 5 (Double Crochet Row):
- Simple double crochet across the row.
Row 6 (Cluster Stitches Row):
- Work 2 double crochets into every other stitch, skipping one stitch between clusters.
Row 7 (Mesh Row):
- Repeat the mesh pattern from Row 1.
Row 8 (Border Row):
- Double crochet into every stitch along the hood and scarf edge, ensuring smooth and even coverage.
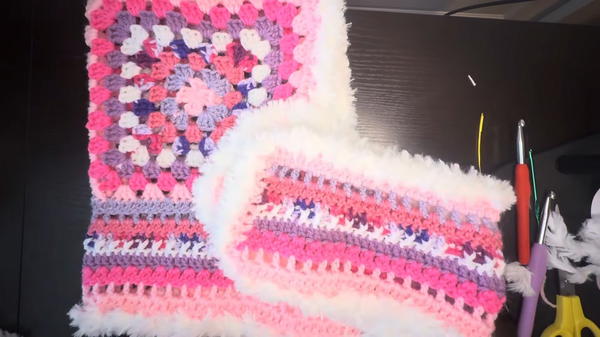
5. Optional Fur Border
- Attach fur yarn at a corner.
- Use a larger hook (6.5 mm) for looser tension.
- Chain 2, skip 2 stitches, and single crochet into the third stitch. Repeat this all the way around for a decorative, fluffy border.
6. Weave in Ends
- Use a yarn needle to weave in the starting and ending yarn tails, ensuring a neat and secure finish. For fur yarn, use a smaller crochet hook to weave it through the stitches.
Tutor’s Suggestions
Color Changes:
Use secure knots when changing colors to reduce the number of tails to weave in at the end.Slip Stitch for Seams:
Always use the back loops when joining granny squares to give the seam a neat and professional look.Tension Adjustment:
For the fur yarn, use loose tension or a larger hook so the border edges don’t tighten and distort the project.Experiment with Stitches:
The scarf portion allows for creativity, so include your favorite stitches like puff or granny clusters to make your scarf unique.
Uses and Benefits
- Practical Use: Provides warmth to the head and neck in a fashionable, all-in-one design.
- Customizable Gift: Makes for a thoughtful homemade present that can be tailored to individual preferences.
- Budget-Friendly: Uses scrap yarn, making it both environmentally friendly and economical.
- Skill Enhancement: Opportunity to practice granny squares, color changes, and textured stitches.
Tip
When adding the fur border, work in bright lighting to make it easier to see the stitches, as the fluffiness can obscure visibility.
Conclusion
The crochet hooded scarf is both a functional and stylish project that allows crocheters to express their creativity while building their skills. From the classic granny square hood to the customizable scarf section, this pattern offers clear and detailed guidance to help you crochet a cozy, eye-catching accessory. With the optional addition of a fur trim, you can create a truly luxurious design.


