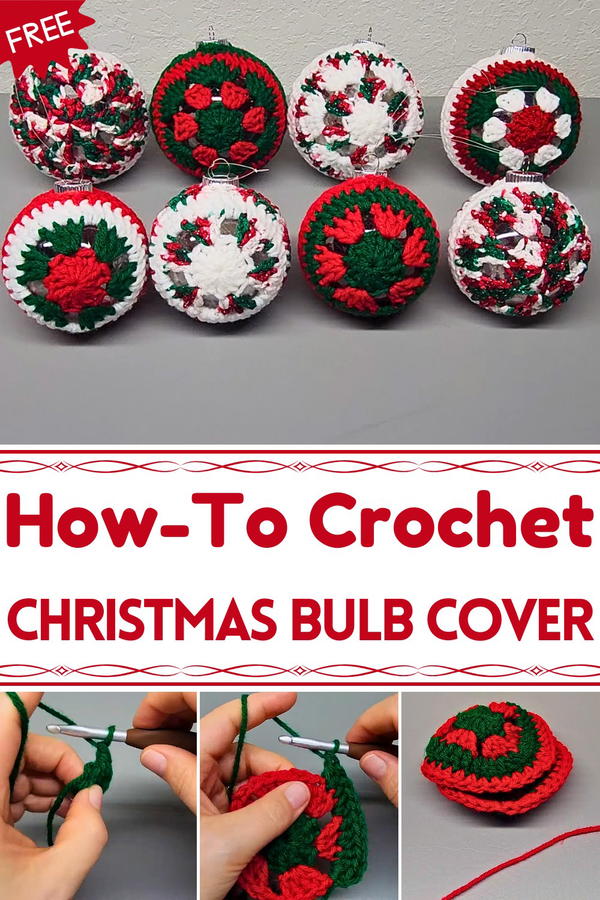
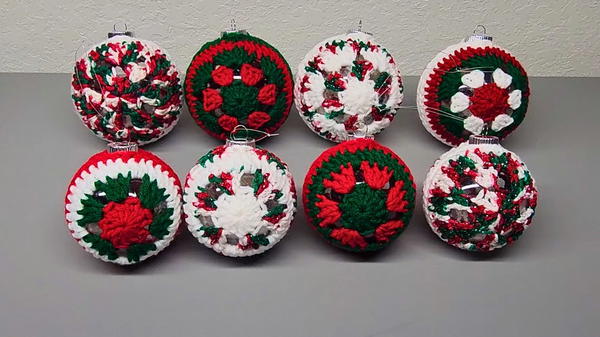
Spark festive joy with this Free Crochet Christmas Bulb Cover Pattern, perfect for adding handmade charm and a cozy, cheerful touch to your décor.
Twinkling lights reflected softly on a snowy windowsill, each glow made even more charming by tiny handcrafted covers hugging the bulbs. The Free Crochet Christmas Bulb Cover pattern turns ordinary holiday lights into delightful accents, bringing warmth, color, and personality to every festive setting. Each cover wraps snugly around bulbs, adding texture and a handcrafted charm that instantly elevates the ambiance of any room.
Festive Crochet Christmas Bulb Cover That Brightens Tree
Beyond decoration, these covers protect delicate bulbs while diffusing light for a soft, cozy glow, making spaces feel inviting and cheerful. Their lightweight and flexible construction allows them to fit a variety of bulb sizes, and the colorful crochet stitches offer endless opportunities to coordinate with holiday décor, table settings, or themed displays.
Crocheting these covers provides a calming, creative activity, letting hands focus on rhythmic stitches while producing a tangible, joyful result. Finished covers are not only beautiful but reusable, making them a practical addition to annual holiday decorations. They also make thoughtful gifts, spreading festive cheer in a handcrafted, personal way.
Materials Needed
- Plastic Bulbs:
- Small: 3.5-inch plastic clear bulbs (Hobby Lobby)
- Large: Just shy of 4-inch plastic clear bulbs (Hobby Lobby)
- Yarn:
- Red Heart Super Saver (Cherry Red and Patty Green)
- I Love This Yarn Christmas (Hobby Lobby with tinsel strand)
- Crafter's Secret Big Idea (Christmas print)
- Red Heart Super Saver Soft White
- Hook: 6 mm crochet hook
- Scissors
- Needle: For weaving in ends
- Fishing Line: Optional, for tying the top of the bulbs
Special Features
- Customizable Size: Create bulbs in different sizes by using various sizes of plastic bulbs.
- Festive Colors: Use holiday-themed yarns for an extra festive touch.
- Intermediate Difficulty: The project combines basic stitches with more advanced techniques.
Step-by-Step Instructions
Row 1: Create the Foundation Ring
- Start with a slip knot.
- Chain 2 (ch2).
- Work 12 double crochets (dc) into the second chain from the hook:
- Yarn over, insert your hook into the chain, yarn over, pull up a loop.

- Yarn over, pull through two loops, yarn over, pull through the remaining two loops.
- Repeat until you have 12 double crochets.
- Yarn over, insert your hook into the chain, yarn over, pull up a loop.
- Slip stitch to the first double crochet to join the round.
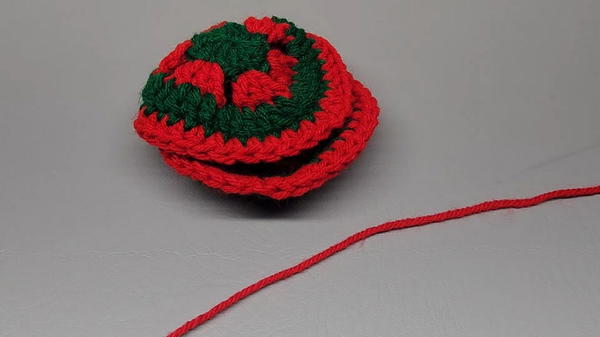
Row 2: Adding Bulbs and Corners
- Chain 1 (ch1) (does not count as a stitch).
- Create a front post bubble stitch (fpbob) around each double crochet:
- Yarn over, insert your hook around the post, yarn over and pull up a loop.
- Repeat until you have 7 loops on your hook.
- Yarn over, pull through the first 6 loops, yarn over, pull through the remaining 2 loops.
- Work 3 double crochets into the next double crochet.

- Chain 2, skip one stitch, and work 3 double crochets into the next stitch.
- Repeat the pattern 3dc, fpbob, ch2 to create four corners.
- Slip stitch to the first bubble stitch to join the round.
Row 3: Color Changes and Details
- Attach the new color with a slip knot to any corner space.
- Chain 3 (ch3) (counts as the first double crochet).
- Work 3 double crochets (dc) into the same stitch.
- Chain 2 and skip the next stitch.
- Repeat working 3 double crochets, chain 2, skip one stitch around the row.
- Finish the row with a slip stitch into the third chain of the starting chain.
Row 4: Final Row with Edging
- Attach the new color (if changing) with a slip knot to any corner space.
- Chain 1 (ch1) and work a single crochet (sc) into the same space.
- Continue working single crochets around the row, adding 5 single crochets in each corner space.
- Finish the row with a slip stitch into the first single crochet.
- Chain 1 and cut off the yarn.
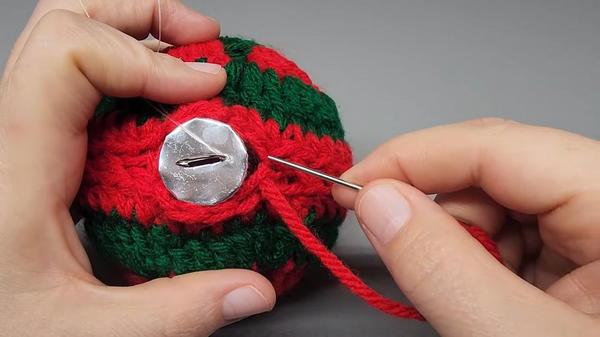
Finishing Touches
- Weaving Ends: Use a needle to weave in all loose ends.
- Sew Together: Sew two panels together using yarn and a needle:
- Back sides together, sew the inside loops of the half double crochets to form a seam.
- Leave an opening to insert the plastic bulb before closing completely.
Tutor’s Suggestions & Tips
- Consistent Tension: Ensure even tension to maintain the shape and texture.
- Color Changes: Fasten off yarn cleanly when changing colors.
- Stitch Count: Double-check stitch counts at the end of each row.
Uses for the Bulbs
- Tree Ornaments
- Garland Decorations
- Gift Accents
- Holiday Home Decor
Pro Tip
Use fishing line to create a sturdy loop for hanging the bulbs. Tie a knot at the end of the line, thread it through the hole in the bulb, and secure it by pulling it through the loop.
Conclusion
Crocheting Christmas bulbs is a delightful and festive project, perfect for adding a personal touch to your holiday decorations. By following these clear instructions, intermediate crocheters can create beautiful ornaments that are sure to impress.