Create a stunning look with this Free Crochet Blouse with Flared Pattern, perfect for breezy days, casual outings, and effortless style in minutes.
A plain ball of yarn can look dull and lifeless at first, but the Free Crochet blouse with flared pattern turns it into something stylish and charming. This blouse grows into a soft, elegant top that fits gently on the body and flares at the bottom, giving it a graceful, flowing look. The airy crochet stitches make it light and comfortable, perfect for warm days or casual outings.
Free Crochet Flared Blouse Pattern – Stylish for Casual Outings
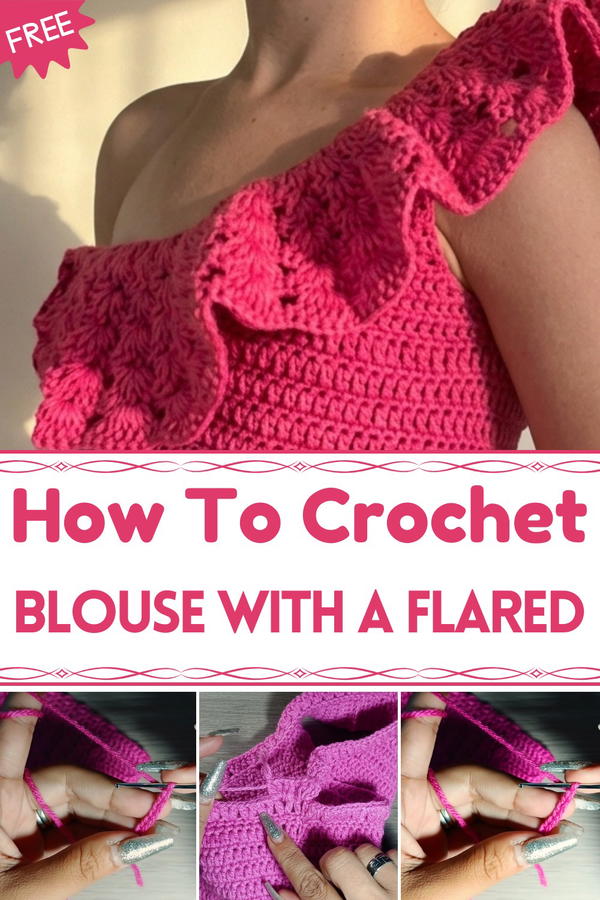
Its flared design adds movement and charm, while the colors and soft texture make it cozy and attractive. Easy to adjust in size, this handmade blouse fits perfectly and looks neat. More than just clothing, it transforms simple yarn into a fashionable, practical, and charming piece that brings elegance to everyday wear.
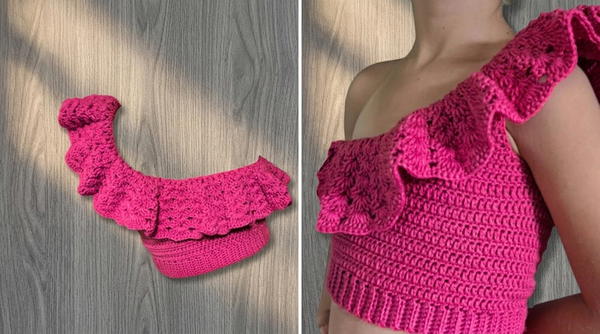
Crocheted Elastic-Stitch Blouse with Flared Hem
Materials Required
To complete this blouse, gather the following materials:
- Yarn: Medium-weight yarn (the thickness depends on your preference and the final size).
- Crochet Hook: A hook size appropriate for your chosen yarn.
- Scissors: For cutting the yarn.
- Tape Measure: For accurate sizing.
- Stitch Markers: To keep track of decreases and points for joining pieces.
- Darning Needle: For weaving in ends and finishing.
Pattern Details
- Gauge: Gauge is not critical but aim for uniform stitches.
- Size: The blouse in the video was made for a 7-year-old girl. You can adjust the sash length (waistband) and height for other sizes.
- Techniques Used:
- Single Crochet (sc)
- Half Double Crochet (hdc)
- Double Crochet (dc)
- Slip Stitch (sl st)
- Front Loop Only (FLO)
Step-By-Step Instructions
Step 1: Creating the Waistband (Elastic Stitch)
Chain Foundation:
- Chain a small sample to test the width. For the pattern blouse, 7 chains were used, which measured 3 cm.
- If needed, adjust the chain count to reach your desired width based on yarn weight and hook size.
First Row:
- Chain 1 more (for turning), then work single crochets (sc) in each chain. You should have 7 stitches at the end of the row (or whatever number matches your initial chain count).

- Chain 1 more (for turning), then work single crochets (sc) in each chain. You should have 7 stitches at the end of the row (or whatever number matches your initial chain count).
Subsequent Rows:
- Chain 1, turn your work.
- Work single crochets using the back loop only (FLO). This technique creates the ridged "elastic stitch" look.
- Continue this pattern, ensuring you have the same number of stitches in every row.
Measure Length:
- Repeat until the waistband reaches the desired circumference. For the video’s blouse, this measured 26 cm.
- Wrap the band around to ensure a snug fit.
Joining:
- Fold the strip lengthwise to make a circle.
- Use slip stitches to join the edges together neatly.
Step 2: Base of the Blouse
Foundation Round:
- Work single crochet stitches evenly around the top edge of the waistband. Place 1 single crochet for each row from the waistband.
Alternating Rounds:
- Alternate between rounds of half double crochets (hdc) and single crochets (sc):
- Chain 2 (to start an hdc round), work hdc in each stitch.
- Chain 1, work single crochets in the next round.
- Continue alternating until the blouse reaches the desired height from the waistband to the armhole. In the video, this measured 11 cm.
- Alternate between rounds of half double crochets (hdc) and single crochets (sc):
Step 3: Shaping the Armholes
Marking:
- Divide the blouse into two equal parts: front and back. Place stitch markers to identify the beginning and end of each armhole section.
Decreases:
- Begin decreasing for the armhole:
- For hdc rounds, decrease at both ends by working two stitches together (hdc2tog).
- For sc rounds, also decrease at both ends.
- Continue decreasing evenly on both sides until the armhole measures approximately 3 cm. (This will vary based on size.)
- Begin decreasing for the armhole:
Straight Edges:
- After completing the armhole shaping, continue working straight up (without decreases) until the required height is reached.
- In the video, the height from the armhole to the shoulder measured 15 cm.
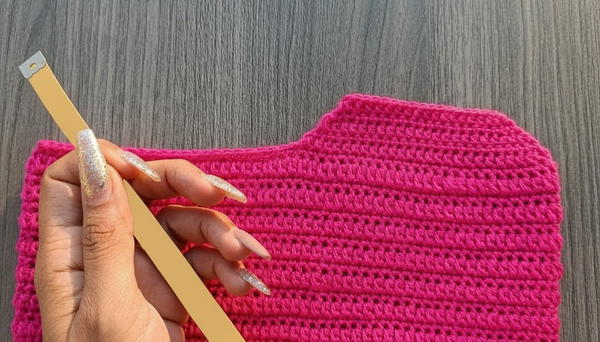
Step 4: Back of the Blouse
- Work the back section exactly like the front, except add one extra row for a slightly longer back.
Step 5: Joining Shoulder Straps
- Align the shoulders of the front and back pieces.
- Use slip stitches to join the straps together on the wrong side of the blouse.
- Ensure the seam is neat and flat.
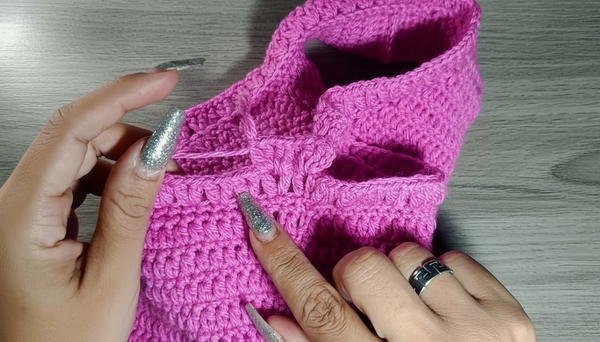
Step 6: Adding the Ruffled Hem
Foundation for Ruffle:
- Attach yarn to the bottom edge of the waistband. Work into the front loops only (FLO) to create a distinct edge for the ruffle.
First Round (Single V-Stitches):
- Chain 3 (counts as first dc).
- In the same stitch, work: [dc, chain 1, dc]. Skip one stitch, and repeat. This creates simple V-stitches around the edge.
Second & Third Rounds (Double V-Stitches):
- Work into each V-stitch: [2 dc, ch 1, 2 dc]. Continue around.
- This creates a full, flared ruffled edge.
Fourth Round (Triple Fans):
- Work into each V: [3 dc, ch 1, 3 dc]. Repeat. This increases the flare of the ruffle.
Final Round:
- Work 7 dc into each V-stitch, creating the final tier of the ruffle. End with sl st and bind off.

- Work 7 dc into each V-stitch, creating the final tier of the ruffle. End with sl st and bind off.
Step 7: Finishing the Sleeves
- Attach yarn at the armhole and work a row of single crochets along the edge for a clean finish.
- Bind off and weave in all yarn ends using a tapestry needle.
Finishing
- Steam block or lightly press the blouse to shape it evenly.
- Ensure all seams are secure and ends are woven in neatly.
Final Words and Tips
- Size Customization: This pattern is adaptable for various sizes. Adjust the waistband circumference, blouse height, and armhole depth accordingly.
- Ruffle Variations: You can create more or fewer ruffle rounds depending on the desired level of flare. Be creative with different stitch combinations for unique textures.
- Yarn Selection: Use soft, breathable yarn for comfortable wear. Cotton or cotton blends work well for this type of blouse.