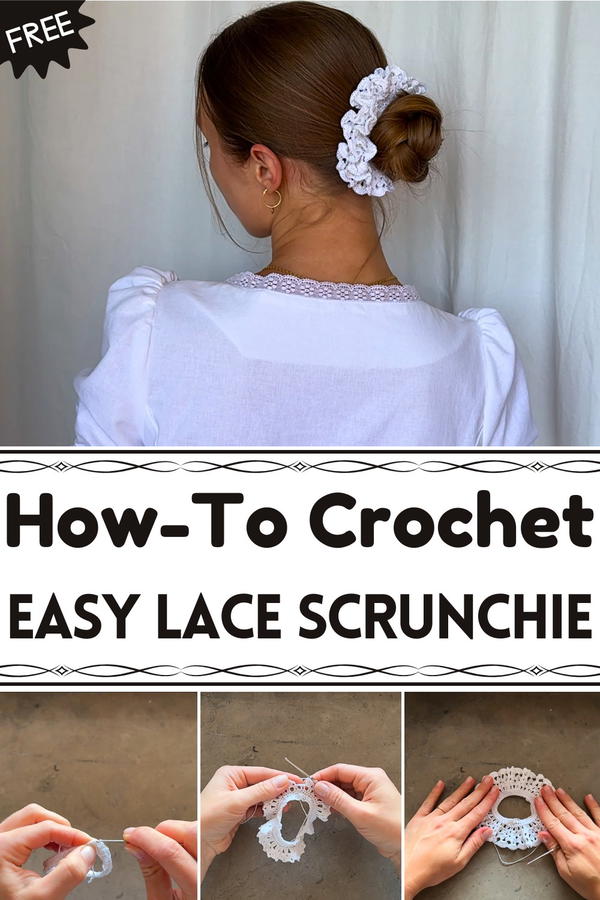
Grace your everyday style with the Free Crochet Lace Scrunchie Pattern, a charming way to add softness, beauty, and comfort to any hairstyle.
Morning sunlight streaming through your window, a steaming cup nearby, and the quiet satisfaction of adding the perfect finishing touch, that’s the charm this Crochet Lace Scrunchie brings to life. Its delicate lace texture catches the light in the most graceful way, making every hairstyle feel effortlessly romantic. Soft yet strong, it glides through your hair without pulling or snagging, keeping your look polished from day to night.
Free Crochet Lace Scrunchie Pattern for Effortless Hair Charm
Each loop carries a touch of vintage beauty, adding sophistication to even the simplest outfit. Whether circling a messy bun, accenting a sleek ponytail, or worn as a dainty wrist piece, it enhances every moment with subtle elegance. Lightweight yarn gives it a refined texture, while the intricate lace design offers breathability and flexibility for lasting comfort.
More than just a stylish accessory, it’s eco-friendly, washable, and reusable a small luxury that stands out in everyday life. With the Free Crochet Lace Scrunchie Pattern, a hint of grace becomes part of your daily rhythm, turning ordinary moments into beautifully styled ones.
Materials Needed
To create this lace scrunchie, gather the following materials:
- Yarn: 100% mercerized cotton yarn (e.g., Sheep Jest Maxi). One skein is sufficient to make multiple scrunchies.
- Crochet hook: 1.6 mm crochet hook.
- Elastic: Any type of elastic, 5 mm wide is recommended. Alternatively, you can use a regular hair tie.
- Scissors: For cutting yarn.
- Stitch marker (optional): To mark stitches.
Step-by-Step Process
A. Preparing the Elastic Base
Measure and Cut Elastic:
- Measure the elastic around your wrist (about 18 cm is suggested). Cut the elastic and tie the ends together to form a ring.
Two Starting Options:
- The video provides two methods to crochet over the elastic. Choose the one you prefer:
- Method 1: Create a slip knot and chain 90 stitches first, then use single crochet to attach the chain to the elastic.
- Method 2 (Easier Option): Skip chaining and directly crochet single stitches over the elastic.

- The video provides two methods to crochet over the elastic. Choose the one you prefer:
B. 1: Crocheting Over Elastic (Chained Version)
Create Foundation Chain:
- Start with a slip knot and chain 90. Make one additional chain for turning (91 chains in total).
Attach Chain to Elastic:
- Place the elastic ring beneath your foundation chain. Start single crocheting over the elastic, inserting your hook into the second chain from the hook:
- Insert hook above the chain and elastic ➞ Yarn over ➞ Pull through elastic ➞ Yarn over again and pull through both loops.
- Continue single crocheting over the chain and elastic all the way around.
- Place the elastic ring beneath your foundation chain. Start single crocheting over the elastic, inserting your hook into the second chain from the hook:
Join Round:
- Once you’ve reached the end, slip stitch into the first single crochet to form the base ring.
C. 2: Direct Crocheting on Elastic (Simpler)
Start with Slip Knot:
- Create a slip knot and place it on your hook.
Single Crochet Directly Over the Elastic:
- Place elastic under your hook and yarn over ➞ Pull through and complete your single crochet.
- Repeat this process until you’ve crocheted around the entire length of the elastic.
Join Round:
- Slip stitch into the first single crochet.
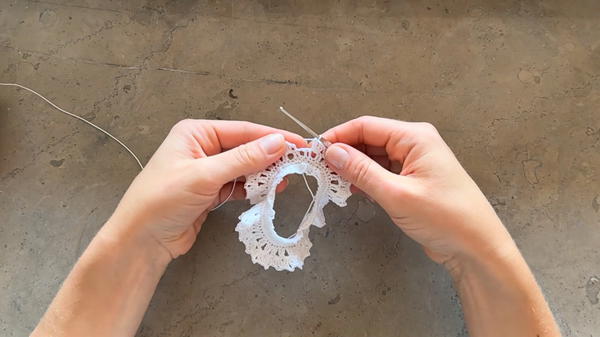
D. Row-by-Row Instructions for Design
1 (Foundation Single Crochets):
- Using either method above, single crochet fully around the elastic to form the base. Slip stitch to complete the row.
2 (First Layer – Forward Loops):
- Chain: Begin with chain 2.
- Double Crochet:
- Work double crochets into the front loops only of each stitch from the previous row, creating a lined texture on the back.
- Double crochet into each stitch ➞ Chain 1 ➞ Double crochet into the next stitch.
- Repeat this pattern all the way around.
- Join Round: Slip stitch into the chain-2 at the start of this row.
3 (Chain-1 Spaces):
- Chain: Begin with chain 2.
- Two Double Crochets in Each Space:
- Work two double crochets into each chain-1 space from the previous row.
- Chain 2, then work another two double crochets in the same space.
- Repeat this all the way around. Slip stitch to join at the end.
4 (Frills with Chain-3 Spaces):
- Slip Stitches to Start: Slip stitch into the next double crochet and into the chain-2 space.
- Crochet Frills in Spaces:
- Chain 2, crochet three double crochets into the same space.
- Chain 3, make another three double crochets in the same space.
- Repeat this pattern for every chain-2 space around. Slip stitch to assemble.
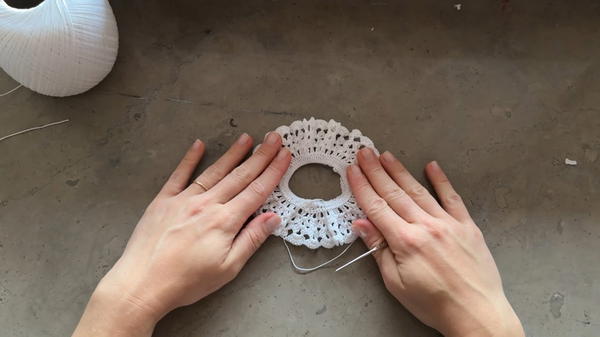
5 (Final Layer):
- Slip Stitches to Start: Slip stitch to the next double crochet and chain-3 space.
- Double Crochets:
- Work 8 double crochets into each chain-3 space to create the final layer of frills.
- Slip stitch to the beginning chain to complete the row.
E. Adding Volume with the Back Loops (Second Layer)
Flip the Scrunchie Over:
- Turn your work to the back loops of the foundation row of single crochets (Row 1).
Attach Yarn and Recreate Rows:
- Use the same instructions from Row 2 to Row 5 to build a second layer on the back loops.
- Tie off and weave in the loose ends to complete the second layer.

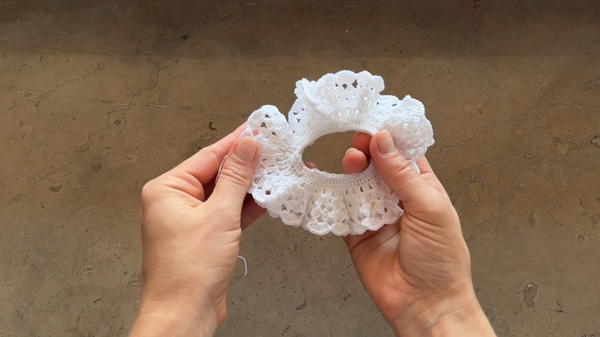
4. Special Features
- Double-Layered Design: The scrunchie’s two-layered frilly pattern adds volume and elegance.
- Customizable: You can adjust yarn colors and sizes to create different looks.
- Portable: Perfect as a compact project to carry with you anywhere.
5. Level of Difficulty
Beginner-Friendly:
This project uses basic stitches like slip stitch, single crochet, and double crochet, making it an accessible project for beginners with some practice in crocheting.
6. Tutor’s Suggestions
- Choose a Comfortable Elastic Length: Adjust the elastic to suit your wrist and hair thickness.
- Work with Tight Tension: Tighten your stitches slightly over the elastic for a neater scrunchie base.
- Experiment with Yarn Types: Try different materials such as metallic or velvet yarns for varied textures.
7. Uses of the Lace Scrunchie
- Hair Accessory: Stylish for casual or formal wear.
- Gifting: Ideal as a handmade, thoughtful gift.
- Fashion Accessories: Use as a wristband or part of a boho-inspired outfit.
8. Tip
To avoid gaps, ensure your single crochets in Row 1 are snug and evenly distributed around the elastic. This will give you a solid base for the layers that follow.
9. Conclusion
The lace scrunchie is a quick, practical, and beautiful crochet project suitable for beginners and advanced crocheters alike. Its elegant design and dual-layered frills make it a standout accessory for any occasion.


