Sprinkle fun vibes on every drive with the Free Crochet Strawberry Car Hanger Pattern, a sweet little touch that makes your car instantly delightful.
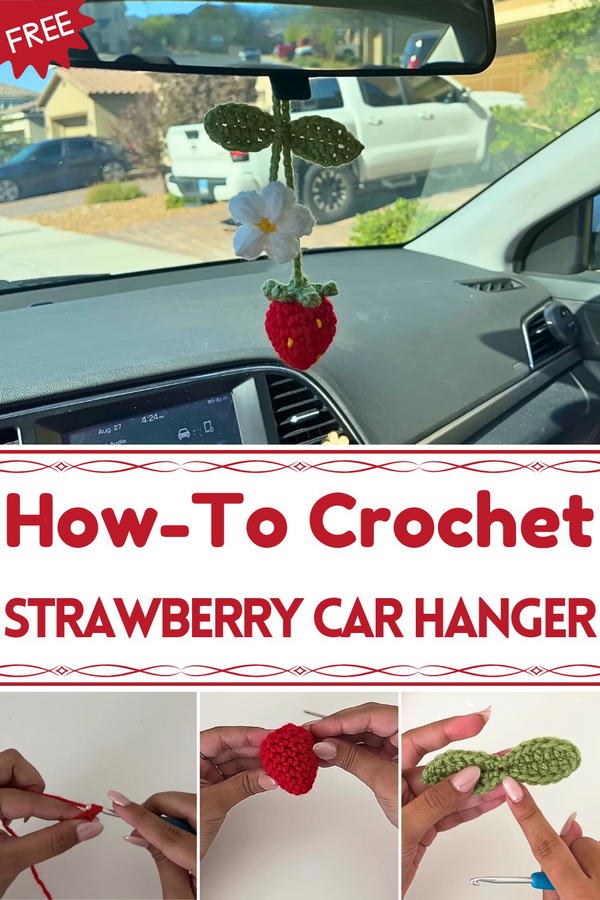
Its vibrant red hue and gentle green top brighten any car interior, adding personality and warmth to your daily commutes. Beyond its charm, this piece helps keep your space inviting while reflecting a love for handmade details. Whether used as a thoughtful gift or a personal accent, it carries a freshness that never fades. Lightweight and easy to hang, it makes even a small corner feel special.
The detailed texture mimics the real fruit beautifully, making it both fun and stylish. A simple touch like this turns your car into a space that feels personal, uplifting, and full of positivity. Let this sweet accessory remind you that beauty can be as simple as a strawberry swaying softly in the sunlight, proof that small details often leave the brightest impression.

Materials Required
- Crochet Hook: A medium-sized crochet hook.
- Yarn:
- Red or pink for the body of the strawberry.
- Green for the leaves and stem.
- Dark yellow for the seeds.
- White for the flower’s petals.
- Light yellow for the flower's center.
- Scissors: To trim excess yarn.
- Darning Needle: For weaving in ends and assembling parts.
- Hot Glue Gun: To secure certain pieces (optional, but recommended for added durability).
- Stuffing Material: Fiberfill or other stuffing material to shape the strawberry.
Step-by-Step Instructions
1. Creating the Body of the Strawberry
- Magic Circle:
- Start with a magic circle and chain 1.

- Single crochet 4 stitches into the magic circle.
- Pull the yarn to close the circle.
- Start with a magic circle and chain 1.
- Increasing Rows:
- Work 2 single crochets in the first stitch to create an increase.
- Then alternate between single crochets and increases, repeating the pattern in each row.
- Building Rounds:
- Continue increasing gradually:
- (Row 3): 2 single crochets and then an increase.
- (Row 4): 3 single crochets and then an increase.
- After a few rows, work 3 plain single crochet rows without increases to define the strawberry’s height.
- Continue increasing gradually:
- Decreasing Rows:
- Work decreases to shape the top of the strawberry:
- Row 1: 2 single crochets, then a decrease.
- Row 2: 1 single crochet, then a decrease.
- Repeat the pattern to close the shape.

- Work decreases to shape the top of the strawberry:
- Stuffing the Strawberry:
- Insert stuffing to shape the strawberry.
- Use your darning needle to weave through the remaining front loops to close the top securely.
2. Adding the Seeds
- Dark Yellow Yarn:
- Cut a long length of yellow yarn.
- Hand-stitch or embroider small seeds evenly around the strawberry using your darning needle.
- Finishing the Seeds:
- Once satisfied, weave in and trim the excess yellow yarn.
3. Creating the Leaves
- Magic Circle:
- Make a magic circle using green yarn and chain 1.
- Crochet 5 single crochets into the magic circle.
- Pull to close, and slip stitch into the first chain.
- Leaf Branch:
- Chain 4, then single crochet down each chain (3 single crochets total).
- Slip stitch into the next stitch, chain 4, and repeat this process.
- Repeating the Leaf Pattern:
- Continue creating the chains and single crochet rows to form 5 leaves in total.

- Continue creating the chains and single crochet rows to form 5 leaves in total.
- Finishing:
- Slip stitch into the starting point, fasten off, and leave a long tail for sewing.
- Trim excess yarn and sew the leaves onto the top of the strawberry.
4. Making the Flower
- Flower Center:
- Using light yellow yarn, create a magic circle and crochet 5 single crochets into it.
- Pull to close the circle, slip stitch into the first chain, and fasten off.
- Flower Petals:
- With white yarn, attach to the yellow center and chain 4.
- Yarn over and crochet into the same stitch 4 times to create a puff stitch.
- Slip stitch to secure the petal.
- Repeat this process 5 times to make 5 petals in total.
- Green Base for Flower:
- With green yarn, make a magic circle and crochet 5 single crochets into it.
- Pull to close, slip stitch, and fasten off.
- Attaching the Flower:
- Assemble the flower by layering the green base, petals, and yellow center together.
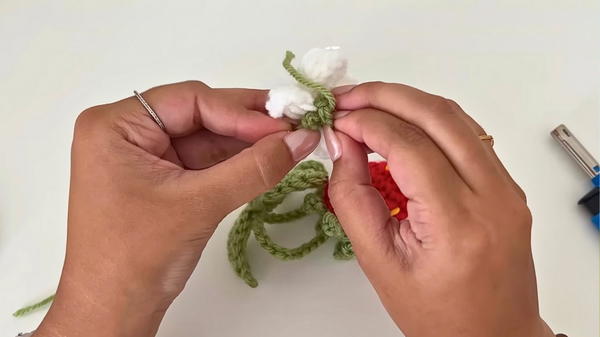
- Sew the flower securely to the top of the strawberry.
- Assemble the flower by layering the green base, petals, and yellow center together.
5. Creating the Hanging Cord and Leaves
- Cord:
- Chain 60 with green yarn, leaving long tails on both ends.
- Knot and cut the ends.
- Leaves for Cord:
- Make individual leaves in the same way as described in the “Creating the Leaves” section, but smaller.
- Assembling the Cord:
- Attach the small leaves to one end of the chain and sew or glue them in place.
Putting It All Together
- Attach the hanging cord securely to the top of the strawberry.
- Use a darning needle or hot glue gun to ensure all parts are firmly attached.
- Once everything is in place, the strawberry car hanger is complete!
Special Features
- Realistic Design: Detailed seeds, leaves, and a flower make this strawberry car hanger an eye-catching piece.
- Versatile: The design can be adapted for keychains, ornaments, or even home décor.
- Customizable: You can change the size, color, or even add larger flowers to suit your preference.
Tutor's Suggestions
- Magic Circle Tips: Practice creating a loose magic circle for smoother stitching and easier assembly.
- Consistent Tension: Keep tension even to ensure uniformity, especially when working on details like the seeds and petals.
- Secure Pieces Firmly: Use a hot glue gun for added security, especially if this item will be used in a car where it might be jostled around.
Level of Difficulty
This project is suitable for intermediate crocheters, as it requires familiarity with the magic circle, increases, decreases, puff stitches, and assembly techniques. Beginners may need additional practice with some of the techniques.
Uses of the Crochet Strawberry Hanger
- Car Ornament: Add a fun and decorative touch to your vehicle.
- Gift Idea: A creative, handmade present for friends and family.
- Home Décor: Hang it in a kitchen, window, or on a key hook.
- Keychain or Bag Charm: Scale it down to make smaller versions for everyday accessories.
Helpful Tip
When assembling the flower and leaves, use a hot glue gun sparingly to avoid bulky seams. This ensures a neat and tidy look while keeping everything secure.
Conclusion
The crochet strawberry car hanger is a beautiful, handmade item that combines fun and creativity with practical crafting techniques. With its intricate details—seeds, leaves, and a flower—it not only showcases your crochet skills but also adds a touch of charm to any space it adorns.


