Meet playful charm with the Crochet Penguin Amigurumi pattern, adding soft, delightful personality and warmth to every home or gift.
In icy landscapes, the playful waddle and charming presence of penguins have always captured hearts, symbolizing warmth and companionship. This Crochet Penguin Amigurumi brings that gentle charm into a soft, huggable form, perfect for children, collectors, or anyone seeking a whimsical accent. Each figure features contrasting yarn colors, giving it an expressive face and a cozy, rounded body. Lightweight yet durable, these amigurumi make delightful decorations for desks, shelves, or bedside tables, adding cheerful personality to any space.
Soft Crochet Penguin Amigurumi with Endearing Personality

Beyond decoration, they serve as thoughtful gifts, comforting companions, or playful elements in storytelling for young ones. The textured stitches provide a satisfying tactile experience, while the compact size ensures easy handling, carrying, and display. Collecting multiple penguins can create themed arrangements or seasonal displays, enhancing their appeal.
Soft, detailed, and versatile, this amigurumi balances artistry with practicality, offering a joyful accessory that combines charm, comfort, and personality. Each finished piece reflects care and patience, resulting in a treasured item that spreads smiles and warmth wherever it is shared or placed, making it a delightful addition to any home.
Materials Needed
- Yarn:
- Penguin Body: 4-ply yarn in your preferred color.
- Beak: Yellow yarn.
- Belly: White yarn.
- Hook Size:
- 3 mm hook for the body (smaller than the recommended size for tight stitches).
- 3.5 mm hook for the flippers.
- Glue/Embroidery Items:
- Black beads for eyes (fabric glue to attach), safety eyes, or black yarn for embroidered eyes.
- Stuffing: Pillow fluff or fiberfill.
- Keyring (optional): For turning the penguin into a keychain.
- Basic Tools:
- Yarn needle.
- Scissors.
- Stitch marker (or a paperclip/contrasting yarn).
Special Features
- Beginner-Friendly: The project uses simple stitches such as single crochet, increases, and decreases.
- Flat Bottom Design: Ensures the penguin can stand upright on its own, adding to its versatility.
- Dual Purpose: Can be used as a keychain, ornament, or standalone decoration.
- Customizable: The penguin can be personalized with different colors, facial features, and embellishments (e.g., beads or embroidered eyes).
- Small and Quick: This project is fast to complete and perfect for using leftover yarn scraps.
Level of Difficulty
This pattern is suitable for beginners and includes straightforward instructions such as working in continuous rounds, making increases, and invisible decreases. Some experience with creating a magic circle is helpful, but Shri explains the process clearly for beginners.
Tutor’s Suggestions
- Tight Stitches: Use a crochet hook size smaller than the recommended size for the yarn to ensure tight stitches that don’t allow stuffing to show.
- Practice the Magic Circle: The magic circle is a foundational skill for amigurumi, making the starting point neat and adjustable.
- Stitch Markers: Since the pattern is worked in continuous rounds, use a stitch marker to track the last stitch of each round.
- Glue Safety: If making this penguin for a child, avoid using glued-on beads and instead opt for embroidered eyes or safety eyes.
- Flat Bottom Tip: Crocheting only in the back loops when closing the bottom of the penguin helps it stand upright.
Step-by-Step Instructions
1. Penguin Body
Round 1: Foundation
- Use your body-colored yarn and a 3mm crochet hook.
- Make a magic circle.
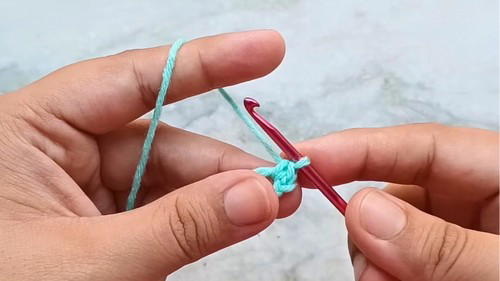
- Chain 1 (does not count as a stitch).
- Crochet 6 single crochets (SC) into the magic circle.
- Pull the tail to close the circle tightly.
2: Increase
- Place 2 single crochets into each stitch (total of 12 stitches).

3: Alternate Increase
- Make 1 single crochet in the first stitch, then 2 single crochets in the next stitch.
- Repeat this sequence to the end (total of 18 stitches).
4–6: Build Consistency
- Continue alternating single crochets and increases for additional rounds. On the final increase round, you’ll have 24 stitches.
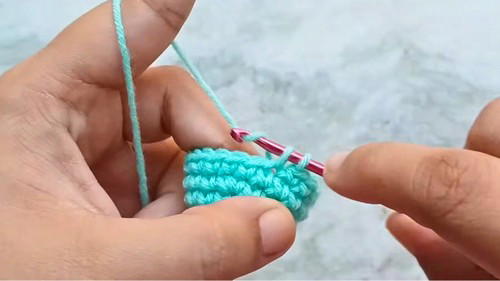
7–12: Body Shape
- Work single crochets only into each stitch, keeping the stitch count constant.
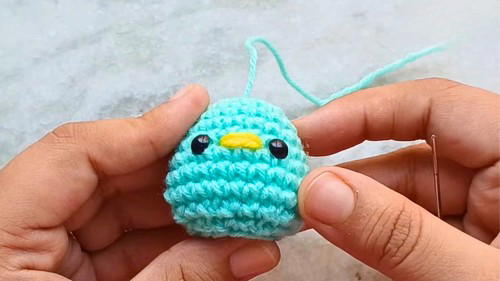
2. Add the Face Details
Beak:
- Count down to rounds 6–7 to position the beak.
- Use yellow yarn and embroider a small triangular beak.
Eyes:
- Place black beads on either side of the beak or use fabric glue for attachment. (Alternatively, embroider eyes or use safety eyes.)
- Let glue fully dry before proceeding.
3. Shape the Bottom
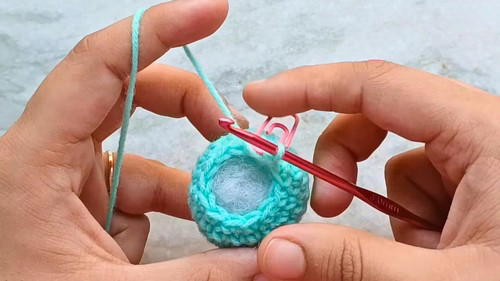
13: Decrease
- Start decreasing to close the bottom of the penguin:
- Make 1 single crochet in the first two stitches, followed by an invisible decrease in the next two stitches.
- Repeat this sequence.
14: Decrease More
- After round 13, make 1 single crochet in the first stitch and an invisible decrease in the next two stitches.
Final Round: Close the Body
For the last round, decrease in every stitch while working only into the back loops.
This will create a flat bottom.
Cut yarn, fasten off, and pull the tail to cinch the hole closed.
4. Flippers (Make 2)
- Use the 3.5 mm hook and body-colored yarn.
- Chain 4.
- Skip the first chain and single crochet into the next two chains.
- In the final chain, add 3 single crochets.
- Work back along the chain with one single crochet in each stitch.
- Fasten off, leaving a long tail for sewing.
5. Belly (White Yarn)
- Use a magic circle and repeat Rounds 1–3 from the body.
- Fasten off and leave a tail for sewing.
6. Assembly
- Attach the Belly: Center the belly on the body and sew it onto the front, ensuring it doesn’t overlap the flat bottom.
- Attach the Flippers: Sew each flipper 2 stitches away from the belly.
- Keychain or Ornament Loop (Optional):
- Thread the tail yarn through a keyring or create a loop for hanging. Tie a secure knot and weave in the ends.
Uses of the Penguin Amigurumi
- Keychains: Add to a keyring for a cute, portable accessory.
- Christmas Ornaments: Great for hanging on your tree as festive décor.
- Gifts: Perfect handmade gift for family or friends during holidays.
- Decorations: Place them as table decorations for themed parties or events.
Pro Tip
For a professional finish, weave in all yarn tails securely and avoid overstuffing the body. This ensures the penguin has a smooth, well-formed shape.
Conclusion
This penguin amigurumi is a delightful and simple crochet project that yields cute, multifunctional results. Whether you make these penguins as holiday ornaments, fun gifts, or keychains, they are sure to bring joy to whoever receives them.


