Slip into winter comfort with this Free Crochet X Twist Headband Pattern featuring stretchable texture chic crossover style and perfect cold-day fit
Winter accessories often serve both style and practicality, but few manage to balance them quite like a twisted headband. This timeless accessory adds just the right amount of warmth without compromising on comfort or appearance. The clever X twist in the front offers a flattering fit that contours comfortably around the forehead while adding dimension and a touch of sophistication. With a stretchable texture and snug feel, it sits securely without being too tight, making it ideal for cold morning walks, outdoor errands, or simply pulling your hair back in a stylish way.
Struggle With Hair Flyaways? Use This Free Crochet X Twist Headband Pattern
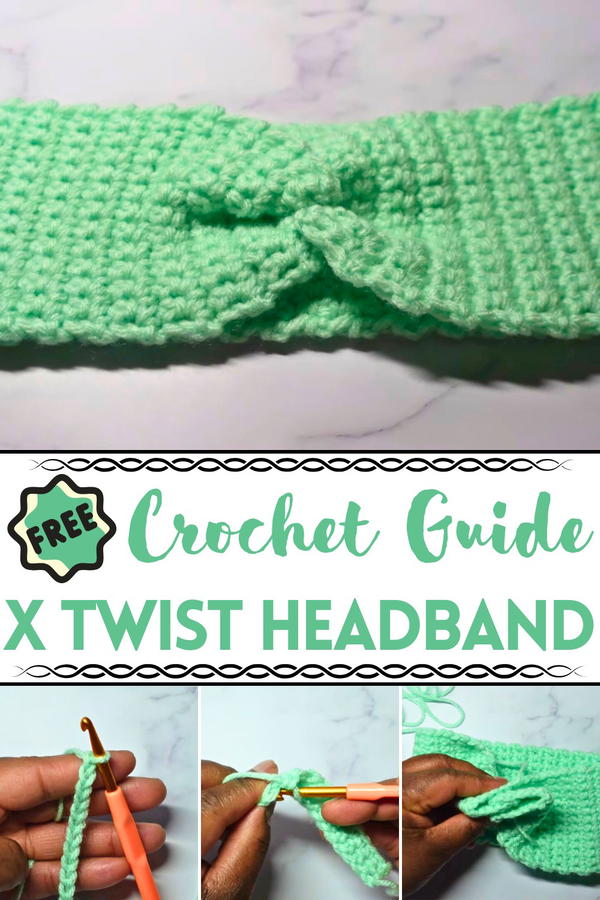
The Free Crochet X Twist Headband Pattern brings this form to life through simple rows worked flat using foundational stitches like half double crochet. The shaping is achieved with a quick seam twist at the end, which gives the piece its signature crossover look.
The result is a neat, clean finish that appears more complex than it is. It’s a portable, one-skein project that’s beginner-friendly and works well in solid or variegated yarns. The piece also doubles as a thoughtful gift item, offering a modern handmade feel in under an hour. Whether styled with loose waves or tucked beneath a hooded coat, this headband effortlessly complements any cool-weather look.
Materials Needed
- Medium-weight yarn
- A 5.5 mm US crochet hook (or the suggested hook size for your chosen yarn)
- Scissors
- Darning/tapestry needle
Step-by-Step Instructions
1: Starting the Base
- Create a Slip Knot
- Begin with a slip knot by wrapping the yarn around your finger, twisting it, and pulling a loop through. Insert your crochet hook into the loop and pull gently to secure the knot.
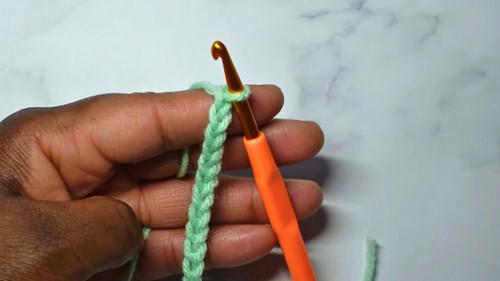
- Begin with a slip knot by wrapping the yarn around your finger, twisting it, and pulling a loop through. Insert your crochet hook into the loop and pull gently to secure the knot.
- Chain 13
- Work 13 chain stitches. These chains will form the foundation row of your headband.
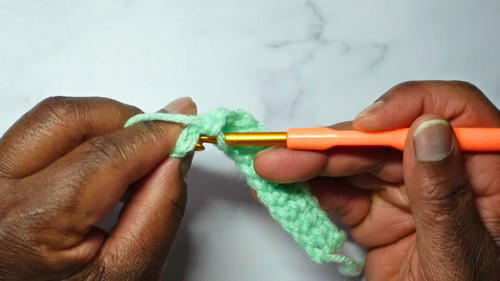
2: Working Single Crochet Rows
First Row
- Insert the crochet hook into the second chain from the hook. Yarn over, pull through the loop, and perform a single crochet (SC).
- Continue working one SC into each chain across the row until you have 12 single crochets.
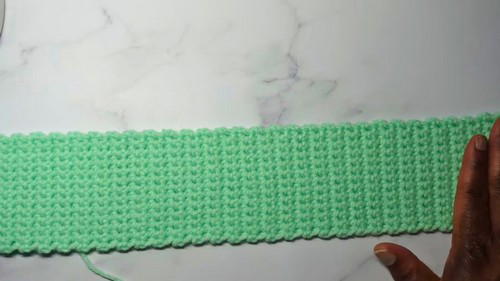
Second Row and Beyond
- Chain 1 and turn your work. Insert the hook into the first stitch of the new row and begin working single crochets.
- Repeat this process for each row, ensuring you place a single crochet in every stitch, and chain 1 at the end of each row.
- Continue adding rows until the length is long enough to fit comfortably around the forehead region of the head.
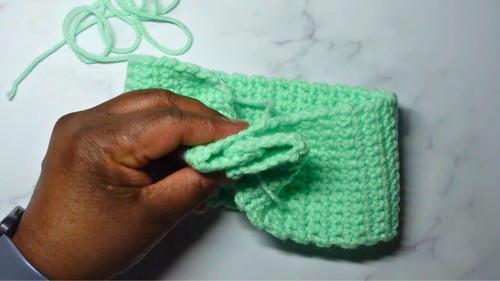
3: Folding and Securing the Twist
Folding the Edges
- Lay the completed crochet piece horizontally and fold the two short edges inward, making sure the fold is symmetrical on both sides.
Creating the Interlaced Twist
- Pinch the folded edges together and fold each in half again, forming a twist-like interlace. Use your tapestry needle to hold the folds in place.
Sewing the Twist
- Using the darning needle and the yarn tail, sew through the overlapping tops of the stitches in the folds, ensuring symmetrical alignment. Repeat several times for reinforcement.
- Using the darning needle and the yarn tail, sew through the overlapping tops of the stitches in the folds, ensuring symmetrical alignment. Repeat several times for reinforcement.
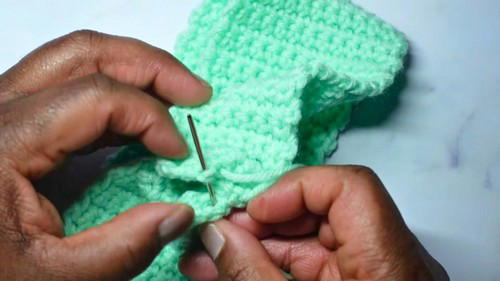
4: Securing the Open Ends
Bringing Ends Together
- After securing the twist, sew together the two remaining open edges using a straightforward stitch. Work from one side to the other, weaving through corresponding stitches.
- After securing the twist, sew together the two remaining open edges using a straightforward stitch. Work from one side to the other, weaving through corresponding stitches.
Reinforcement
- Use additional stitches to reinforce the seams and prevent unraveling. Create a knot with the yarn tail before trimming excess yarn.
5: Finishing the Headband
- Correct Side
- Turn the headband to its correct side, revealing the completed twisted design.
- Final Adjustments
- Ensure the twist looks clean and symmetrical. Check the stretch of the yarn—if stretchy, consider making the headband slightly shorter to prevent excessive loosening when worn.
Special Features
- Twisted Design: The unique folding and sewing technique gives the headband a sophisticated, professional finish.
- Stretchy Fit: The headband adapts to the wearer’s head circumference, offering comfort without compromising on style.
- Beginner-Friendly: The single crochet stitches used throughout the project make it an accessible project for newcomers to crochet.
Level of Difficulty
Easy
This project is beginner-friendly due to its reliance on simple stitches and straightforward techniques. The sewing portion may require some patience, but it’s manageable even for those unfamiliar with sewing.
Tutor's Suggestions
- Measurement Tip: If using stretchy yarn, make the length slightly shorter than the head circumference to account for stretch when worn.
- Focus on Symmetry: Ensure folds and interlacing are symmetrical to achieve a polished and uniform look.
- Reinforcement: The tutor emphasizes reinforcing the sewn areas to increase durability.
Uses
- Practical accessory for everyday wear
- Stylish gift for friends or family
- Perfect for chilly weather, keeping the forehead and ears warm
Tip
When sewing the twist and open ends, don’t worry about perfect precision. Focus on securely stitching the pieces together. A little imperfection in alignment can be hidden by the stretch and fold of the headband.
Conclusion
This crochet headband project is an excellent choice for crocheters of all skill levels. Its simple stitches, elegant design, and step-by-step instructions make it a fun and rewarding experience. Whether made for personal use or as a gift, this headband combines utility and style in a way that anyone can appreciate.


