Slide into simplicity with this Free Crochet Mobile Pouch Pattern that keeps your phone protected in style while staying light, compact, and hands-free.
Carrying tech accessories has shifted from bulk to beauty, with compact styles gaining the spotlight for their convenience and visual appeal. The Free Crochet Mobile Pouch Pattern brings that charm forward while serving practical needs, keeping your phone safe, scratch-free, and easy to access.
Free Crochet Mobile Pouch Pattern That Feels Tailored to Your Style
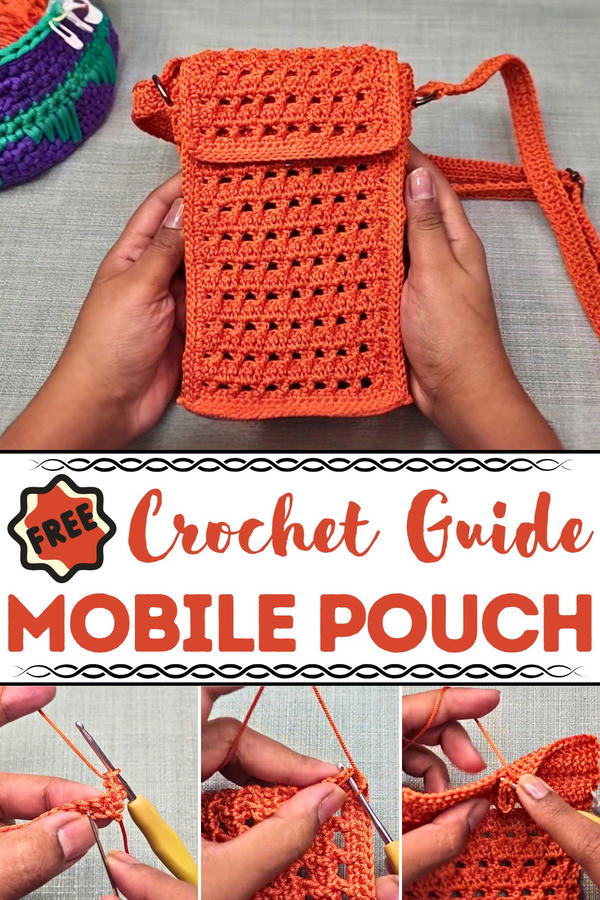
This pouch stands out with its lightweight structure and clean finish, offering enough space to hold your essentials without feeling heavy or oversized. The snug stitch work provides a secure grip for most phone sizes, and the optional strap allows you to wear it crossbody or around the neck for hands-free ease. Its surface texture adds a cozy appeal that pairs well with both casual wear and minimal outfits.
Beyond phones, it can also house small items like cards, earbuds, or lip balm, perfect for errands, walks, or light travel. The compact style suits all ages and can be customized with color choices for personal flair or thoughtful gift-giving. With a balance of everyday usefulness and soft style, this free crochet mobile pouch pattern answers the call for something smart, stylish, and effortlessly portable.
Special Features
1. Mobile Pouch Design
- Holds two phones securely.
- Equipped with a card slot to store cards safely.
- Includes a loop for keyrings, chains, or carabiners.
- Features an adjustable strap for carrying convenience.
2. Unique Patterns
- The front panel of the pouch features a mesh-like twisted crochet pattern for texture and design.
- The back panel seamlessly incorporates double crochets for a plain finish.
3. Attention to Detail
- Single crochet borders are added to make the edges neat.
- Special sewing techniques are used for a clean, smooth assembly that ensures structural integrity.
4. Multipurpose Use
- Can be hung on a pant loop, bag strap, or carried as a sling using the adjustable strap.
- Adds elegance and functionality with dedicated compartments for phones and cards.
Level of Difficulty
This project is best suited for:
- Intermediate crafters, who are already familiar with basic crochet stitches like single crochet, double crochet, slip stitches, and chain stitches.
- Beginners, who are willing to follow detailed step-by-step instructions and experiment with new techniques like front post double crochet and assembling components using stitch markers.
Although the tutorial provides clear guidance, beginners may need extra practice for tricky parts, like creating the twisted mesh stitch or sewing the project neatly.
Materials Used
Here are the supplies needed for this project:
- Polyester yarn (1 mm) — 200 grams.
- Crochet hook (2.5 mm).
- Tapestry needle for sewing.
- D-rings (2 cm wide) — used in strap assembly.
- Metal strap adjuster (optional) — for adjustability.
- Magnetic sew-on button (1.5 cm) — snap buttons can also be substituted.
- Stitch markers.
- Scissors.
Step-By-Step Instructions
1. Front Panel (Twisted Mesh Design)
- Create 25 chains for the foundation row.
- Work 25 single crochets into the first row.
- Alternate between double crochets and front post double crochets, skipping stitches as outlined in the video, to build the twisted mesh pattern.
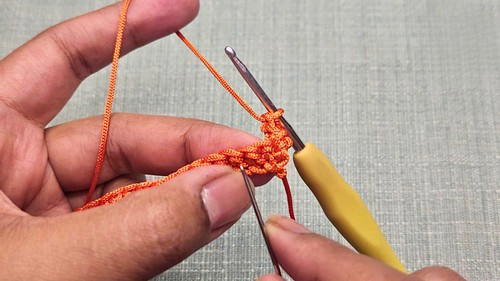
- Repeat the mesh and plain row combination until completing 22 rows. End with a single crochet border around the panel for neatness.
2. Side Panels
- Start with 7 chains and follow the same mesh design to crochet 20 rows for the side panels.
- Attach D-rings by sewing them into place while crocheting specific rows.
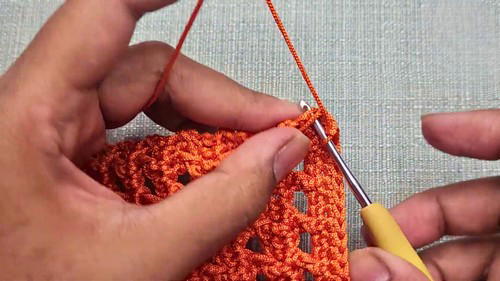
3. Back Panel with Flap
- Work 11 rows with the twisted mesh design for the flap, mirroring the pattern of the front panel.
- For the back panel, switch to simple double crochets for 22 rows.
- Attach a loop in the middle of row 14 to hold keyrings or carabiners.
4. Card Slot
- Crochet a rectangle of 17 chains wide and 10 rows tall, using simple double crochets.
- Add an indent at row 10 using chains and slip stitches, creating a space for easily accessing cards.
- Finish with single crochets, ensuring slip stitches are worked only into back loops for clean edges.

5. Base Panel
- Crochet an oblong base by working 25 single crochets across seven rows.
- Add single crochet borders to all sides for a polished finish.
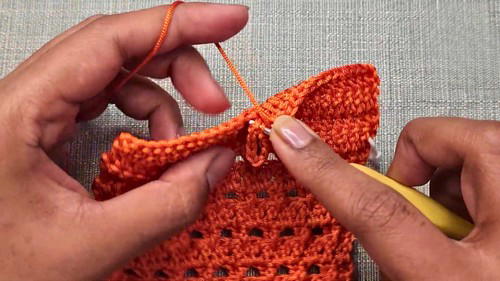
6. Assembly
- Use a tapestry needle and stitch markers to attach the base panel to the side panels with slip stitches.
- Sew the front panel to the edges of the pouch with slip stitches and carefully align corners for clean edges.
- Attach the back panel and flap to the pouch similarly, ensuring alignment with the marked flap row.

- Secure the card slot inside the pouch on the back panel using stitch markers to position it properly and stitch it neatly.

Tutor's Suggestions
- Take your time with tricky stitches, such as front post double crochet, to ensure consistency and a polished finish.
- Double-check alignment when sewing panels together to avoid uneven edges.
- Use stitch markers generously—they’re indispensable for accurate positioning, especially during assembly.
- If attaching a strap adjuster isn’t possible, use simple ties for adjustability instead.
Uses of the Mobile Pouch
This pouch is ideal for:
- Safely storing two phones.
- Easy access to cards with its built-in card slot.
- Adding carabiners or keychains using the attached loop.
- Lightweight carrying with the adjustable strap.
Tip for Success
Practice the front post double crochet stitch on scrap yarn before starting the pouch. This stitch forms the key design element of the front panel and determines the overall aesthetic of the bag. Familiarity with the technique will make the process smoother and faster.
Conclusion
This crochet mobile pouch is a functional and stylish accessory that challenges your crocheting skills while providing a satisfying, practical result.


