Glow with cozy elegance using this Free Crochet Sweater Vest Pattern, that's for stylish layering and adding warmth with handmade charm.
On a cool afternoon, a light breeze moved through the open window, and the thought of something warm yet not too heavy felt just right. The Free Crochet Sweater Vest pattern brings that comfort to life, offering a perfect mix of style and practicality. Its neat stitch work forms a smooth, flexible texture that layers beautifully over shirts, blouses, or dresses, making it suitable for both casual and semi-formal looks.
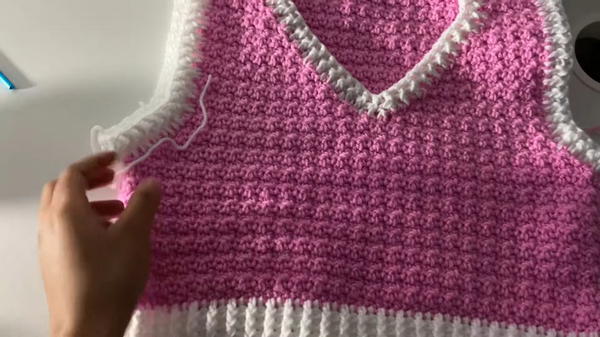
Autumn Glow Crochet Sweater Vest Pattern for Cozy Outfits

The vest’s lightweight structure keeps it breathable while still adding a gentle touch of warmth, ideal for transitional weather. What makes this piece special is its timeless appeal—simple lines and soft edges give it a clean, polished appearance that never goes out of fashion. The pattern allows room for creativity through color choices, yarn types, or subtle accents, letting each version reflect personal taste.
Beyond its visual charm, it’s also a practical wardrobe staple that adds depth and texture to any outfit without feeling bulky. Comfortable, durable, and stylish, this crochet vest serves as an easy layering piece that enhances both comfort and elegance. It’s a versatile addition that fits effortlessly into everyday wear, making ordinary outfits feel a little more cozy and refined.
Special Features
- Houndstooth Stitch: The use of alternating single and double crochets creates a visually appealing texture that is easy to master.
- Custom Sizing: The sweater vest is tailored to your measurements—ensuring a perfect fit.
- Contrasting Borders: The ribbed edges around the hem, armholes, and neckline are made using white fluffy yarn, adding a decorative and modern touch.
- Beginner-Friendly Decreases: The tutorial teaches simple and clear methods for shaping the neckline and armholes through decreases.
- Straightforward Construction: The sweater vest is made in separate panels (front and back), which are later sewn together.
Materials Needed
- Yarn:
- Pink Acrylic Yarn (Bernat Premium, Weight 4) – 720 yards.
- White Acrylic Yarn (from a dollar store) for ribbed accents.
- Crochet Hook:
- 5mm crochet hook.
- Darning Needle:
- For sewing panels and weaving in loose ends.
- Tape Measure:
- For taking bust and armhole measurements.
- Stitch Markers (Optional):
- To mark midpoints and keep track of decreases.
- Scissors:
- For trimming yarn.
Step-by-Step Instructions
Step 1: Measuring and Starting the Foundation Chains
- Bust Measurement:
- Use a tape measure to measure your full bust circumference and divide it by 2. This will give you the width of the front and back panels.
- For example, Peculiar's bust measurement was 33 inches, so she worked with 16.5 inches for each panel.
- Create Odd Number of Chains:
- Make a slip knot and chain the required number to match half of your bust measurement.
- Ensure the foundation chain has an odd number of chains. For a 16.5-inch width, Peculiar made 55 chains.
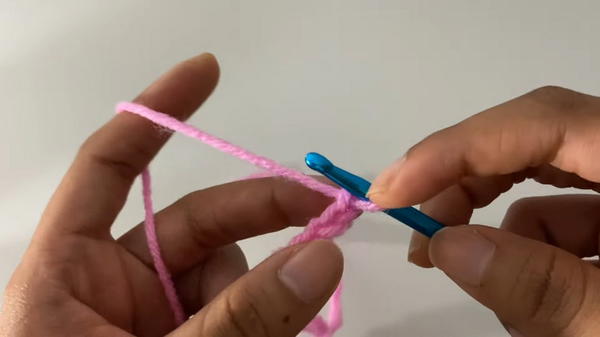
Step 2: Learning the Houndstooth Stitch
- Begin the Stitch:
- Insert your hook into the second chain from the hook and work a single crochet (SC).
- Insert a double crochet (DC) into the next chain.
- Alternate between single crochet and double crochet across the row.
- End the Row:
- If you start with a single crochet, ensure you end the row with a double crochet.
- Chain 1 and turn your work.
- Row Two and Beyond:
- Crochet the opposite stitch on each stitch: place a single crochet on top of the previous row’s double crochet, and a double crochet on top of the previous row’s single crochet.
- Continue in this pattern.
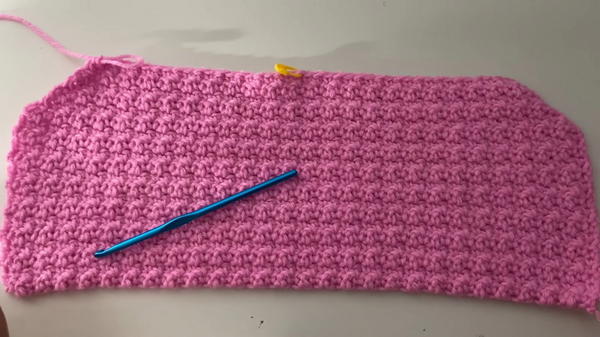
Step 3: Creating the Front Panel
- Regular Rows:
- Work the houndstooth stitch for 14 rows or until your desired length reaches about 4.5 inches.
- This forms the base of the vest, stopping just under the bust.
- Decreasing for the Armholes:
- Skip the first stitch in a row to start the decrease.
- Continue the pattern, and when you reach the last two stitches, decrease again.
- Perform decreases at the beginning and end of rows for the next 6 rows.
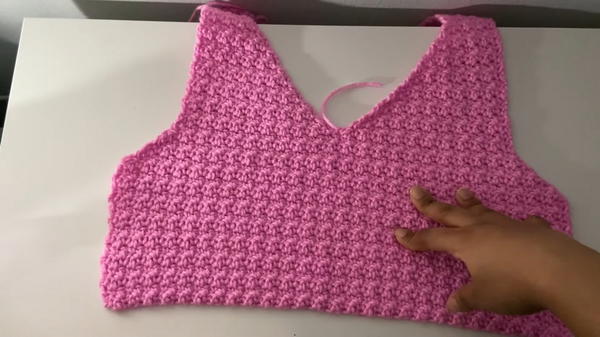
- Shaping the Neckline:
- Divide the panel in half to create the neckline.
- Decrease in the middle section of the vest to shape the V-neck.
- Work 14 rows of decreases for the neckline while keeping the sides straight.
Step 4: Creating the Back Panel
- Start the Panel:
- Create the same number of chains as the front panel.
- Repeat the houndstooth stitch for 14 rows to reach under the bust.
- Decreasing for Armholes:
- Perform decreases on both ends of the row for 6 rows, similar to the front panel.
- Straight Rows for the Back:
- Instead of shaping a neckline, work 24 straight rows with no decreases to finish the back panel.
Step 5: Add the Straps and Assembly
- Add Shoulder Straps:
- Count 7 stitches from the edges of the back panel and front panel. Create small straps by working 4 rows of houndstooth stitch for these sections.
- Sew Panels Together:
- Sew the front and back panels together using a darning needle. Ensure the “good” side of each panel is facing inward during sewing.
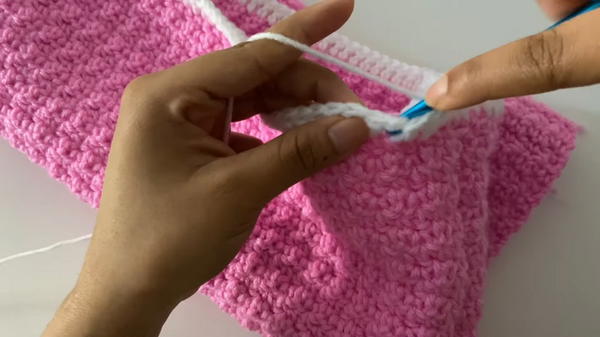
Step 6: Adding the Ribbing
- Hemline Ribbing:
- Attach white yarn along the bottom edge of the vest.
- Work double crochets into each stitch for the first row.
- For the next 4 rows, alternate front post double crochet (FPDC) and back post double crochet (BPDC). This creates the ribbed texture.
- Armhole Ribbing:
- Attach white yarn around the armholes.
- Work double crochets around for the first row, followed by FPDC and BPDC for 4 rows.
- Neckline Ribbing:
- Attach the white yarn to the neckline.
- Work decreases near the midpoints of the neckline to maintain its V shape.
- Alternate FPDC and BPDC for 4 rows.
Level of Difficulty
- Beginner-Friendly: The sweater vest is simple to make, requiring basic stitches (single and double crochets) and straightforward shaping techniques (decreases).
- The tutorial emphasizes clear instructions, making it ideal for beginners.
Tutor's Suggestions
- Choose Yarn Appropriately:
- Peculiar uses soft acrylic yarn for comfort and workability.
- Keep Count of Rows and Stitches:
- Ensure that your stitch counts and measurements are consistent to avoid uneven panels.
- Take Breaks Between Assembly Steps:
- Sewing panels and weaving in ends can be tedious; take breaks to avoid rushing this important step.
Uses
- Everyday Layering: Pair the sweater vest with a white shirt or turtleneck for a casual, trendy outfit.
- Seasonal Wear: Ideal for cooler weather, thanks to its ribbing and snug fit.
- Gifting: Handmade crochet sweater vests make thoughtful, personal gifts.
A Handy Tip
When working the ribbing, ensure your tension is even. Loose tension may cause the ribbing to flare out, while tight tension may make the edges too firm.
Conclusion
Peculiar’s Beginner-Friendly Crochet Sweater Vest Tutorial is an ideal project for new crocheters looking to elevate their skills. With its simple houndstooth stitch, easy shaping, and customizable features, this sweater vest is both stylish and practical. The inclusion of ribbed borders and contrasting yarn highlights the design's sophistication, making it a cozy and trendy addition to your wardrobe.


