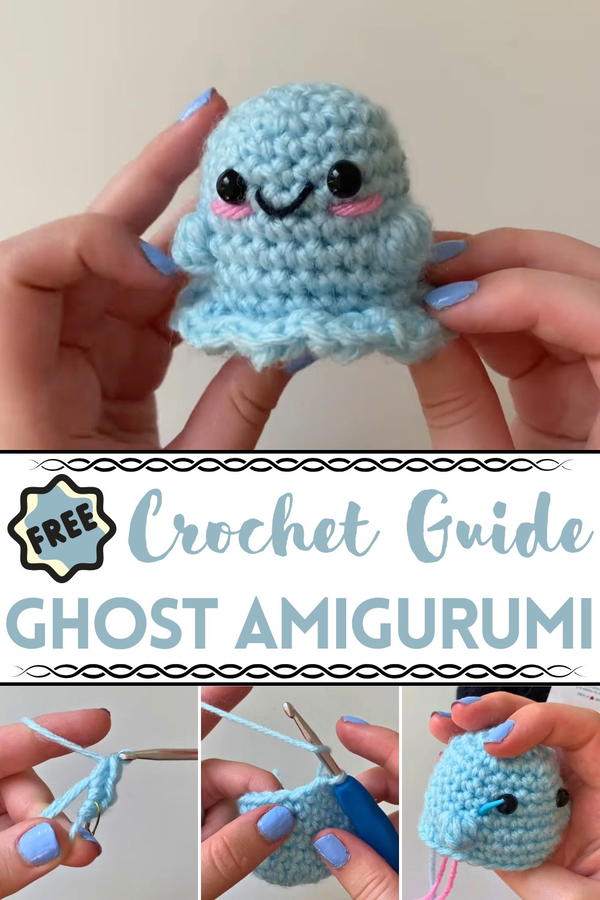
Haunt in style with this Crochet Ghost Amigurumi pattern, a spooky-cute design that fills Halloween with charm for décor or thoughtful gifts.
Halloween celebrations often feel brighter with a touch of whimsy, and nothing captures that playful spirit better than a friendly little ghost. The Crochet Ghost Amigurumi pattern brings this seasonal charm to life in a delightful, lasting form that combines cuteness with festive appeal. Its rounded shape, soft texture, and expressive details give it personality, making it an irresistible accent for shelves, mantels, or party décor.
Festive Chic Crochet Ghost Amigurumi with Holiday Joy
Unlike fragile decorations that fade or tear, this ghost remains intact year after year, offering a reliable favorite to display each season. Lightweight and compact, it can be placed almost anywhere, from a child’s room to a festive centerpiece, adding fun without overwhelming the space. Beyond decoration, it also makes a thoughtful handmade gift or a playful toy, safe and comforting thanks to its soft yarn structure.
Its durability ensures it withstands storage and handling, keeping its charm for many seasons to come. Whether paired with other Halloween accents or standing alone, it adds warmth and character to any display. With its mix of practicality, charm, and timeless appeal, the Crochet Ghost Amigurumi pattern is a delightful keepsake that carries the joy of Halloween year after year.
Materials Needed
- Yarn:
- Weight 4 Medium Acrylic Yarn: The tutorial demonstrates in blue yarn to improve visibility, but the ghost is primarily crocheted in white or plush yarn for a soft appearance.
- Optional Accent Yarn: Pink (weight 3, thin) for blush and black (weight 3, thin) for the smile.
- Crochet Hook: 4 mm hook for weight 4 yarn.
- Safety Eyes: 8 mm for this specific yarn weight (adjust based on yarn thickness).
- Stuffing: Polyfill or teddy bear stuffing for shaping.
- Stitch Marker: Essential for tracking rounds.
- Darning Needle: For sewing facial details and closing the top.
- Craft Scissors: For cutting yarn.
Special Features of This Crochet Ghost
- Amigurumi Ghost Design: The pattern gives the ghost a cute, chubby shape with creative ruffles to mimic a floating effect.
- Bobble Stitch Arms: Unique bobble stitches are used to create the ghost’s tiny arms, adding personality.
- Facial Customizations: Includes instructions for embroidering blush and smile details to personalize your ghost.
- Beginner-Friendly Options: While the ghost can be crocheted with plush yarn for added charm, beginners can start with simpler acrylic yarn first.
- Ruffled Finish: The ghost includes a decorative ruffle at the bottom using the “front loop” technique.
Level of Difficulty
This ghost amigurumi is beginner-friendly, though it introduces a few slightly advanced techniques such as bobble stitches, magic circles, and ruffle details. Beginners may wish to use acrylic yarn initially before progressing to plush yarn, as plush yarn can be more challenging to handle.
Step-by-Step Instructions
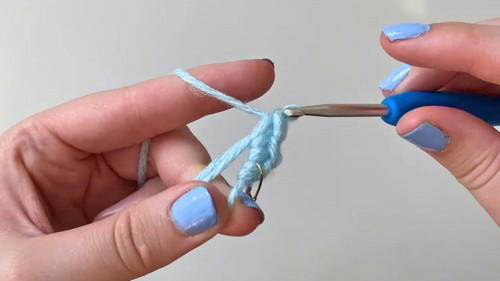
1. Start with the Magic Circle
- Create a magic circle following the technique described in the tutorial or from the referenced Crochet 101 video.
- Work 6 single crochets (SC) into the magic circle.
- Pull the tail tight to close the circle, and place a stitch marker on the first stitch to track rounds.
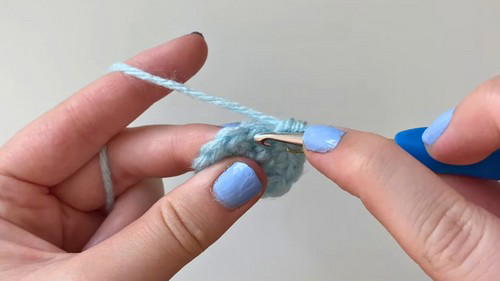
2. Build the Ghost Body (Rounds 2–11)
2: Increases
- Work 2 SC into each stitch (this is an increase).
- By the end of the round, you should have 12 stitches.
3: Pattern - 1 Increase, 1 SC
- Alternate between 2 SC in one stitch (increase) and 1 SC in the next stitch.
- Total stitch count: 18 stitches.
4: Pattern - 1 Increase, 2 SC
- Alternate between 2 SC in one stitch (increase) and 2 individual SC in the next stitches.
- Total stitch count: 24 stitches.
5–8: Building the Ghost’s Height
- Work 1 SC in each stitch (no increases).
- These rounds establish the ghost’s cylindrical body.
3. Adding the Ghost’s Arms and Facial Details (Round 9–11)
Bobble Stitch Arms (Round 9)
- Begin with 5 SC to position the first arm.
- Into the next stitch, create a bobble stitch:
- Yarn over, insert the hook, yarn over, pull through, yarn over, pull through 2 loops. Repeat 4 times in the same stitch until you have 6 loops on the hook. Yarn over and pull through all loops.
- Add 8 SC before replicating the bobble stitch for the second arm.
- Finish the round with single crochets in the remaining stitches.
10–11
- Work 1 SC evenly in each stitch across both rounds.
- The ghost’s body is now complete, leaving space for stuffing and facial features.
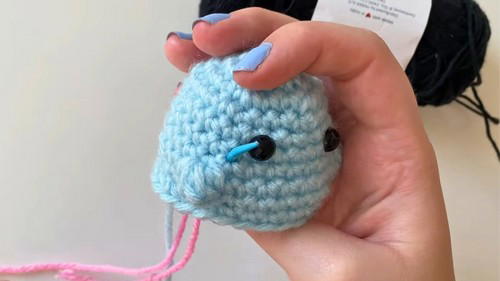
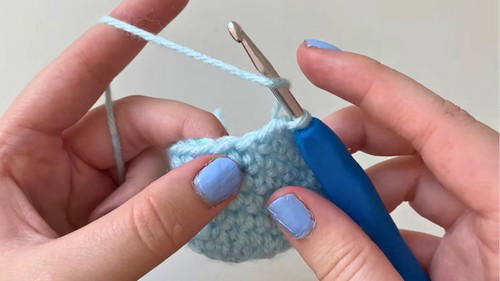
4. Attach the Ghost’s Eyes and Sew the Features
- Safety Eyes: Insert the safety eyes between rows 6 and 7, ensuring 4 stitches apart for symmetry. Attach the backing pieces inside the ghost.
- Blush (Pink Yarn): Using a darning needle, thread the blush yarn below each eye. Sew blush stitches over 2 stitches each. Tie the ends loosely inside to prevent distortion.
- Smile (Black Yarn): Sew a small, curved smile below the blush area, starting between the eyes. Tug gently for definition and secure ends inside.
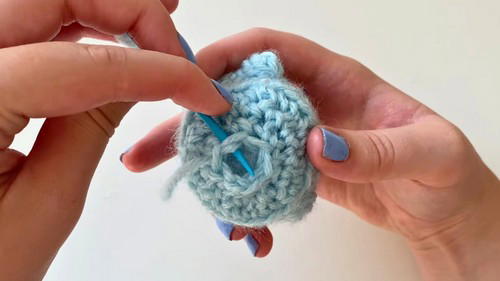
5. Stuff and Close the Ghost (Rounds 12–13)
12: Decreases (Working Back Loops Only)
- Alternate between 2 SC and 1 decrease stitch, using back loops only. This shapes the ghost’s top edge.
- Total stitch count: 18 stitches.
13: Final Decreases
- Alternate between 1 SC and 1 decrease, working through both loops.
- Total stitch count reduces to 6 stitches.
Close the Opening
- Stuff the ghost firmly with polyfill.
- Using the darning needle and long tail, sew through the remaining 6 stitches in a criss-cross pattern. Pull tight to close the hole completely.
6. Add the Ruffle Detailing
- Reattach the yarn to the ghost’s front loops from Round 12.
- Begin with 1 SC in the first front loop, followed by 3 half-double crochets (HDC) in the next front loop. Alternate this pattern all the way around:
- SC, 3 HDC.
- Slip stitch into the first SC to join the round, then fasten off and weave in the ends.
Tutor’s Suggestions
- Avoid Pulling Too Hard: Over-tightening the magic circle or seams may cause the yarn to snap.
- Start with Acrylic Yarn: Plush yarn looks incredible for this project but can be tricky for beginners due to its thickness and fuzziness. Practice with acrylic yarn first.
- Track Your Rounds: Always use a stitch marker to keep track of rounds, especially since this project involves intricate steps like bobble stitches and alternating patterns.
Uses of the Ghost Amigurumi
- Halloween Ornaments: Hang these ghosts around your home or on spooky wreaths.
- Table Décor: Display them on coffee tables or shelves for a festive touch.
- Kids’ Toys: Turn these ghosts into small plushies for children.
- Party Decorations: Use them as thematic favors or props for Halloween gatherings.
Pro Tip
If using thick plush or blanket yarn, increase the size of your crochet hook to better accommodate the yarn’s heft. This adjustment will make the stitches easier to work with and create an even softer texture for the completed ghost!
Conclusion
This crochet ghost project is a delightful way to prepare for the Halloween season while advancing your crochet skills. Whether it’s the bobble arms, embroidered features, or finishing ruffle details, this ghost is packed with charm and creativity. With clear instructions and customizable options, you can experiment with different yarn types, colors, and sizes to make unique ghosts for your spooky celebrations.


