Brighten your fall accessories with this Free Crochet Pumpkin Keychain Pattern, a charming and handy project perfect for seasonal flair and heartfelt gifting.
A small seasonal symbol can hold more charm than its size suggests. That’s exactly what this delightful piece manages to convey. With its cozy texture and gentle roundness, the Free Crochet Pumpkin Keychain Pattern offers an endearing way to carry autumn warmth wherever you go. Whether attached to a backpack, purse, or set of keys, it brings a soft festive touch that’s as functional as it is decorative. The soft stitches echo the comfort of fall, and its compact size makes it ideal for thoughtful gifting or personal use.
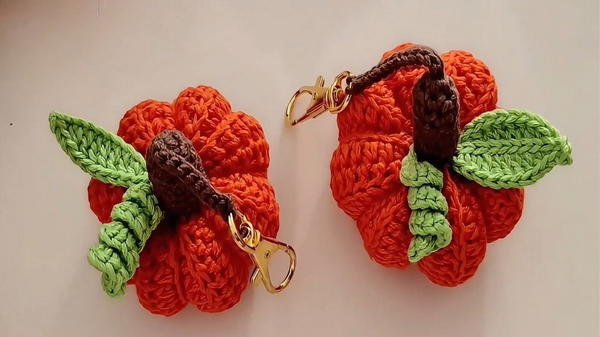
How to Use Leftover Yarn for a Cute Pumpkin Keychain

The pumpkin’s classic form is thoughtfully rendered in yarn, offering a familiar shape that adds whimsy without overwhelming. Its cheerful presence brightens up everyday accessories while staying lightweight and easy to carry. Suitable for seasoned hands or those new to the hook, this piece provides a relaxing project with rewarding results.
Aside from being a charming seasonal embellishment, it also serves as a memorable token for friends, party favors, or themed decor. Soft, simple, and filled with character, this small keychain is a gentle nod to changing leaves and cozy evenings, proving that even the tiniest touches can celebrate the season in a meaningful and stylish way.
Step-by-Step Details
1. Materials Needed
- Wool or yarn of three basic colors (preferably orange, green, and brown for a pumpkin theme)
- Marker
- Keychain loop (optional, if making a keychain)
- Scissors
- 2 mm rope or yarn
- Crochet hook
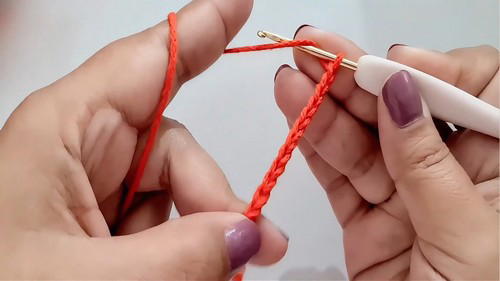
2. Crochet Base and Body Creation
- Secure the First Stitch: Start by securing the first stitch using your yarn for the base of the pumpkin.
- Chain Stitches: Decide the size of the pumpkin by the number of chain stitches (e.g., 18–28 chain stitches for medium size).
- Half Double Crochets:
- Skip the first chain stitch and begin crocheting in subsequent stitches with half double crochet.
- Place markers at the first and last stitches for easier tracking.
- Continue Rounds:
- Turn after each row and crochet by taking only half of the chain stitch from the previous row.
- Repeat the process for 28 rounds to create the pumpkin body.

3. Closing and Forming the Pumpkin Shape
- Leave extra yarn to create divisions for the pumpkin sections.
- Slip stitch the edges to close the body of the pumpkin.
- Fill the Pumpkin:
- Add filling material inside the body to give it a realistic rounded shape.
- Pull the cord to ensure the filling is evenly distributed and the pumpkin is tightly closed.
- Dividing Sections:
- Create segment divisions to mimic the realistic grooves of a pumpkin using the leftover yarn. Form a cross first, then subdivide into additional sections.
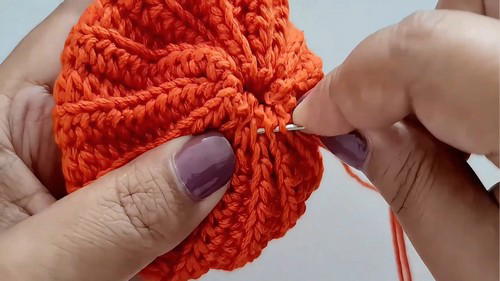
- Create segment divisions to mimic the realistic grooves of a pumpkin using the leftover yarn. Form a cross first, then subdivide into additional sections.
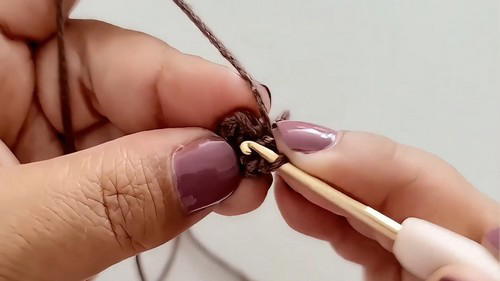
4. Adding the Stem
- Create a magic ring with yarn.
- Crochet 6 single stitches within the ring.
- Increase single stitches in subsequent rows to build the stem, ensuring the keychain or loop is incorporated securely.
- Tie knots and reinforce with additional stitching to prevent it from slipping.
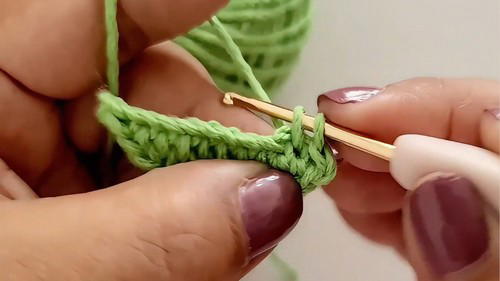
5. Adding the Leaf and Final Touches
- Begin with 11 chain stitches and crochet in a mirrored pattern:
- Slip stitch → Single stitch → Half double crochet → 5 double crochets.
- Repeat on the opposite side in reverse order.
- Attach the leaf to the top of the pumpkin, ensuring it's securely in place.
- Add decorative elements to enhance visual appeal, like another round of slip stitching along the leaf’s edge for texture.
Special Features
- Realistic design: The pumpkin has lifelike grooves created by segmenting the body.
- Customizable sizes: The pumpkin size can be adjusted according to the number of chain stitches used.
- Multi-purpose: The tutorial includes instructions for making a keychain, but the pumpkins can also serve as table decor, ornaments, or gifts.
Level of Difficulty
- Intermediate: Requires prior knowledge of basic crochet techniques like chain stitching, single stitching, half double stitching, and slip stitching.
Tutor's Suggestions
- Use different types of yarn (e.g., wool or stamen) for varying texture effects.
- Ensure proper placement of markers at the beginning and end of rows to avoid mistakes.
- Focus on balancing the filling so the pumpkin has an even round shape.
- Double-up yarn for groove creation to improve aesthetic consistency.
Uses and Applications
- Perfect for seasonal decor during fall and festive holidays like Halloween or Thanksgiving.
- Ideal for gifting and creative DIY projects.
- Versatile as a keychain, table centerpiece, or shelf decoration.
Tip
For a neater look, use contrasting yarn colors for stem and leaf to make the details stand out. Also, while closing the sections, try pulling the yarn gently to avoid uneven grooves.
Conclusion
This step-by-step tutorial empowers crocheters to create a charming crochet pumpkin with their personal touch. Whether for decoration or gifting, this project is both rewarding and versatile.


