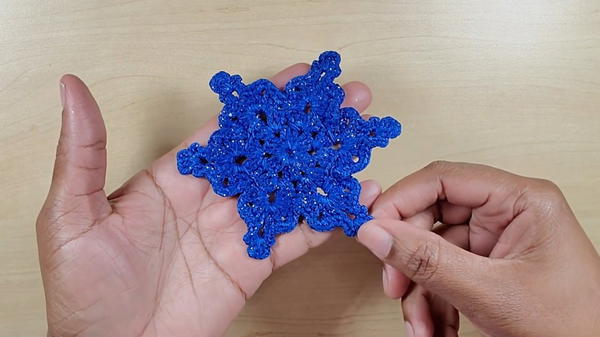
Glisten through winter with the Free Crochet Snowflake Pattern, perfect for ornaments, décor, or festive gifts that add delicate charm and elegance.
On a quiet winter evening, the first frost settled on the windows, leaving delicate crystalline shapes that sparkled under the soft glow of lamplight. These intricate forms inspired the Free Crochet Snowflake pattern, capturing the fleeting beauty of snowflakes in lasting handmade artistry. Each piece reflects careful symmetry, making it ideal for embellishing holiday décor, from hanging ornaments and table accents to cozy gifts for friends and family.
Free Crochet Snowflake Pattern That Brings Festive Joy

Its lightweight structure ensures it drapes gracefully, whether layered into garlands, framed as wall art, or sewn onto festive linens. Beyond decoration, these snowflakes can be used as thoughtful tags, festive coasters, or even cheerful additions to greeting cards, offering both practicality and visual delight. The satisfaction of completing each motif also provides a soothing, mindful activity, enhancing focus and relaxation.
With its timeless elegance and delicate structure, the Free Crochet Snowflake pattern combines aesthetic appeal with functional creativity. This winter-inspired crochet brings subtle warmth to any space, celebrating the quiet magic of snow in a form that lasts far longer than the season itself, offering beauty, flexibility, and endless opportunities for personal expression.
Materials Required
- Yarn/Thread: Thin crochet thread (e.g., blue thread used in the tutorial).
- Crochet Hook:
- 2.0 mm crochet hook for larger snowflakes.
- 1.35 mm crochet hook for smaller snowflakes.
- Scissors: For trimming yarn ends.
- Darning Needle: For weaving in ends and securing the finish.
- Glitter Glue: For adding a sparkly finish to the snowflake.
- Water: Mixed with glitter glue to create the stiffening solution.
- Disposable Dish: For soaking the snowflake in the glitter glue solution.
- Iron: Used to flatten the snowflake for a neat finish.
- Pins and Cushion: To pin down the snowflake while drying.
Step-by-Step Instructions
1. Starting the Snowflake Base
- Slip Knot:
Create a slip knot and chain 8 (or chain 6, depending on your thread thickness).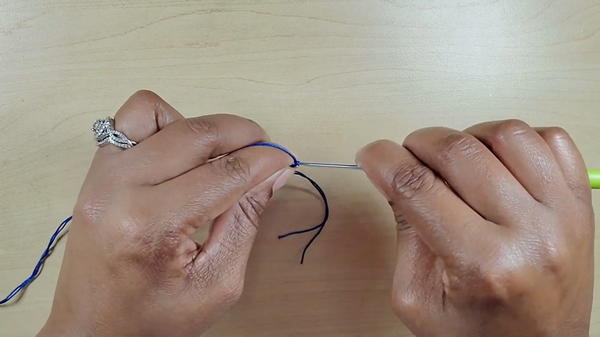
- Forming a Circle:
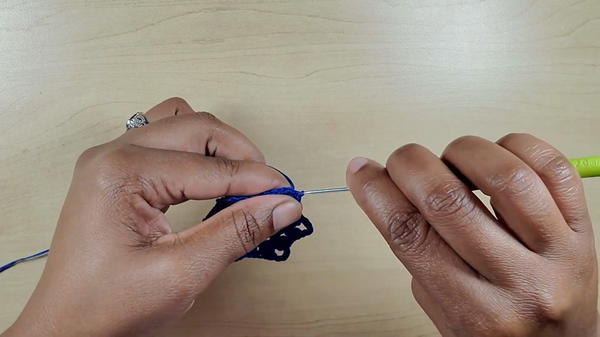
Slip stitch into the first chain to form a ring. - Foundation for the Snowflake:
Chain 3 (counts as the first double crochet), then make 2 double crochets into the ring. Chain 3 and repeat this process.- You should complete 6 sets of 3 double crochets, each separated by a chain of 3.
- Slip stitch to the top of the starting chain 3 to close this round.
2. Building the Shells
- Moving to the Next Space:
Slip stitch into the top of the next double crochet and then into the chain-3 space. - Creating the Second Layer:
- Chain 3, then make 2 double crochets in the same space.
- Chain 4 (separation chains for this row).
- Make another set of 3 double crochets in the same space to complete one shell.
- Repeat the Process:
Move to the next chain-3 space and repeat the shell pattern (3 double crochets, chain 4, 3 double crochets).- Do this for all 6 chain spaces.
- Slip stitch to close the round.
3. Adding the Final Layer
- Transition with Slip Stitches:
Single crochet or slip stitch to move to the next round. - Clustered Shells:
- Begin with 3 double crochets in the first chain space, followed by a chain of 3.
- Complete the cluster by adding 3 more double crochets into the same space.
- Creating Decorative Peaks (Picots):
- Chain 5, followed by single crocheting into the desired stitch.
- Adjust the placement of picots to create symmetrical edges.
- Continue Around the Snowflake:
Repeat the clusters and picot stitches across all chain spaces to create the intricate snowflake pattern.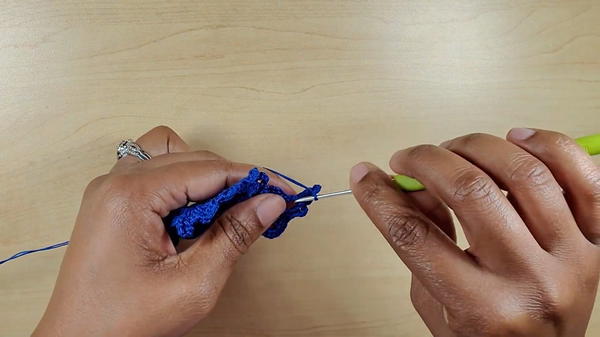
4. Tying Off and Trimming
- Slip stitch into the starting point to finish.
- Pull on the central thread to tighten the center of the snowflake.
- Use the darning needle to weave in the loose ends for a clean finish.
Adding the Decorative Finish
- Flattening the Snowflake:
- Use an iron to carefully flatten out the snowflake, ensuring all points and picots are straight.
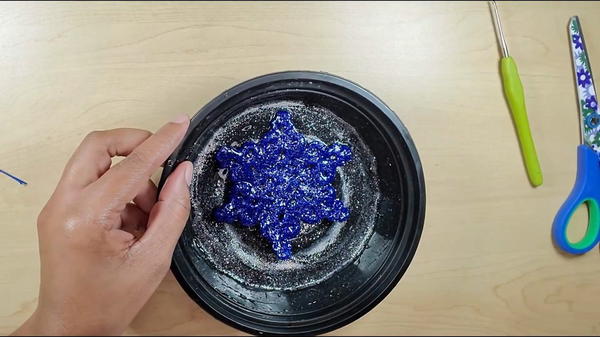
- Soaking in Glitter Glue Solution:
- Mix glitter glue and water in a disposable dish.
- Dip the snowflake into the mixture, ensuring it’s fully coated.
- Squeeze out excess glue without distorting the shape.
- Drying the Snowflake:
- Place the snowflake on a cushion and pin down the points to maintain its shape.
- Allow it to dry completely before removing the pins.
Special Features
- Delicate and Glittery Design: The snowflake has a lace-like appearance that sparkles when finished with glitter glue.
- Customizable Sizes: By using different hook sizes, you can create larger or smaller snowflakes to suit your preferences.
- Versatile Uses: They can be used as Christmas tree ornaments, window decorations, gift toppers, or festive garlands.
Level of Difficulty
The tutorial is suitable for advanced beginners to intermediate crocheters. It mainly uses basic stitches (chains, double crochets, and slip stitches) combined with picot edges for added detail.
Tutor's Suggestions
- Thread Thickness: Adjust the number of chains based on yarn thickness for better manageability.
- Flattening Tips: Ironing before and after the glitter glue process ensures a professional, crisp look.
- Picot Precision: Ensure picots are evenly spaced for a symmetrical and polished design.
Uses of the Snowflake
- Holiday Ornaments: Hang them on your Christmas tree or windows for a festive touch.
- Gift Decorations: Add them to wrapped gifts for a handmade, personal touch.
- Garlands and Wall Art: Create multiple snowflakes and string them together for holiday décor.
Helpful Tip
For long-lasting snowflakes, reinforce the stiffening process by applying glue twice. Ensure the snowflake fully dries after each application for a firmer structure.
Conclusion
These crocheted snowflakes are not just a craft project—they’re a celebration of creativity and holiday spirit. With their intricate design, sparkling finish, and versatile uses, they’re a perfect addition to your festive décor. The tutorial’s detailed guidance ensures that even crocheters with basic skills can achieve beautiful results.


