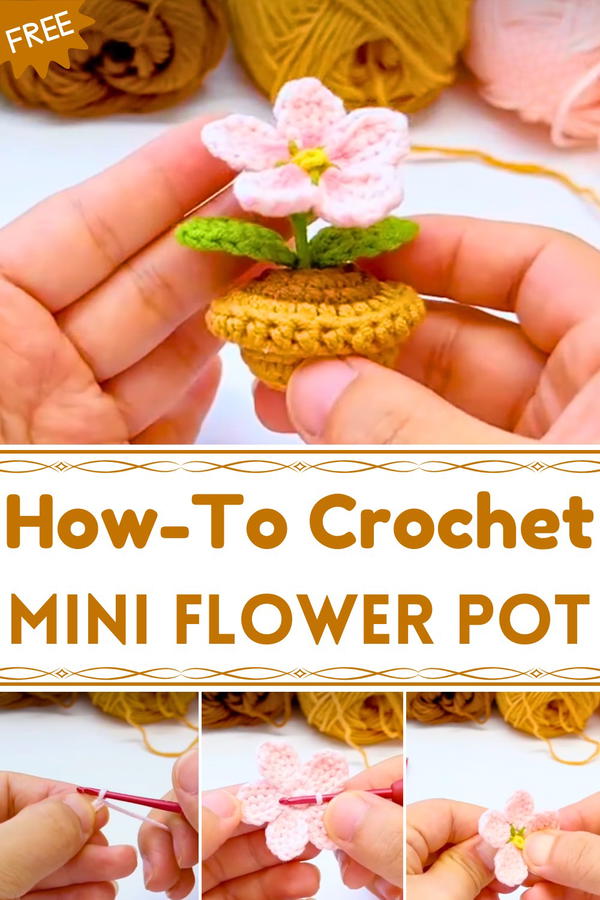
Sprinkle charm into your decor with this Free Crochet Mini Flower Pot Pattern, ideal for creating cute, decorative pieces that brighten any space.
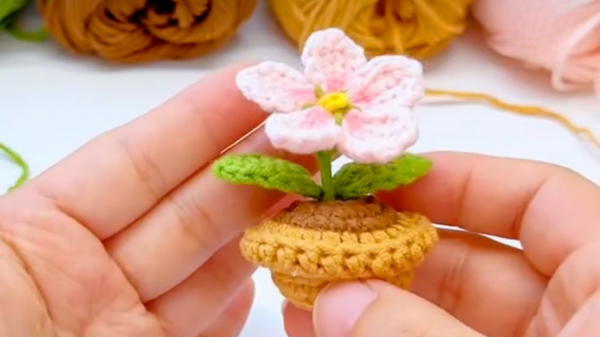
Sunlight once caught the edge of a tiny, forgotten pot, hinting at the charm it could hold if given new life. Through careful stitching and soft yarn, that simple vessel became a delightful miniature accent that brightens any space. The Free Crochet Mini Flower Pot pattern allows crocheters to make these charming creations, offering a playful way to add color and texture to home décor or workspaces.
Sweet Crochet Mini Flower Pot Pattern Adds Cozy Accent
Each stitch forms a sturdy yet flexible structure, perfect for holding tiny artificial blooms, succulents, or decorative fillers without losing shape. Beyond its visual appeal, working on this pattern promotes focus, patience, and fine motor skills, turning a small crafting session into a satisfying and calming activity. These mini pots are highly versatile: they can be arranged in clusters, used as gifts, or incorporated into larger decorative displays, adding personality to shelves, desks, or windowsills.
Lightweight yet durable, they maintain their form while offering a soft, tactile charm that complements any setting. Customizing yarn colors and arrangements allows each pot to reflect the maker’s personal style. The Free Crochet Mini Flower Pot pattern transforms simple yarn into delightful, functional accents that bring warmth, creativity, and handcrafted elegance to everyday surroundings.
Materials Required
- Yarn: Lens Susan Family, four strands of cotton yarn.
- Crochet Hook: 2.5 mm hook.
- Fiberfill/Cotton Balls: To stuff the pot.
- Zinc Wire: For the flower stem and base rigidity.
- Craft Glue: To secure certain parts of the project.
- Sewing Needle: For assembling the flower.
- Scissors: For yarn and zinc wire trimming.
- Blush or Paint: For optional detailing on the pot.
Step-by-Step Instructions
1: Crochet the Flower
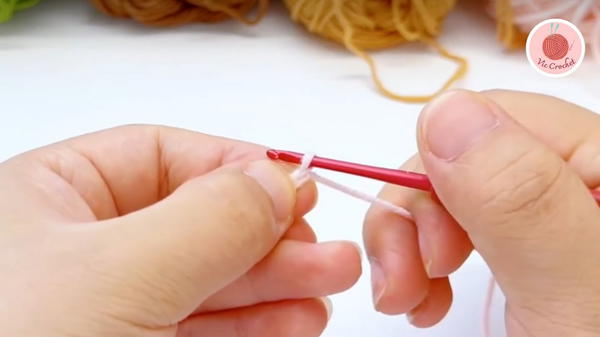
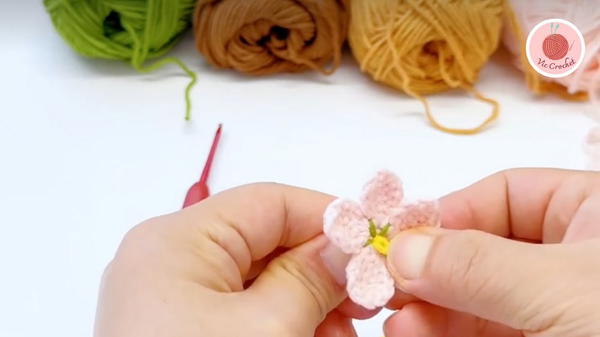
Start the Magic Circle:
- Begin with five single crochets into a magic circle and pull the thread tight, leaving a tiny gap.
- Slip stitch into the first stitch.
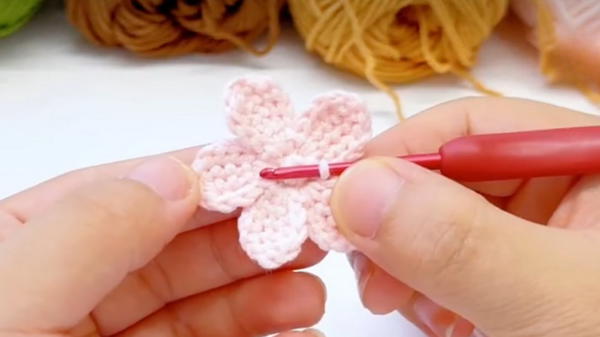
Crochet the Petals:
- Crochet four petals using unfinished triple crochets.
- Follow the video’s instructions to handle loops and draw thread to create intricate shapes.
- Repeat the process for all five petals, ensuring even spacing between each.
- Cut the thread and trace it to the back after completing the petals.
Create the Flower Base:
- Crochet a circular base with rows of five single stitches. Pull the loop tight after each round and slip stitch.
- Cut the thread, leaving excess for stitching.
- Assemble the flower and flower base using a sewing needle, passing tightly through petal positions.
Add the Pistil:
- Take zinc wire, fold it in half, then wrap yellow thread around it to create the pistil.
- Fix the pistil in place using craft glue, thread it through the flower's center, and adjust its position.
2: Crochet the Leaves
Shape the Leaf:
- Chain seven stitches to start.
- Crochet as follows:
- One single stitch.
- Half-double crochet.
- Double crochet.
- Half-double crochet.
- Single crochet.
Complete the Edge:
- Slip stitch into the base of the first stitch to finish the leaf shape.
- Cut the zinc wire and wrap yarn around to create a leaf stem.
- Repeat the process for additional leaves.
Attach the Leaves:
- After wrapping the flower stem, attach the leaves firmly. Ensure they are positioned beautifully and evenly.
3: Crochet the Pot Base
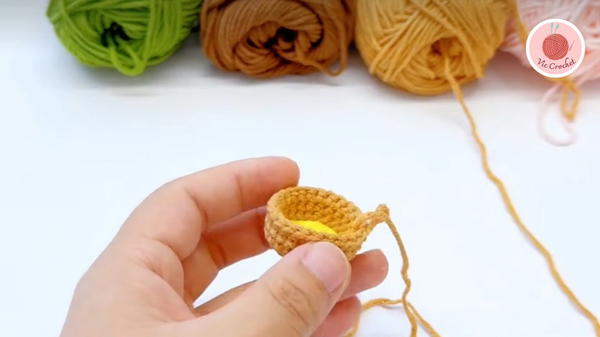
Start with Magic Circle:
- Crochet six single stitches into the magic circle, pull tight, and slip stitch into the first stitch.
Increase Rows:
- Row 2: Increase six stitches (two single crochets per stitch).
- Row 3: Alternate between one single stitch and one increase stitch.
- Row 4: Crochet into the half-leg stitches to shape the pot sides.
Continue Rows:
- Rows 5 to 7: Crochet 26 single stitches per round.
- Flip the bottom over and cut a circular shape slightly larger than the bottom layers.
Secure the Pot:
- Cut a small slit in the bottom, apply glue, and press the base and pot together to stabilize.
- Cut a small slit in the bottom, apply glue, and press the base and pot together to stabilize.
4: Assemble the Components
Join the Pot Base:
- Create a second piece identical to the initial pot bottom.
- Use double crochet stitches to join the two layers firmly.
Stuff the Pot:
- Insert some fiberfill or cotton balls for added structure.
Attach the Flower and Leaves:
- Secure the flower stem in the pot using glue and adjust leaf positions for aesthetic appeal.
Special Features
- Miniature Design: The small size makes it perfect for portable accessories like keychains or table decorations.
- Intricate Details: Includes realistic-looking petals, leaves, pistil, and a stable pot base.
- Customization Options: You can modify yarn colors, flower shapes, or add decorative blush to enhance your design.
Level of Difficulty
Intermediate
- Requires accuracy in managing small components like petals and leaves.
- Suitable for crocheters who are comfortable with basic stitches and willing to experiment with more intricate techniques.
Tutor’s Suggestions
- The tutor emphasizes working at a steady pace, especially when creating petals.
- Keep a loose tension when crocheting certain parts, such as the unfinished triple crochet and pistil.
- Use craft glue liberally when assembling components to ensure long-term durability.
Uses
- Decorative Accessory: Display on desks, shelves, or windowsills.
- Keychains: A fun, portable option for personalizing bags or keys.
- Gift Idea: Perfect handmade gift for plant lovers or crochet enthusiasts.
Tip
When working on the flower petals and pot details, ensure you use stitch markers or follow the video closely to maintain stitch count and symmetry. Small mistakes may affect the final shape of the design.
Conclusion
The super mini plant pot is a delightful crochet project that combines creativity and skill. From shaping a flower to attaching realistic leaves and crafting a sturdy pot, the tutorial guides you through each step with precision. Whether used as a decoration or a small gift, this adorable crochet project is sure to charm anyone who sees it.


