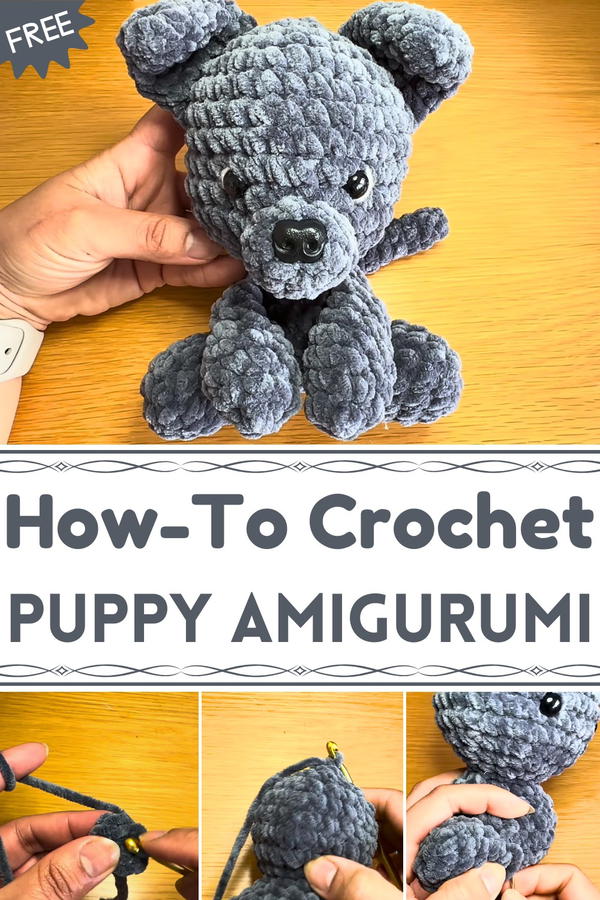
Bring adorable charm to life with this Free Crochet Puppy Amigurumi Pattern, ideal for making cute toys that spread joy and brighten any space.
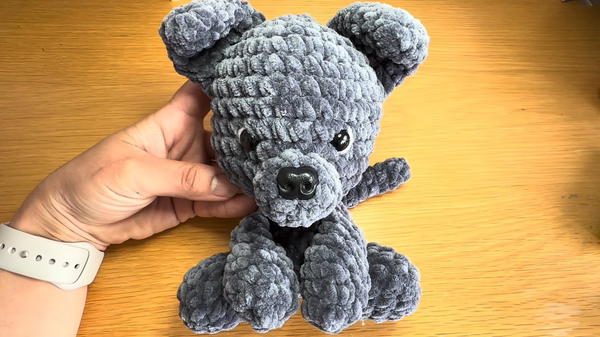
A tiny little bundle once sat on a table, just waiting to turn into the cutest puppy companion you could imagine. With a few clever stitches and a pinch of patience, that simple fiber came to life as a miniature puppy bursting with personality and charm. The Free Crochet Puppy Amigurumi pattern makes it easy to crochet these adorable figures, perfect for toys, gifts, or quirky décor that adds a smile to any room.
Adorable Crochet Puppy Amigurumi Pattern That Brings Joy
Every stitch builds a cuddly but sturdy little friend, ready for hugs, display, or even a mini adventure across the shelves. Working on this pattern is not only fun but also a secret workout for your fingers, boosting focus, patience, and dexterity while keeping you relaxed and entertained. Customizing colors, tiny facial features, and accessories turns each puppy into a one-of-a-kind companion with its own playful personality.
Lightweight and durable, these little amigurumi pups are ideal for gifting, decorating, or starting a mini collection of furry friends. Make a few, and you’ve got a whole gang ready for imaginative play or shelf-side storytelling. The Free Crochet Puppy Amigurumi pattern turns simple fiber into tiny bundles of joy that are as fun to make as they are to cuddle!
Materials Required
- Plush Yarn: In a color of your choice.
- 12 mm Safety Eyes: Two pieces.
- Plastic Nose: 1-inch size (or embroider one with black yarn).
- Crochet Hook: 5.5 mm.
- Darning Needle: For sewing and embroidering.
- Stitch Marker: To keep track of rounds.
- Scissors: For trimming yarn.
- Fiberfill Stuffing: To stuff the dog.
- Optional: Pins to help with assembly.
Step-by-Step Instructions
Part 1: Head
Starting the Head
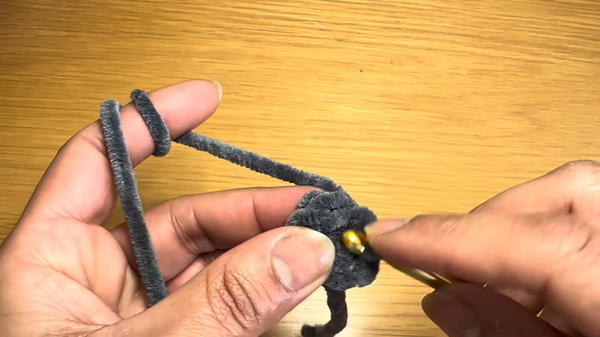
- Create a slip knot and chain two (or use a magic ring).
- Work six single crochets into the magic ring or second chain from hook.
Increasing for the Head
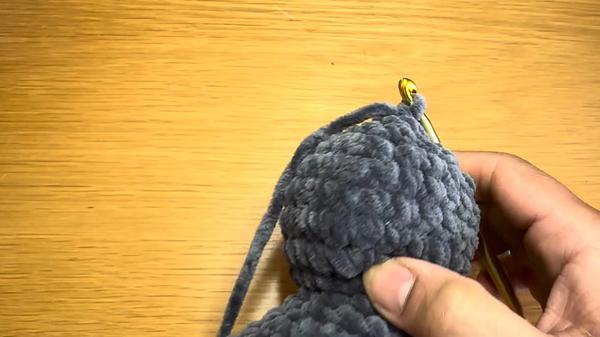
- Pull the yarn end to close the gap and start working in spirals.
- Increase in each stitch around (12 stitches total).
- Continue increasing by alternating single crochets and increases until you reach a stitch count of 30.
 Maintaining Round and Adding Eyes
- Work 6 rounds of 30 single crochets each.
- Insert 12 mm safety eyes after positioning them 6-7 stitches apart, two rounds above your last stitch.
Decreasing for the Head Shape
- Alternate rounds of single crochets and decreases until your stitch count is reduced to 12.
- Stuff the head with fiberfill.
Closing the Head
- Work single crochet and decrease combinations to reduce the stitch count to 9.
- Work single crochet and decrease combinations to reduce the stitch count to 9.
Part 2: Body
Starting the Body
- Begin with an increase in each stitch from the remaining 9 stitches.
- Continue with rounds, increasing and then maintaining single crochets, to reach a stitch count of 24.
Shaping the Body
- Work a series of single crochet and decrease rounds to reach a stitch count of 12.
- Stuff the neck and body area with fiberfill.
- Work decreases to close the gap at the top of the body.
Part 3: Legs
Creating Legs
- Chain 2, work 6 single crochets in the second chain, and start working in spirals.
- Increase to reach 12 stitches, then work 3 rounds of single crochets.
- Decrease to form the leg shape and close the top, leaving a tail for sewing.
Repeat for Second Leg
- Make another leg following the same steps.
Part 4: Arms
Creating Arms
- Start similarly to the legs, but after reaching a stitch count of 9, work 2 rounds of single crochets.
- Stuff the lower part of the arm.
- Use single crochets and decreases to shape the top, then close, leaving a tail for sewing.
Repeat for Second Arm
- Make another arm following the same steps.
Part 5: Muzzle and Ears
Creating Muzzle
- Work a circle with 10 single crochets at the circumference.
- After a few rounds, stuff lightly and leave a tail for sewing.
Creating Ears
- Start with a circle growing to 12 single crochets.
- Shape the ear with incremental rounds; close, leaving a tail.
Repeat for Second Ear
- Make another ear following the same steps.
Part 6: Tail
- Creating Tail
- Work a circular base expanding to 5 single crochets and single crocheting in spirals for 10 rounds.
- Close, leaving a long tail for attachment.
Part 7: Assembly
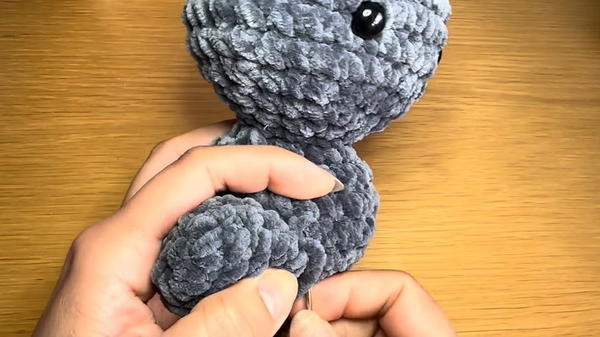
Attaching Legs and Arms
- Sew the legs aligning with the bottom edge of the body.
- Attach the arms diagonally between the legs and neck.
Attaching Muzzle, Ears, Tail
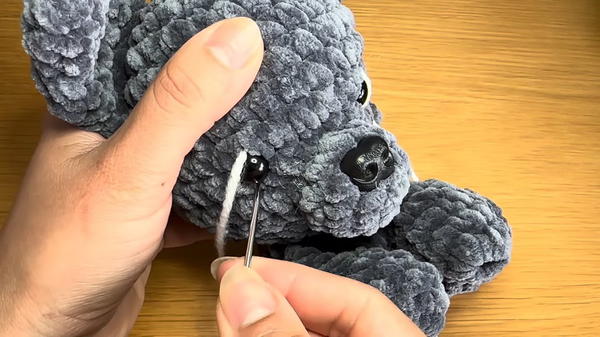
- Sew the muzzle centered between the eyes, using a plastic nose or embroidered nose.
- Sew the ears two rounds above the eyes on either side.
- Attach the tail to the back of the body.
Optional: Detailing the Eyes
- Use white yarn to add a detail around the eyes, giving a nice finishing touch.
Special Features
- Customizable Components: You can modify the sizes of the eyes, nose, or yarn colors.
- Beginner-Friendly Techniques: It is accessible to beginners with basic single crochet, increase, and decrease stitches.
- Detailed Instructions: Clear and thorough step-by-step guidance.
Tutor’s Suggestions
- Work at Your Own Pace: Take your time with each step for better results, especially while assembling the parts.
- Use Safety Eyes and Nose: For a child-safe toy, ensure that eyes and the nose are securely attached.
- Regularly Use Stitch Markers: Helps keep track of rounds and stitches effectively.
Level of Difficulty
Beginner to Intermediate
- Beginners can achieve this project with patience, while intermediate crafters might find it easier to manage and customize.
Uses
- Gifts: Perfect for personalized gifts for birthdays, baby showers, or holidays.
- Decorations: Cute addition to home decor or a child's room.
- Children's Toys: Soft and cuddly toy for kids when made safely with appropriate materials.
Tip
Keep the yarn tension consistent throughout the project to ensure uniformity in the stitches. Use stitch markers generously to avoid losing your place, especially during rounds with increases and decreases.
Conclusion
This plush yarn crochet dog project is a wonderful way to create a soft, adorable toy with personalized touches. The step-by-step tutorial ensures that even beginners can achieve a polished result. With clear instructions and helpful tips, you’ll enjoy making this charming little dog that is sure to delight anyone who receives it.


