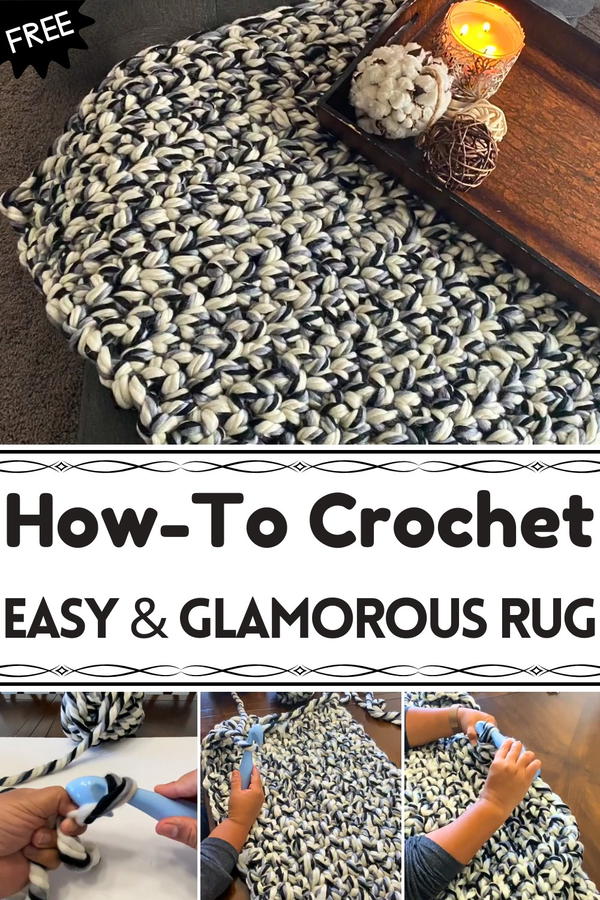
Enhance your home décor with the Free Crochet Area Rug Pattern, a cozy and stylish creation that adds warmth, texture, and charm to any room.
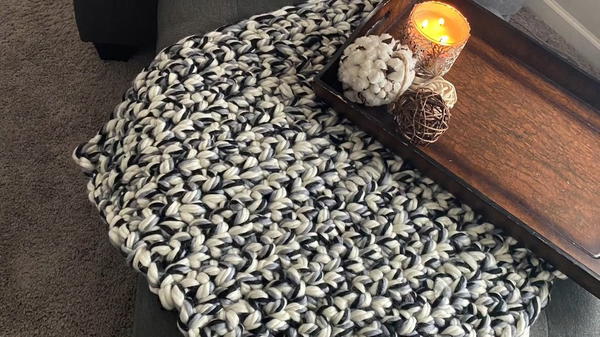
On a quiet morning, sunlight spills across the living room floor, highlighting the soft textures that define the space. A handmade rug anchors the room, offering warmth, comfort, and a subtle touch of personality. Using the Free Crochet Area Rug pattern, anyone can turn simple yarn into a striking piece that enhances both style and functionality. Its thick, plush stitches create a cushioned surface, perfect for bedrooms, living areas, or cozy reading corners.
Modern Crochet Area Rug Pattern for Home Decor
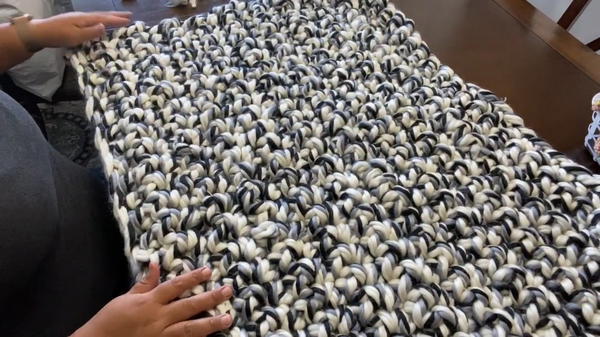
This rug combines practicality with visual appeal. Its durable construction ensures lasting use, while the size and texture can be tailored to suit different spaces. It serves as a soft area for children to play, a decorative element that unites furniture, or a welcoming accent for entryways and hallways. Working on this project encourages focus, patience, and mindfulness, providing a relaxing and rewarding experience as the rug gradually takes shape.
The Free Crochet Area Rug pattern transforms ordinary yarn into a piece that is both useful and elegant. Completing it delivers a tangible sense of accomplishment while enhancing any home with warmth, texture, and handmade charm. This project leaves a lasting impression, offering comfort and a touch of personalized style that elevates everyday living.
Materials Needed
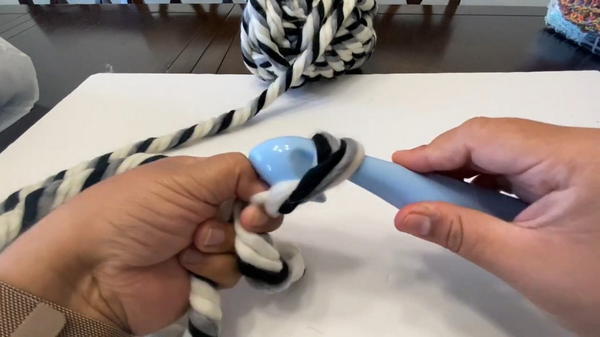
- Yarn: Jumbo-sized yarn (e.g., Hobby Lobby’s Jumbo-licious yarn, now discontinued). Veronica used 7 skeins, each skein being 22 yards.
- Note: If you don’t have this yarn, you can substitute by combining 3-4 strands of a different yarn to achieve the required thickness.
- Crochet Hook: Jumbo crochet hook (unspecified size but "big").
- Veronica mentions this hook was purchased from Michaels for about $2.
- Scissors: For cutting the yarn.
- Tapestry Needle: For weaving in ends (optional but recommended).
Special Features of This Area Rug
- Quick Completion: The rug can be finished in under 30 minutes, perfect for crafters with limited time.
- Chunky Texture: The thick yarn creates a soft, plush finish, ideal for adding warmth and coziness to a room.
- Customizable Size: Modify the number of chains to make the rug larger or smaller as desired.
- Beginner-Friendly: Uses basic stitches, making it approachable for those new to crochet.
Level of Difficulty
Beginner-Friendly
- While this project is great for beginners, the thick yarn can be slightly bulky to manage at first. Veronica recommends taking your time to get comfortable with the materials.
Step-by-Step Instructions
Step 1: Create the Foundation Chain
- Begin by chaining 26 chains for a medium-sized rug.
- If you want a larger rug, you can add more chains. Keep the chain count even for best results.
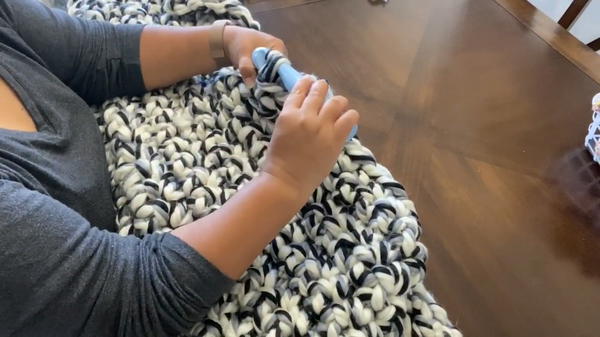
Step 2: Work the First Row
- Skip the first chain from the hook and insert your hook into the second chain.
- Yarn over, pull up a loop (you now have two loops on the hook), and yarn over again to pull through both loops.
- This creates a single crochet stitch (SC).
- Continue placing SC stitches into each chain across the foundation.
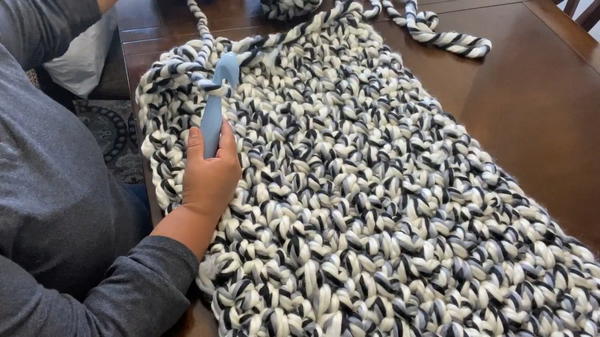
Step 3: Build the Rug
- At the end of the first row, chain one and turn your work.
- Begin working SC stitches into every stitch across.
- Repeat this process for each row, creating a flat and even texture.
- Veronica recommends careful stitch placement to avoid accidentally skipping or adding extra stitches.
- Continue with SC stitches until the rug reaches your desired length.
- For Veronica’s rug, she continued until the dimensions measured approximately 93 inches by 75 inches.
- For Veronica’s rug, she continued until the dimensions measured approximately 93 inches by 75 inches.
Step 4: Connect New Yarn Skeins
- As you run out of yarn, tie new skeins by joining the ends together securely.
- Trim the excess after tying to ensure a seamless transition.
Step 5: Finishing the Edges
- Once the rug reaches your desired size, fasten off the yarn, leaving a long tail.
- Use a tapestry needle or your hands to weave the tail into the edges for a clean finish.
- Repeat with the starting tail and any other loose ends.
Step 6: Trim and Final Adjustments
- Inspect your rug for any uneven or loose ends.
- Trim any excess yarn and adjust the edges to make sure the shape is even.
Tutor’s Suggestions
- Yarn Substitutions: If you can’t find jumbo yarn, combine 3-4 strands of worsted weight yarn to achieve the same thickness.
- Picking the Right Size: Adjust the starting chain and row count to fit your intended rug space.
- Take Breaks if Needed: Working with chunky yarn and a large hook can feel heavy after a while; rest your hands when necessary.
- Double Check Stitch Count: Ensure you’re maintaining the correct number of stitches in each row for clean edges.
Uses for the Crochet Rug
- Bedroom: Place the rug by your bed for a soft and cozy feel when you wake up.
- Living Room: Use this rug to add warmth and texture to your living space.
- Decorative Accent: Use the rug as an accent under chairs or focal furniture pieces.
Conclusion
Veronica Steele’s crochet rug tutorial is a quick and rewarding project that results in a stylish home accessory. With minimal materials, simple stitches, and less than 30 minutes of work, you can create a beautiful area rug that adds comfort and personality to your space. It’s beginner-friendly, customizable, and perfect as a unique addition to any room.
Final Tip
For beginners, starting with jumbo yarn and a large hook may feel a bit awkward, so practice a few single crochet stitches on a small scrap first. This will help you get comfortable before beginning the project.


