Sweeten your holidays with this Free Crochet Candy Christmas Pattern, adding playful charm, festive colors, and cheerful décor to any space.
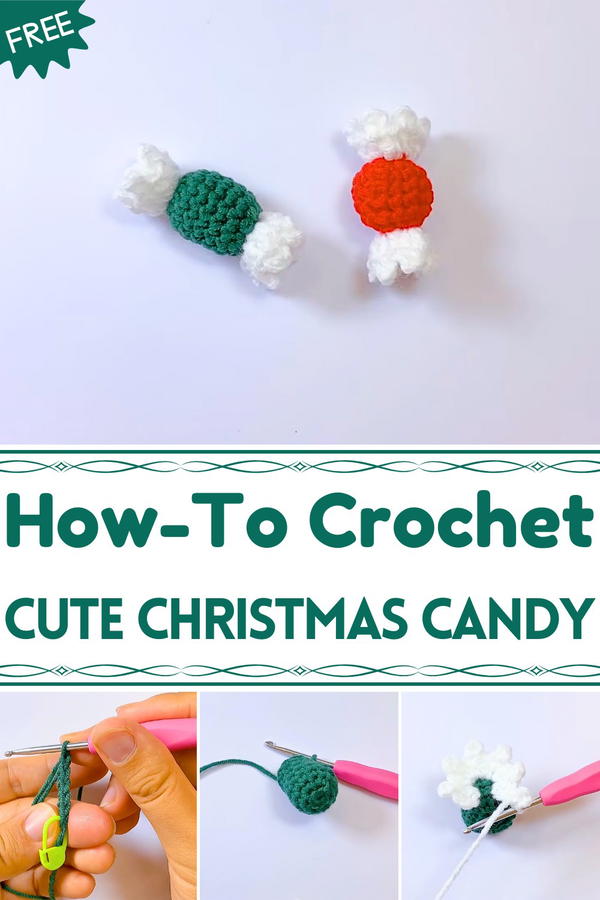
What makes it truly delightful are the cheerful colors and soft texture that instantly bring a festive and joyful atmosphere to any space. The specialty of this project is its versatility, it can be made in different sizes, colors, and combinations to suit any holiday theme or personal style. Beyond visual appeal, these candies offer practical benefits: they are safe for homes with children or pets, reusable for multiple seasons, and easy to store without losing their shape.
Lightweight and durable, they are simple to hang or arrange creatively throughout the house. This project also provides a satisfying creative experience, allowing crocheters to enjoy both the process and the resulting charm. Combining cheer, versatility, and handmade appeal, these candy decorations bring warmth and festive spirit to every home, turning ordinary spaces into joyful holiday settings.

Materials Needed
- Yarn: Two colors (e.g., one for the candy body and one for the edges)
- Crochet Hook: Choose a size suitable for your yarn
- Yarn Needle: For sewing and finishing
- Scissors
- Stuffing: To shape the candy
Step-by-Step Instructions
1. Starting the Candy Body
- Begin with a double circle (magic ring) and hold the yarn firmly.
- Work 6 single crochets (SC) into the circle.
- Mark your first stitch to track the rounds (especially useful for beginners).
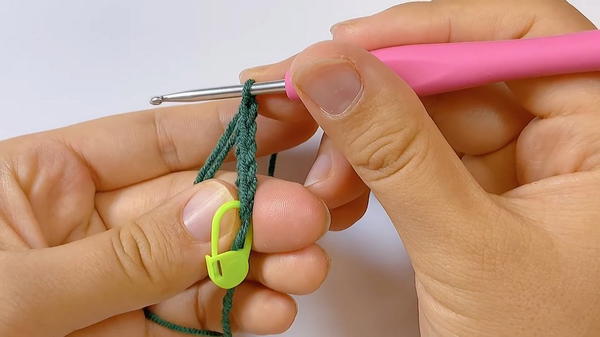
- Close the circle by pulling the yarn tail to tighten it, and use a slip stitch to join the first stitch.
- Chain 1 at the end of the round as a turning stitch.
2. Round Two: Increases
- Only work into the half side of each stitch and increase by making 2 single crochets in each space.
- Repeat this process six times to end with 12 stitches.
- Join the round with a slip stitch and chain 1 (this chain doesn’t count as a stitch).

3. Rounds Three to Seven: Steady Work
- For these rounds, simply work 1 single crochet in each stitch.
- By the end of Round Seven, the candy body will take shape.
4. Round Eight: Decreasing Stitches
- For this round, work decrease stitches by crocheting 2 single crochets together.
- Repeat this process six times to reduce the stitch count back to 6 stitches.
- Add the stuffing before completing this round.
5. Closing the Candy Body
- Cut the yarn, leaving a 15 cm tail.
- Use a yarn needle to stitch through the inner side and close the opening.
- Hide the tail inside and trim any excess yarn.
6. Adding the Candy Edge
- Switch to the second yarn color (e.g., white) and start with a slip knot.
- Join the yarn to the candy body.
- Work in the six spaces on each end of the candy:
- Chain 3 and make 1 double crochet in the same space.
- Chain 3 again and locate the next space to join with a slip stitch.

- Repeat 5 more times, this time starting with 2 double crochets instead of a chain.
7. Completing the Edges
- After creating the six loops for the candy edge, join them with a slip stitch in the starting stitch.
- Cut the yarn, hide the tail, and repeat the same process on the other end of the candy.

Special Features
- Beginner-friendly: Uses basic stitches like single crochet, double crochet, and slip stitch.
- Decorative versatility: Can be used as hair clips, brooches, hair ties, or festive ornaments.
- Two-tone design: Adds color contrast to mimic the look of wrapped candy.
Tutor’s Suggestions
- Mark the first stitch in every round to avoid confusion, especially if you’re new to crochet.
- Work carefully with the yarn tension to ensure uniformity.
- Experiment with different colors to create a variety of candy designs for multiple uses.
Level of Difficulty
This project is beginner to intermediate. While the stitches are basic, working with small spaces and adding neat edge details may require practice.
Uses
- Hair accessories: Turn them into fun hair clips or hair ties.
- Brooches: Add a brooch pin for festive attire.
- Home decor: Use as part of your holiday ornaments or gifts.
Crochet Tip
Always use stitch markers for projects worked in rounds, especially if the pattern involves increases and decreases. This simple step saves time and ensures accuracy.
Conclusion
Crocheting this candy is not just a creative experience, but also a way to make something charming and useful. With its cheerful design and endless possibilities, this project is perfect for personal use or gifting.


